Corner to Corner Join As You Go: A Beginner Photo Tutorial
")
If you love the look of a crochet patchwork blanket, but the idea of seaming squares together makes you want to pull your hair out, then this is the tutorial for you!
Today, I’m diving into one of my new favorite crochet techniques – Corner-to-Corner Join As You Go, also known as C2C JAYG. Learn how to do it, start to finish, with my helpful written, photo, and video tutorials.
PIN IT NOW, TRY IT LATER!
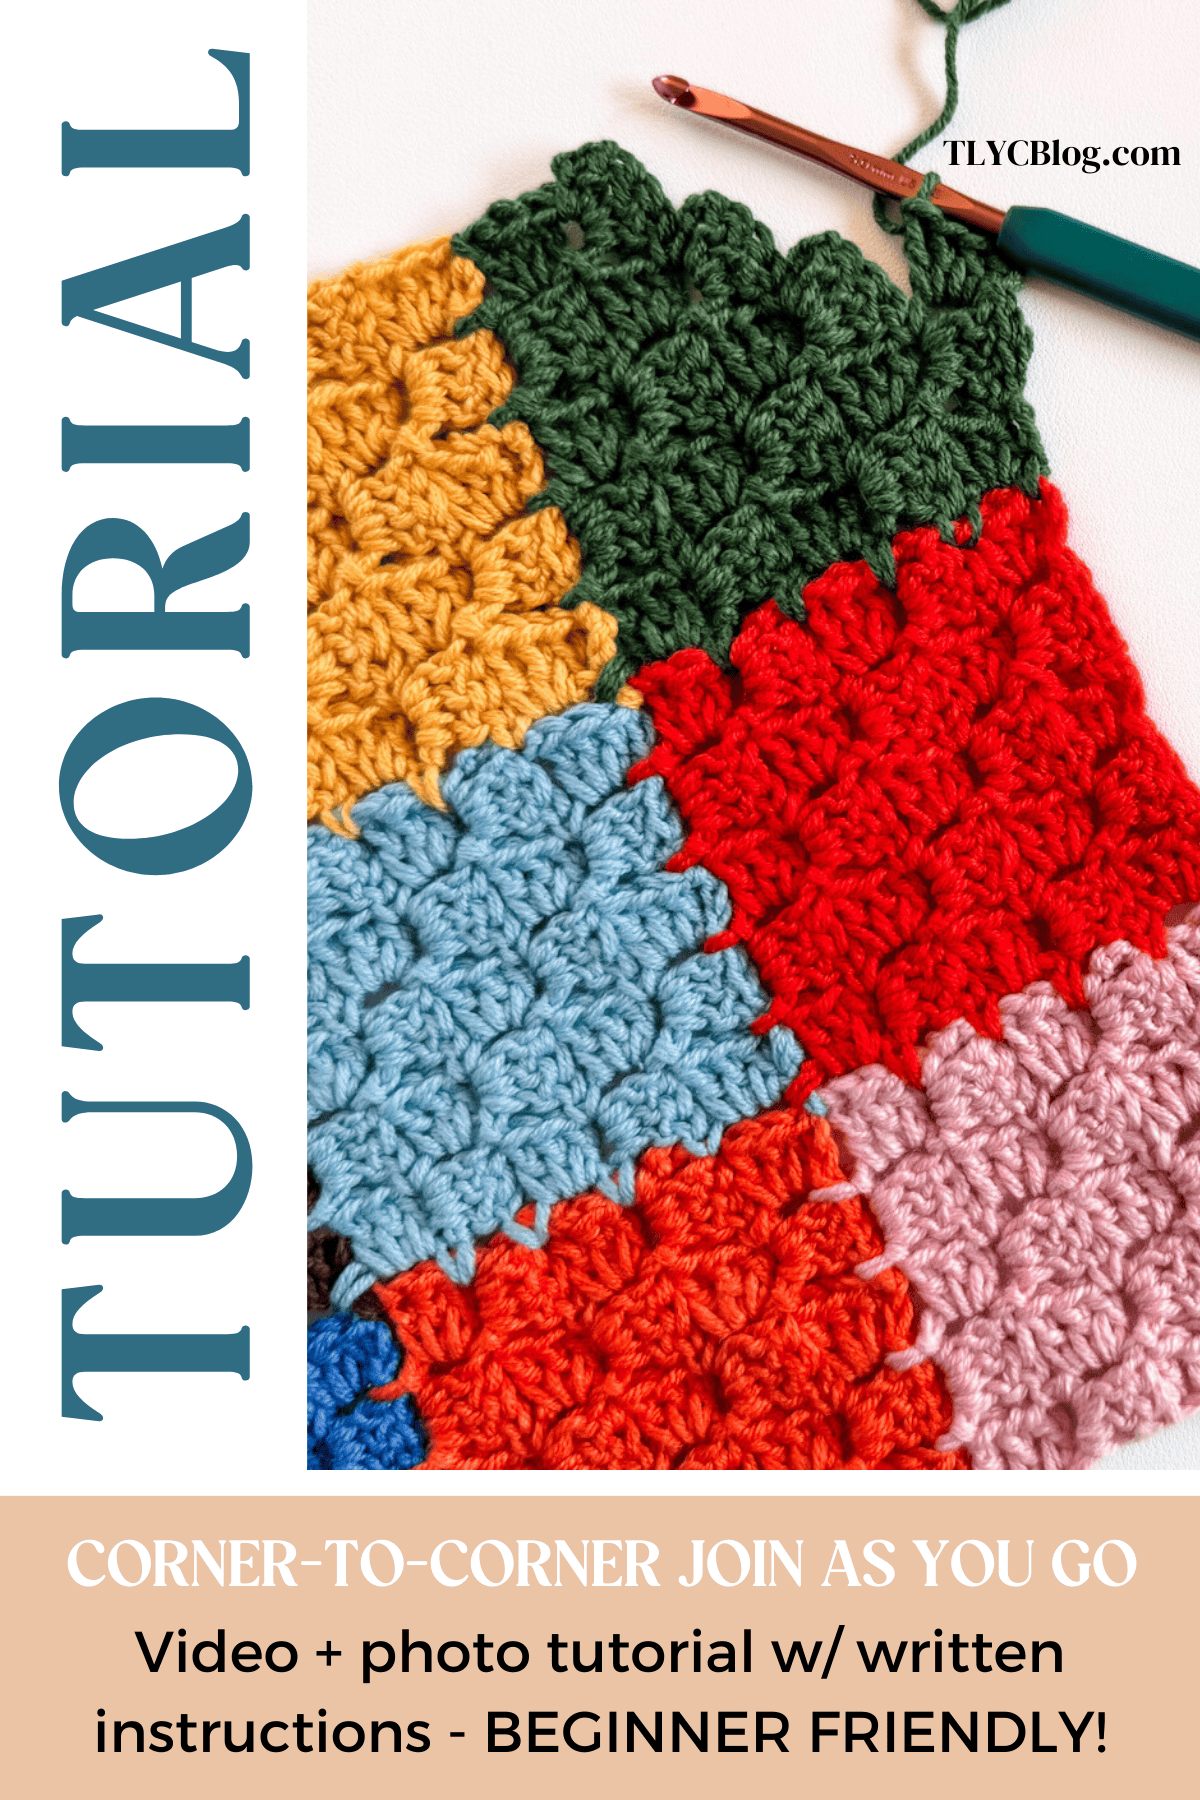
The Corner 2 Corner Join As You Go (C2C JAYG) method lets you crochet squares and attach them as you go, using the humble slip stitch. That means:
- No giant pile of squares to seam together
- No putting your project on hold to find the perfect joining technique
- A tidy join that stays consistent and adds to the beauty of your blanket.
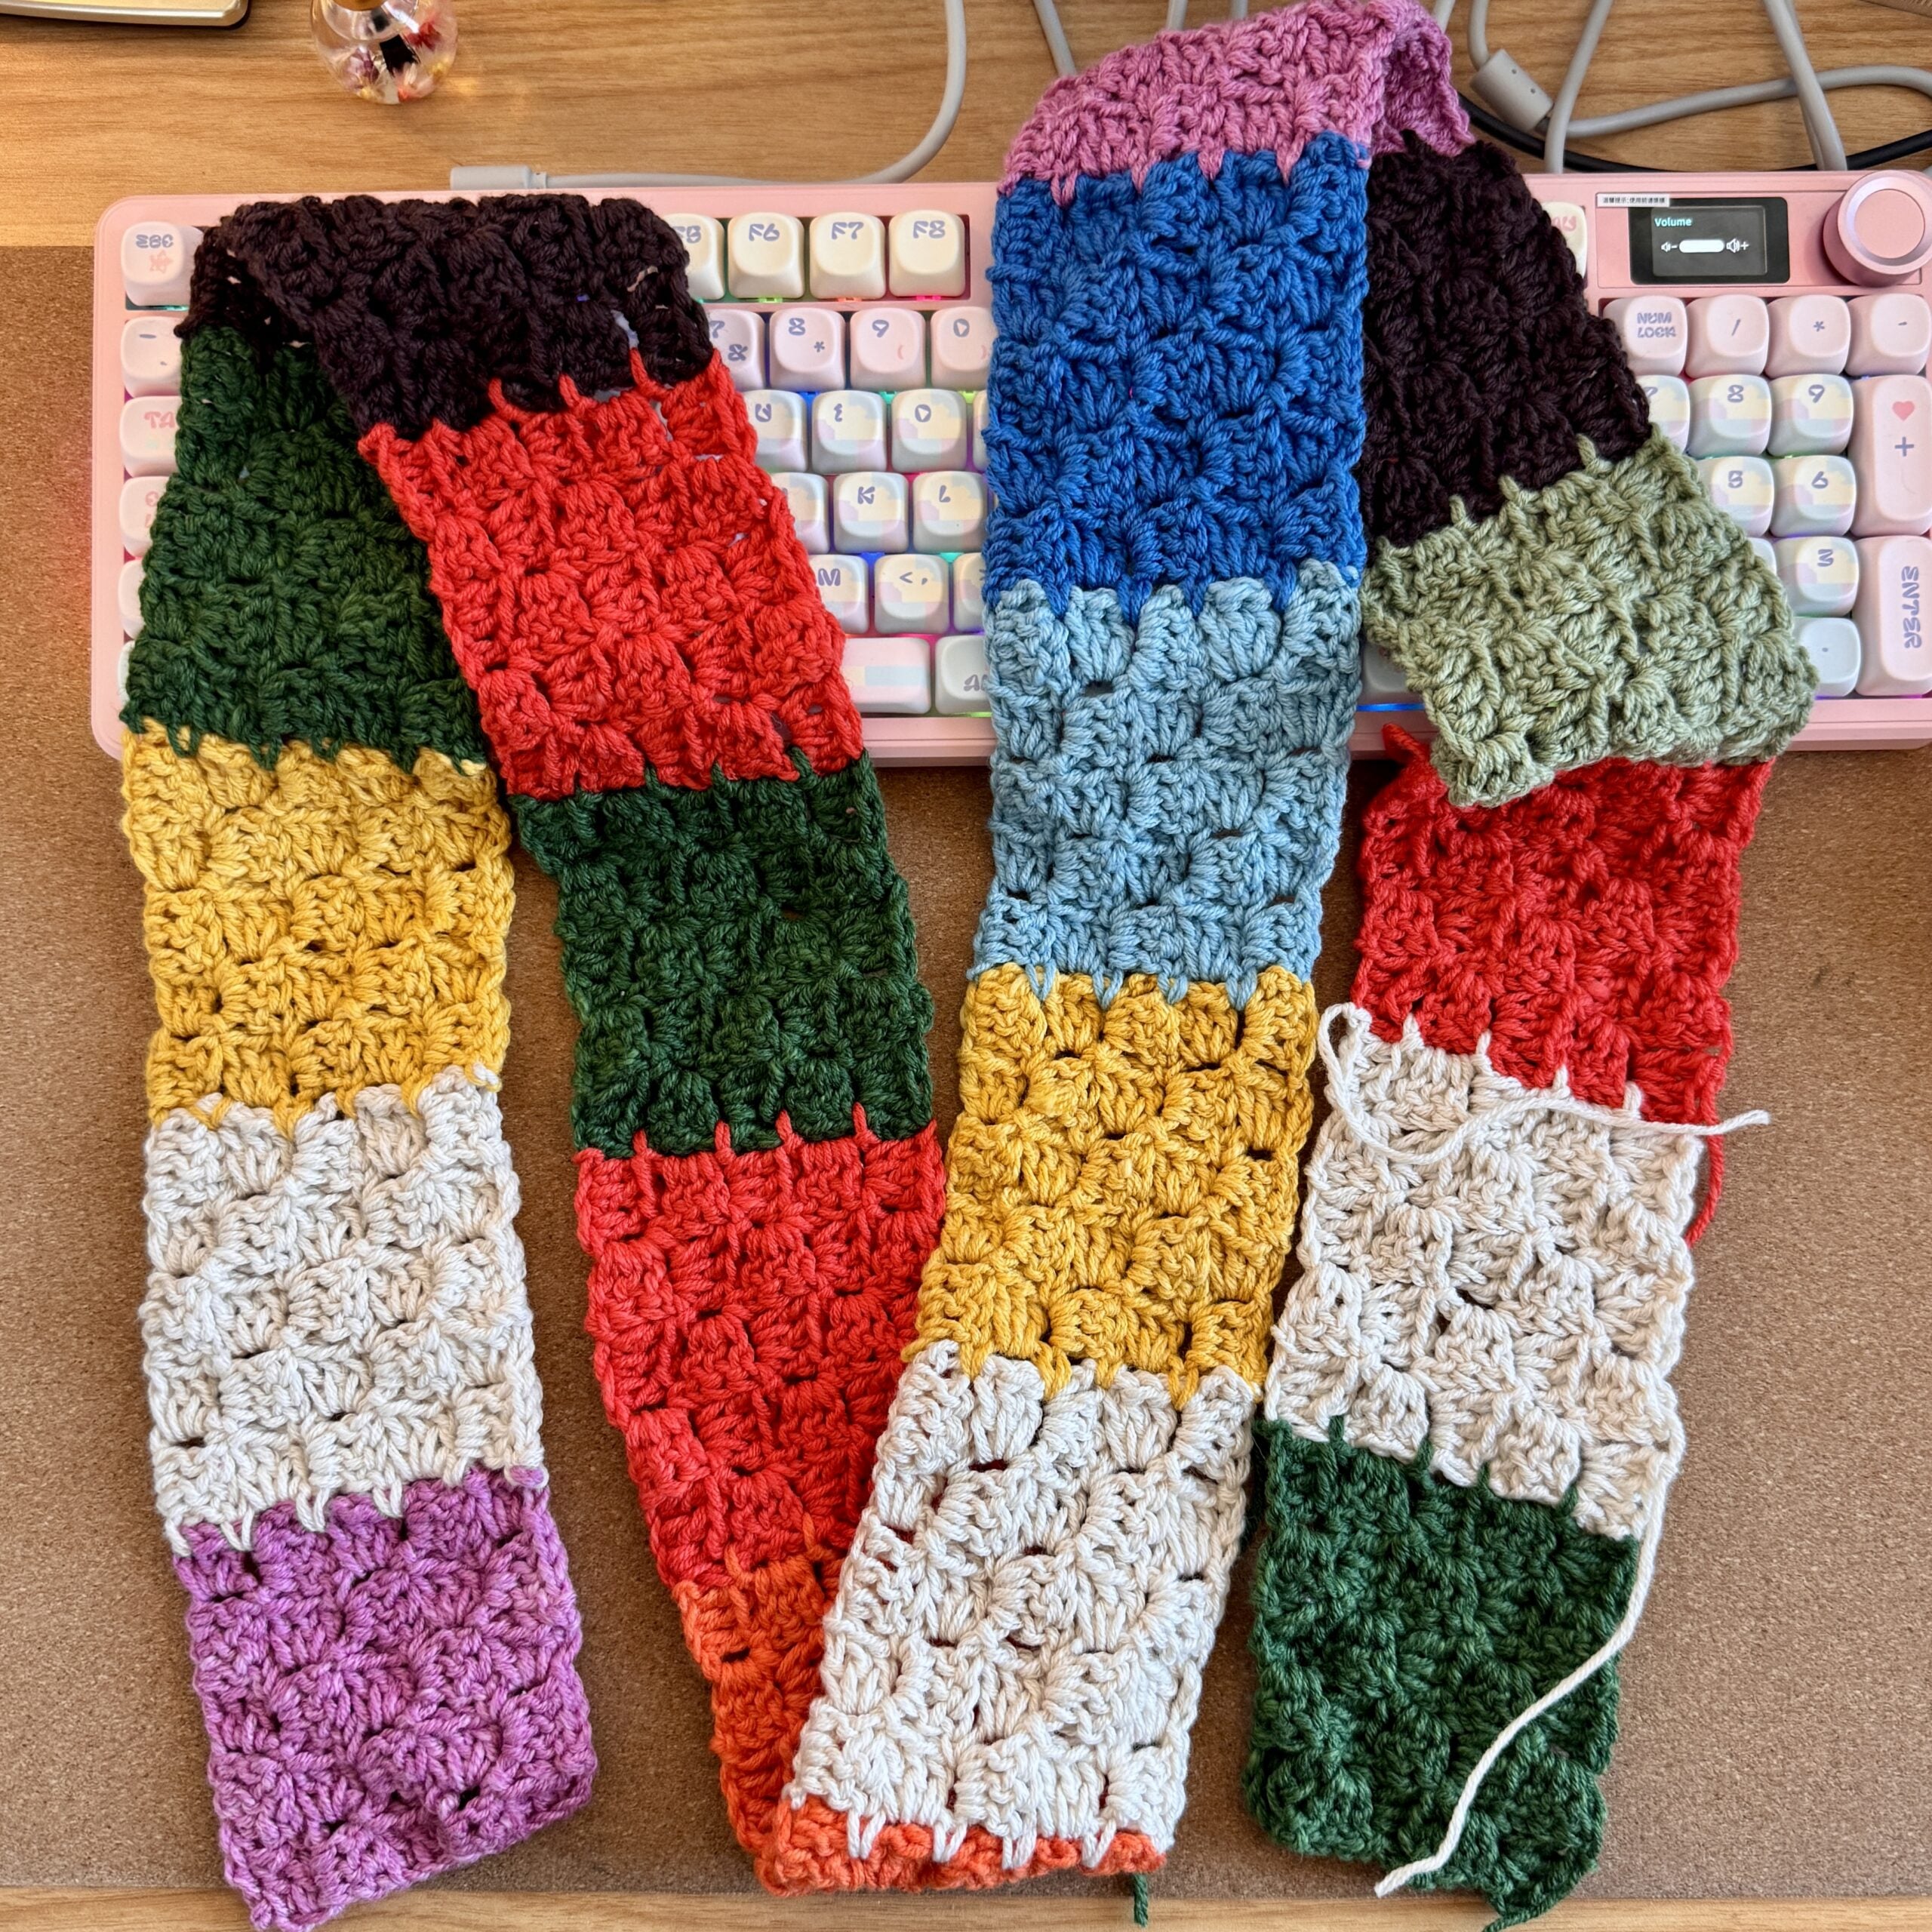
And yes, this is the exact technique that inspired the Roll With It Blanket, the crochet patchwork blanket I’m making for my 2026 year-long project. It’s designed to be relaxing, stash-friendly, and delightfully random. If you’re looking for your next long-haul make, keep reading for the details on turning this into your year-long blanket project.
What is C2C Join As You Go?
C2C (Corner-to-corner) crochet is a method where squares are built from one corner to the opposite corner using “tiles” or “blocks”. These tiles stack like pixels, making C2C ideal for scrap blankets, modular clothing, and colorful home decor.
Join As You Go (JAYG) is a way to work crochet motifs that connects them while you create them. For this technique, the join is made with slip stitches placed in the space between tiles so the blocks connect cleanly.
Put these two concepts together for a simple, secure way to assemble a crochet patchwork blanket.
Why is this technique perfect for a 2026 year-long blanket?
Year-long blankets are part of TL Yarn Crafts’ DNA (I’ve been making them since 2019!), but the biggest complaint I hear is that they’re tough to keep up with. If you’ve been wanting to make a year-long crochet blanket, but are scared it will become just another unfinished WIP, C2C JAYG will be your best friend!
Here’s the magic of this addictive technique: you can make one square a day, or save them up for a week or even a month! C2C JAYG goes so quickly, you can never really get too far behind. And, if you want a cozy, low-pressure way to pick the colors for your blanket, try out my Roll With It Blanket. The color of each square on your crochet patchwork blanket is determined by the roll of a die. Don’t believe me? Check out this reel where I break it down. Need a more thorough breakdown? Follow the Roll With It Blanket plan, outlined in THIS blog post.
C2C JAYG Written & Video Instructions
Ready to try out the C2C JAYG technique for yourself? Here’s what you’ll need to start:
- Yarn (any stash yarn for practice is fine)
- Crochet hook that matches your yarn
- Scissors
- Tapestry needle
Abbreviations used:
- Ch = chain
- Dc = double crochet
- Sl st = slip stitch
- Sp = space
- Tile/block = one C2C unit, made up of ch 3 + 3dc
More of a visual learner? Follow me step by step in this tutorial video:
Square 1
This is the first square of your project. It lies at the bottom-left of the project if you are a right-handed crocheter. This square is your “anchor” piece. All squares will be the same size as this one.
Make the first tile: Ch 6. Dc in 4th ch from the hook and each of the 2 remaining chs (Image 1).
Increase Row: Ch 6. Dc in the 4th ch from the hook and each of the 2 remaining chs. Turn the tile made in the previous step (Image 2). Sl st in the ch-3 space of that tile to join (Image 3). Ch 3, dc 3 times in same ch-3 space (Image 4).
Remaining Increase Rows: Ch 6. Dc in the 4th ch from the hook and each of the 2 remaining chs. Turn the tiles completed in the previous steps (Image 5). *Sl st in the ch-3 sp of the next tile to join (Image 6). Ch 3, dc 3 times in the same ch-3 space.* Repeat from * to * until the row is complete. Repeat this step to your desired size (Image 7).
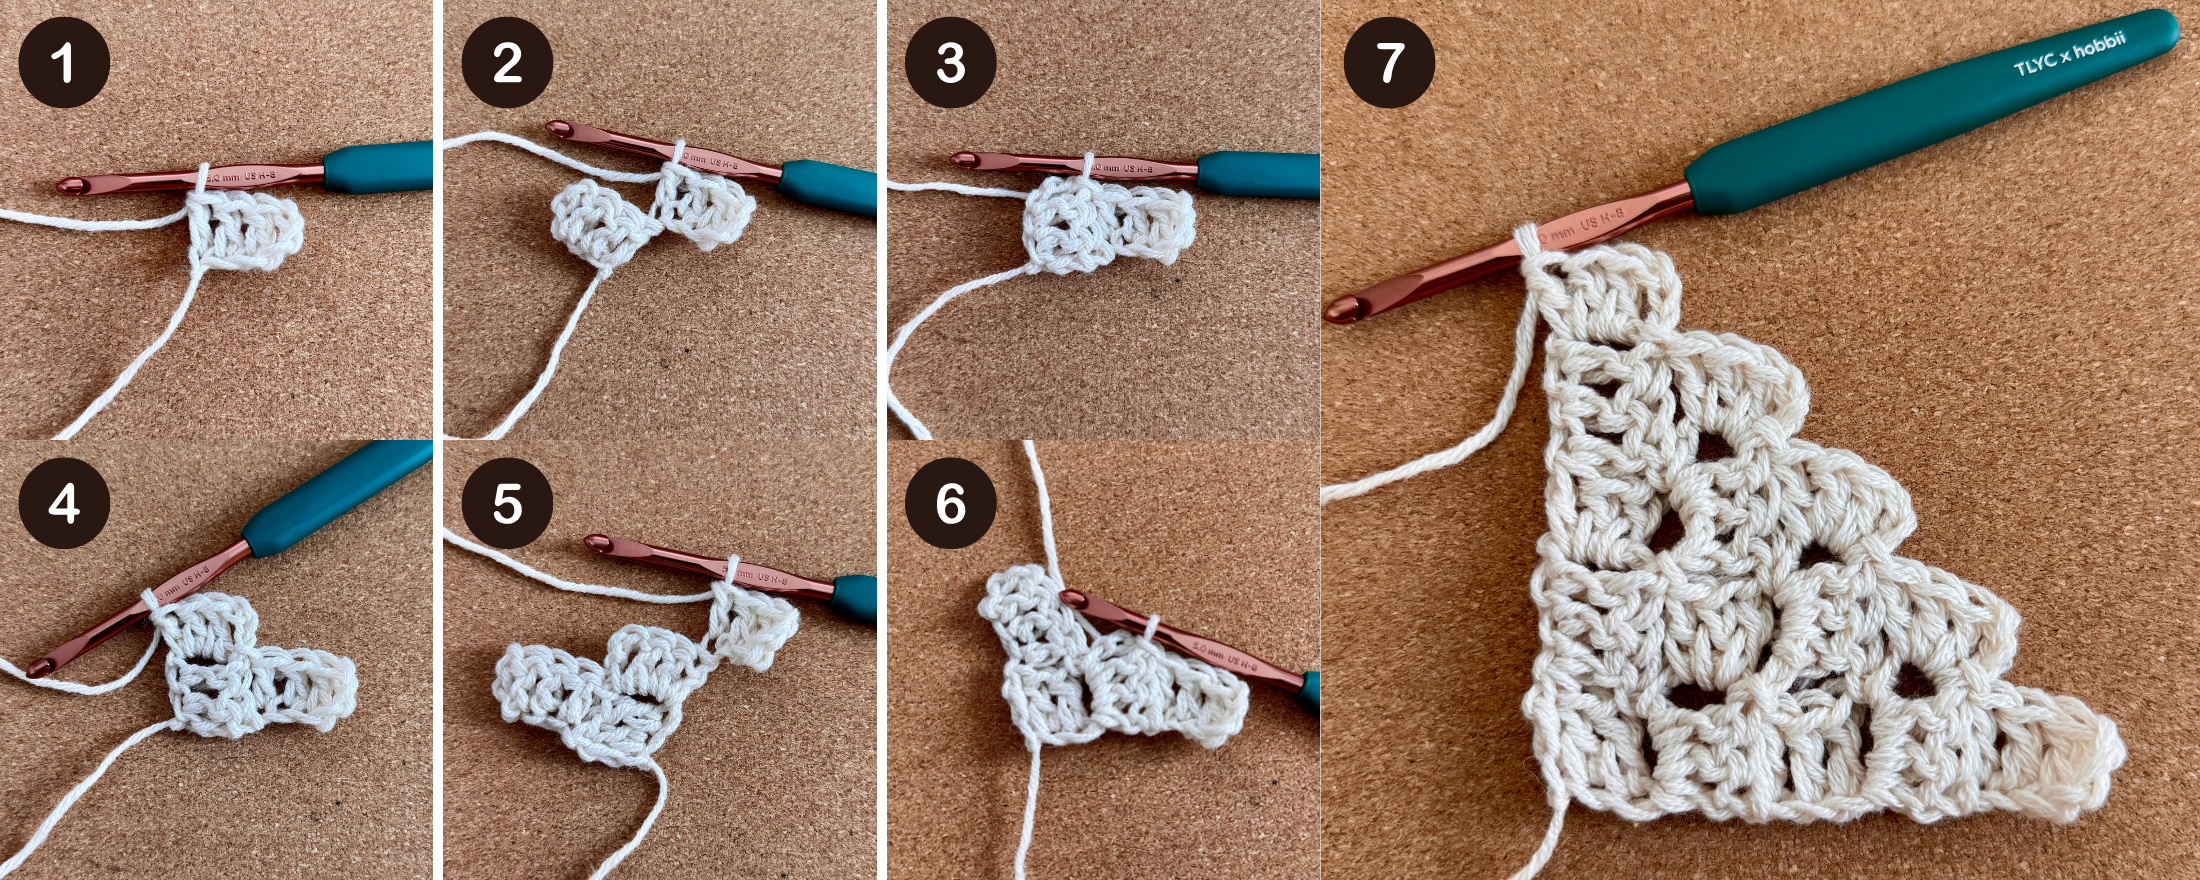
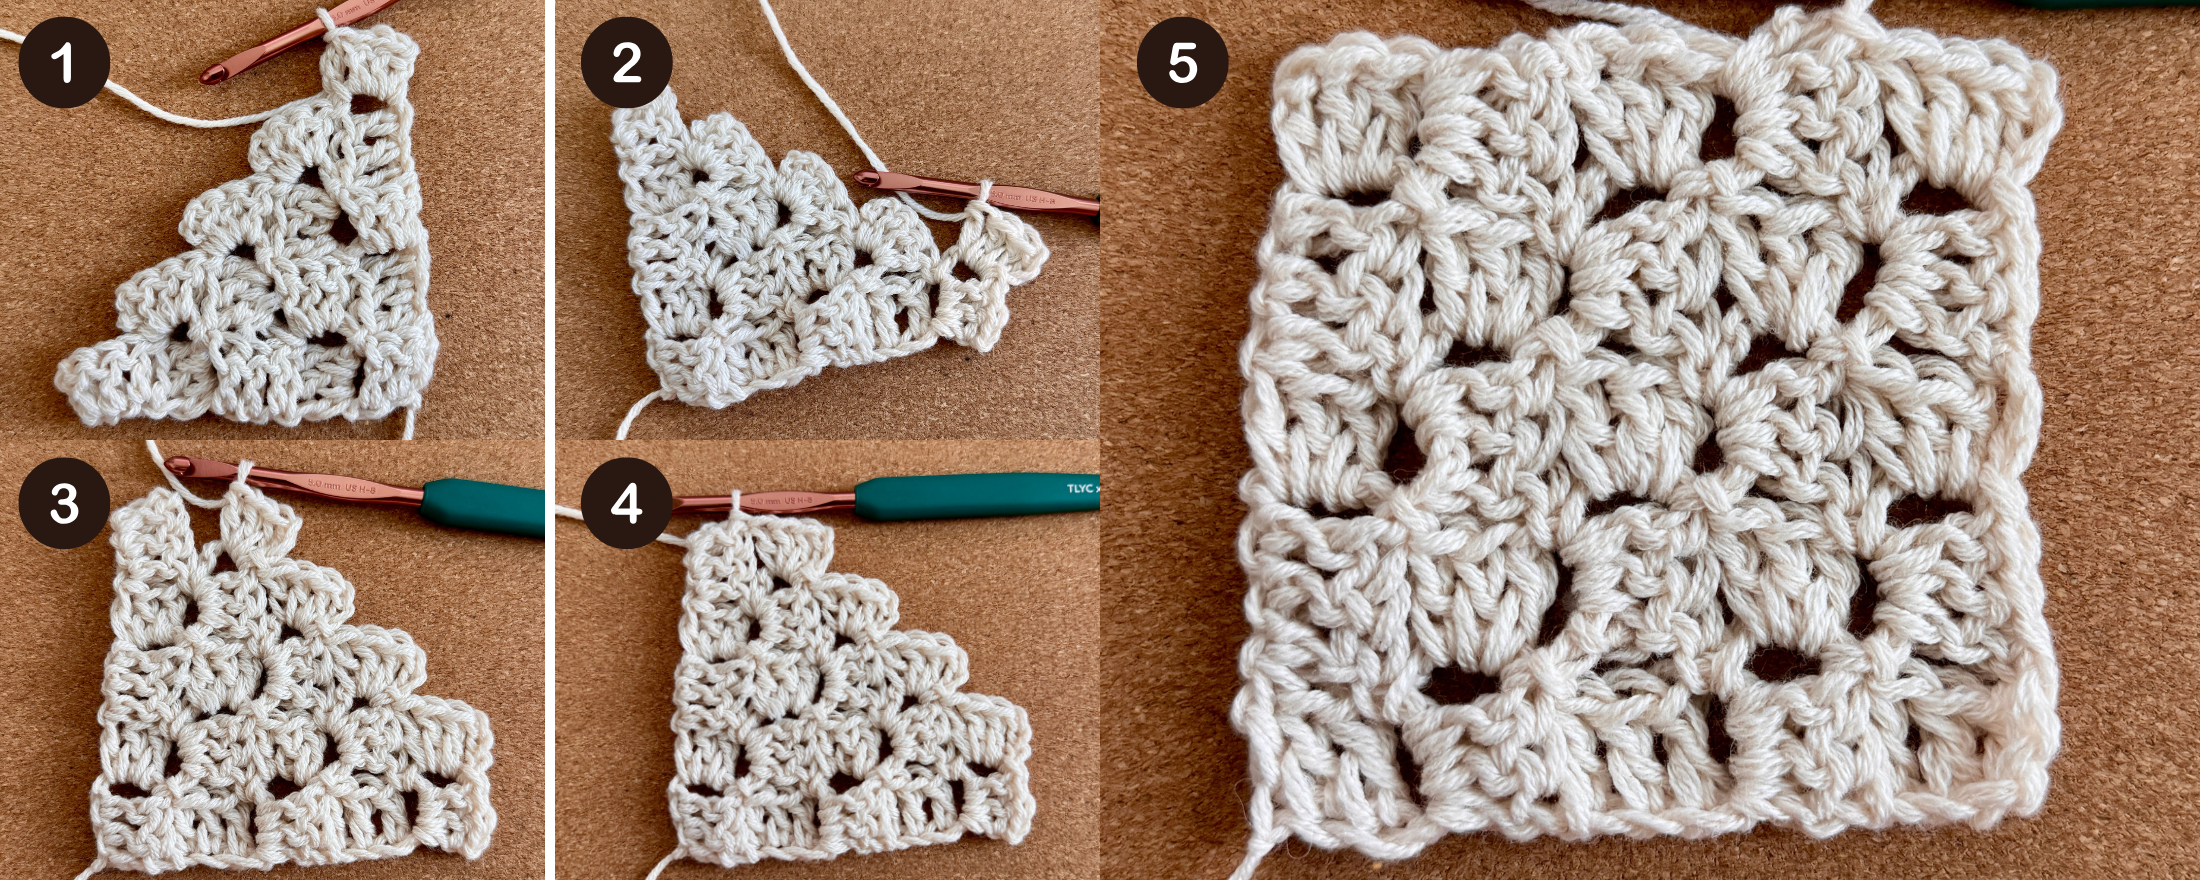
Decrease Rows: Turn work (do not chain!) Sl st in each of the next 3 dc AND in the ch-3 sp (Image 1). Ch 3, dc 3times in the same ch-3 space (Image 2). *Sl st in the ch-3 sp of the next tile to join. Ch 3, dc 3 times in the same ch-3 space.* Repeat * to * until you reach the last tile (Image 3). Sl st in the ch-3 sp of the last tile (Image 4). Repeat this step until the square is complete (Image 5). Fasten off.
Square 2
This square connects to Square 1 along one edge. This square uses normal C2C, as well as slip stitches to connect the squares together.
Join and Make the First Tile: Turn Square 1 to Wrong Side. This is the side where the first tile shows the front of the dc stitches. Place a slipknot on the hook and insert the hook in the bottom-right corner of the square (Image 1). Yarn over and pull through the fabric and loop on the hook to join. Ch 6, dc in the 4th ch from the hook and each of the 2 remaining chs (Image 2).
Join to Square 1: Sl st into the sp between the next 2 tiles on Square 1 (Image 3). Ch 3, sl st in the sp between the next 2 tiles up on Square 1 (Image 4). Turn your work. Ch 3, dc 3 times in the same ch-3 space. (Image 5). Sl st in the ch-3 space of the next tile to join(Image 6). Ch 3, dc 3 times in the same ch-3 space.
Right-Side Increase Rows: Ch 6. Dc in the 4th ch from the hook and each of the 2 remaining chs. Turn your work. *Sl st in the ch-3 sp of the next tile to join. Ch 3, dc 3 times in the same ch-3 space.* Repeat from * to * until you reach the edge of Square 1. Sl st into the sp between the next 2 tiles on Square 1. Ch 3, sl st in the space between the next 2 tiles up on Square 1.
Wrong-Side Increase Rows: Turn your work – you are now on the Wrong Side. Ch 3, dc 3 times in the ch-3 space. *Sl st in the ch-3 sp of the next tile to join. Ch 3, dc 3 times in the same ch-3 space.* Repeat * to * until you reach the end of the row.
Repeat Right-Side and Wrong-Side Increase Rows until you reach the last tile on Square 1.
Joining to the Last Tile: Begin this step when you’ve completed the last tile on an increase row of Square 2, and are ready to join to Square 1 (Image 6). Skip the ch-3 of the next tile on Square 1. Join with a sl st in the next dc of that same tile (Image 7). This creates a more secure join and avoids a gap in this area.
Decrease Rows: Repeat the same Decrease Rows from Square 1. Fasten off when complete (Image 8).
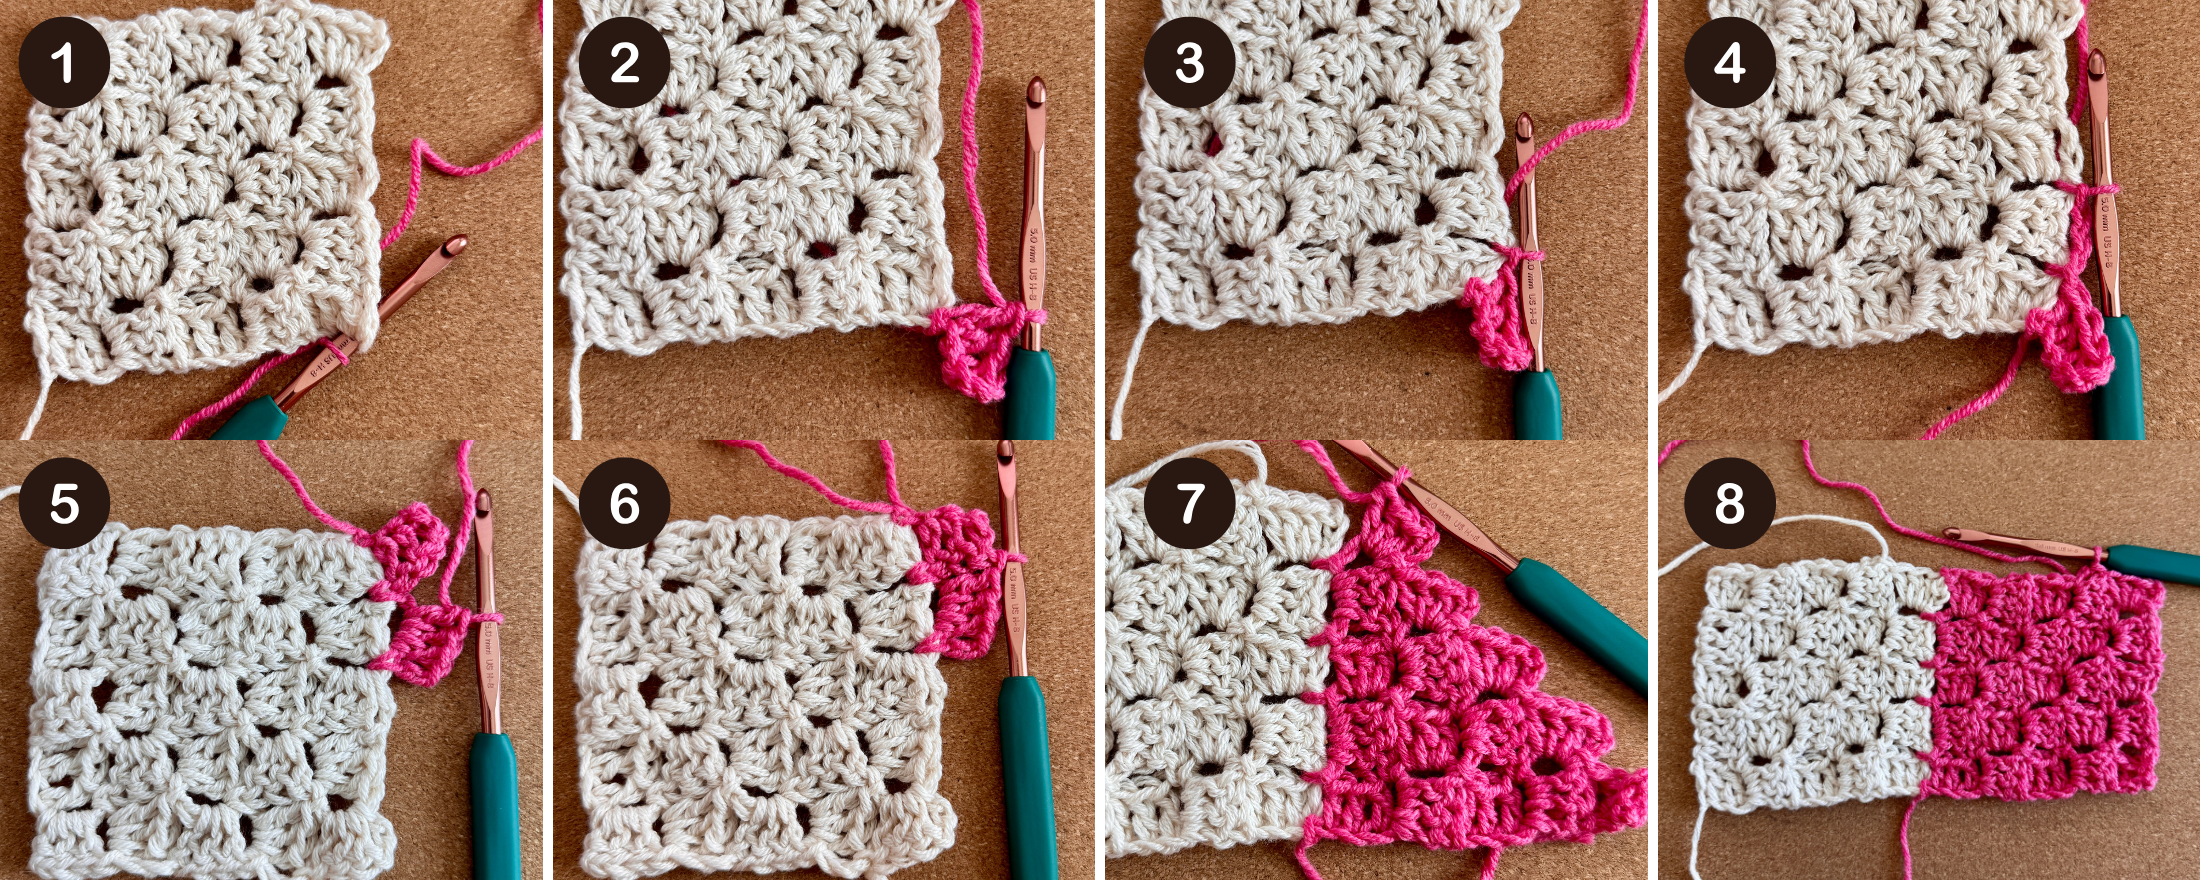
Repeat Square 2 to the width of your project.
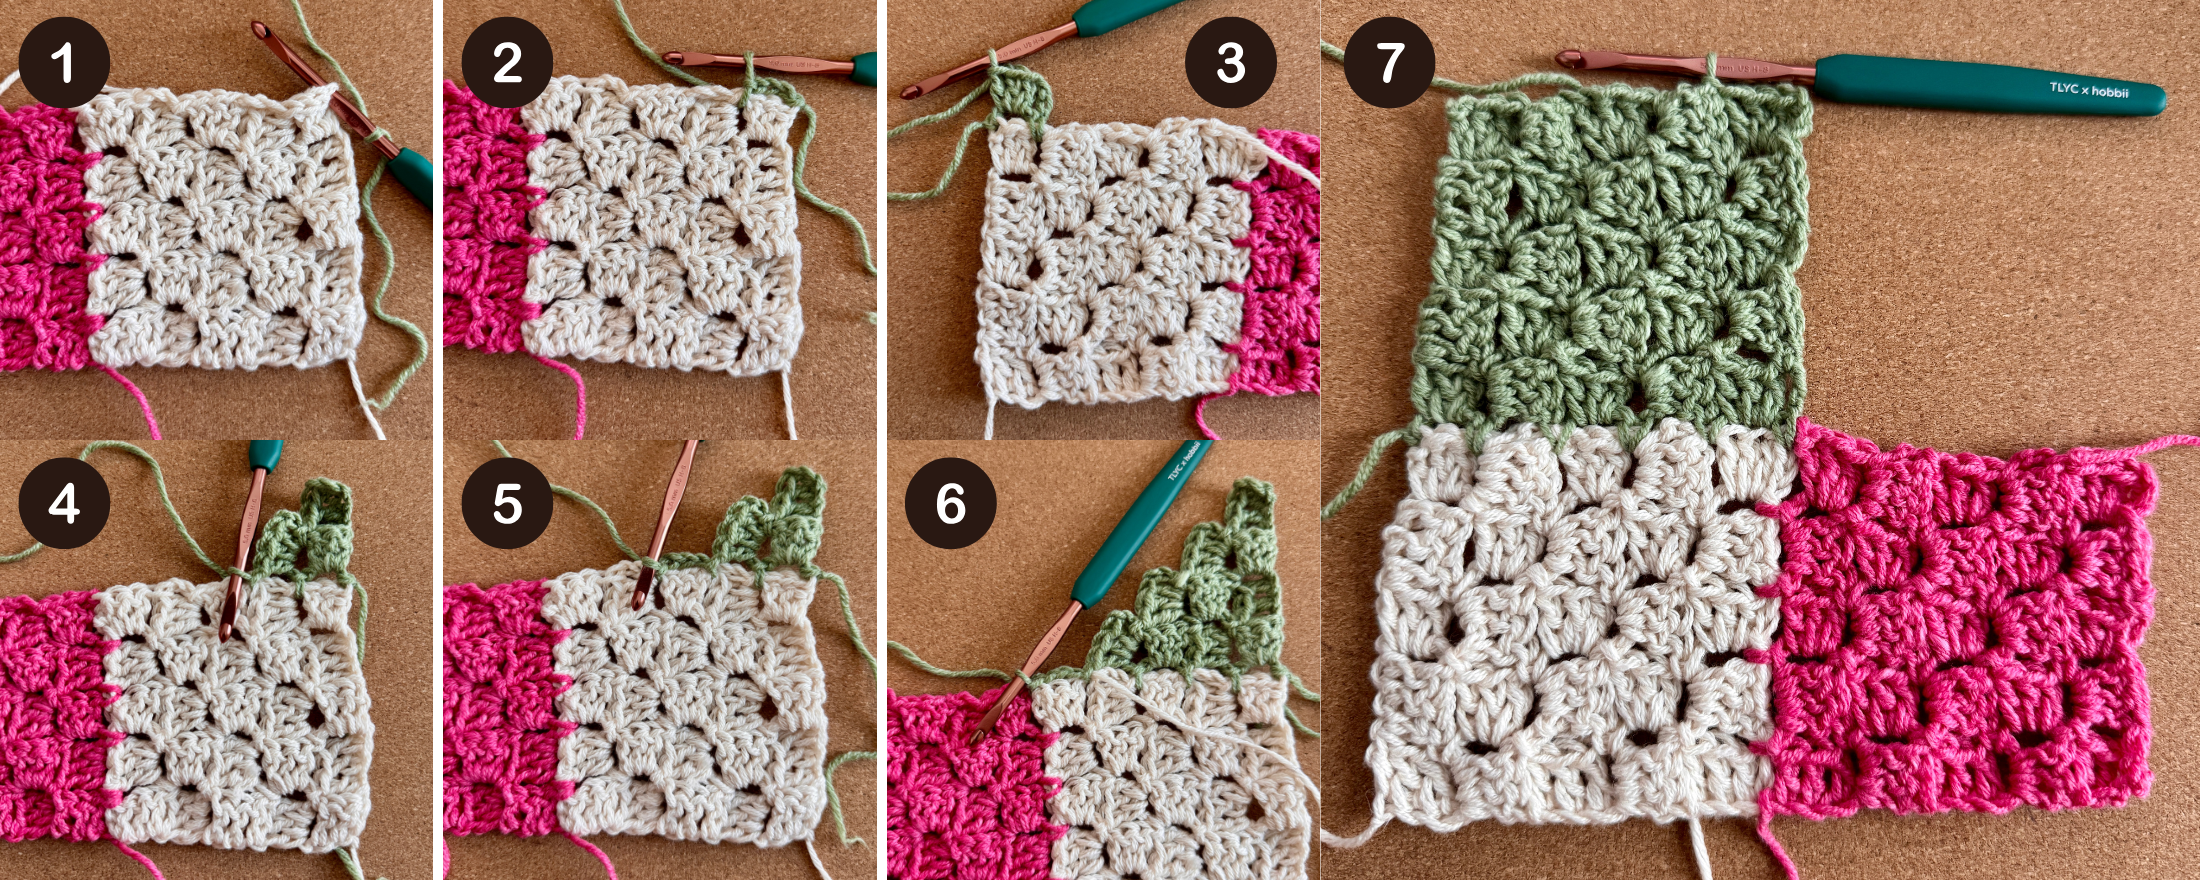
Square 3
This square is built on top of Square 1. This is how all new rows are added to the project.
Join and Make the First Tile: Turn work to Wrong Side. Place a slipknot on the hook and insert hook in the top corner of Square 1 (Image 1). Yarn over and pull through the fabric and loop on the hook to join. Ch 3, sl st in the sp between the tile just joined to and the next tile to the left on Square 1 (Image 2). Turn your work – you are now on the Right Side of the work. Ch 3, dc 3 times in ch-3 space (Image 3).
Wrong-Side Increase Rows: Ch 6. Dc in the 4th ch from the hook and each of the 2 remaining chs. Turn your work. *Sl st in the ch-3 sp of the next tile to join. Ch 3, dc 3 times in the same ch-3 space.* Repeat from * to * until you reach the edge of Square 1. Sl st into the sp between the next 2 tiles on Square 1 (Image 4). Ch 3, sl st in the space between the next 2 tiles up on Square 1 (Image 5).
Right-Side Increase Rows: Turn your work – you are now on the Right Side. Ch 3, dc 3 times in the ch-3 space. *Sl st in the ch-3 sp of the next tile to join. Ch 3, dc 3 times in the same ch-3 space.* Repeat * to * until you reach the end of the row.
Repeat Wrong-Side and Right-Side Increase Rows until you reach the last tile on Square 1.
Join Between Square 1 and Square 2: When you reach the end of the Increase Rows, your final join is in the space between the square you’re joining to, and the next square. At the end of the row, sl st into the sp between the next 2 tiles on Square 1. Ch 3, sl st in the space between the last tile of Square 1 and the first tile of Square 2 (Image 6). Turn your work and complete the final Increase Row.
Decrease Rows: Repeat the same Decrease Rows from Square 1. Fasten off when complete (Image 7).
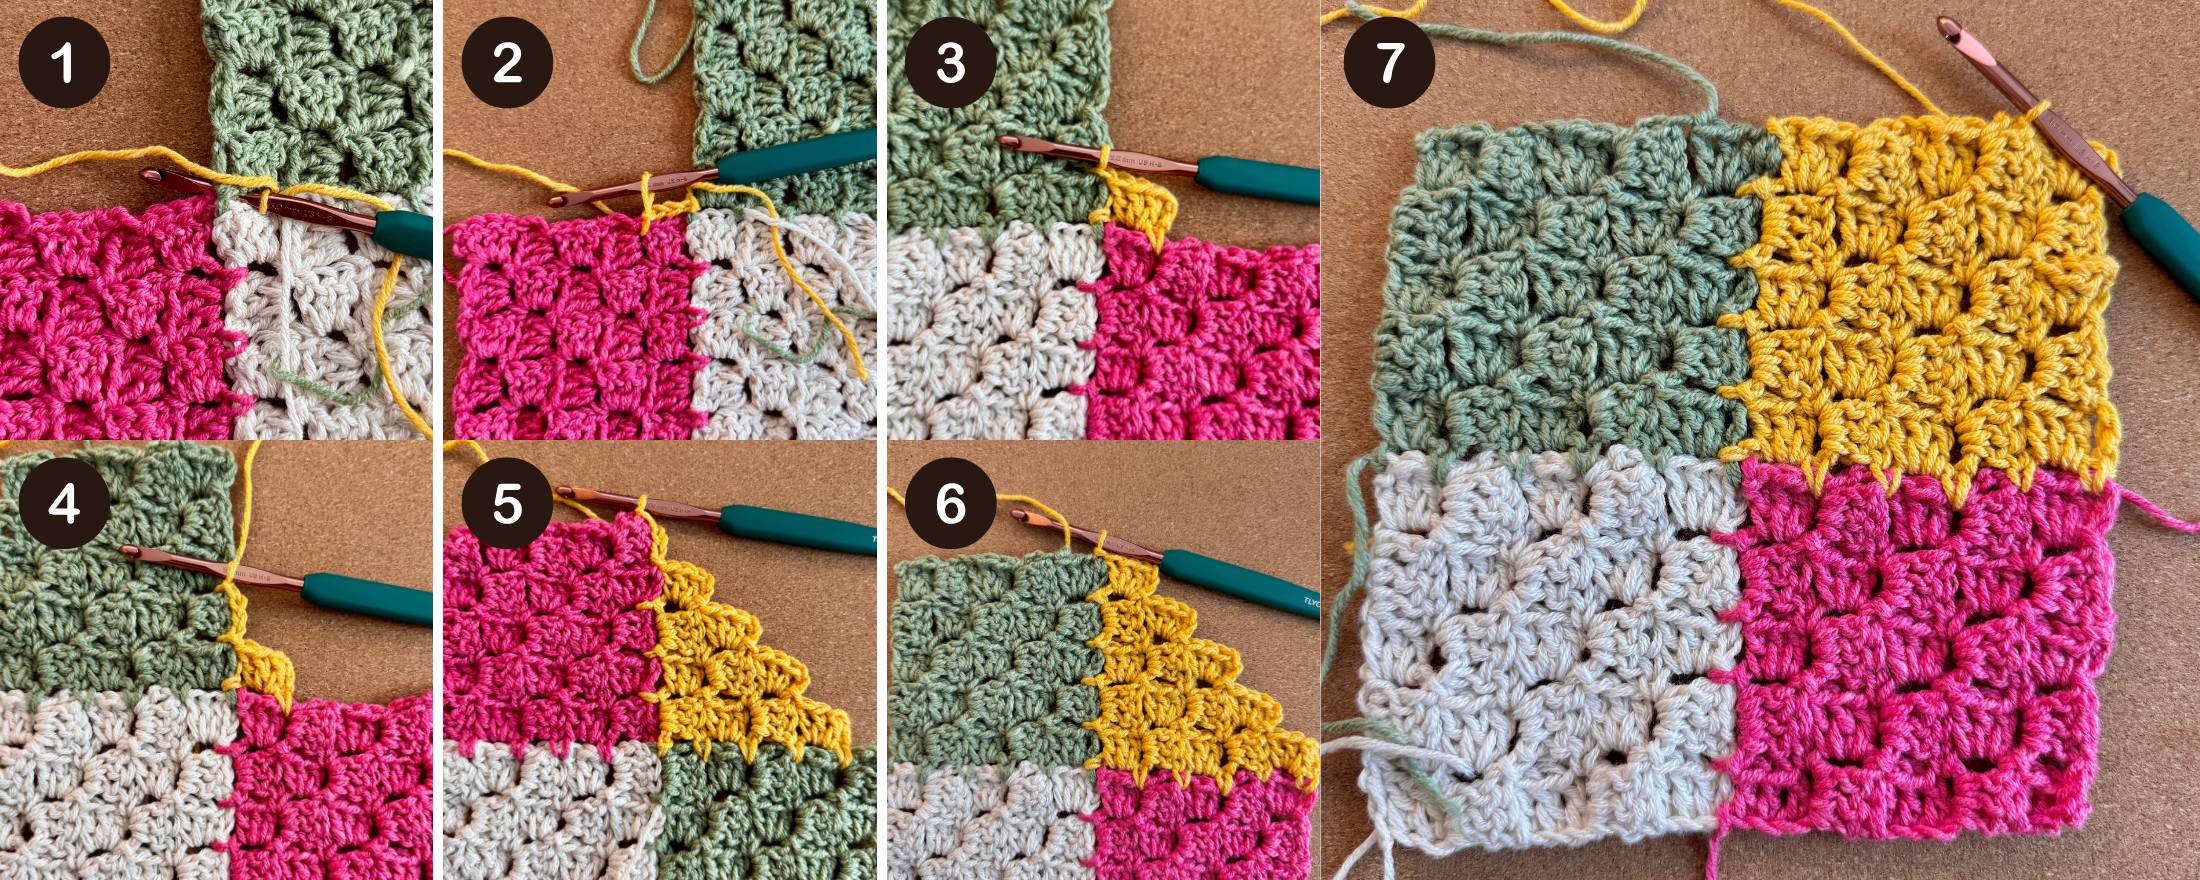
Square 4
This square connects to Square 3 along one edge, and Square 2 along another edge.
Join and Make the First Tile: Turn work to Wrong Side. Place a slipknot on the hook and insert hook in space between Square 1 and Square 3 (Image 1). Yarn over and pull through the fabric and loop on the hook to join. Ch 3, sl st in the sp the first two tiles on Square 2 (Image 2). Ch 3, dc 3 times in the ch-3 space. Sl st into the sp between the next two tiles on Square 3 (Image 3). Ch 3, sl st in the sp between the next two tiles up on Square 3 (Image 4).
Increase Rows: Turn your work. Ch 3, dc 3 times in the ch-3 space. *Sl st in the ch-3 sp of the next tile to join. Ch 3, dc 3 times in the same ch-3 space.* Repeat from * to * until you reach the edge of a joining square. Sl st into the sp between the next 2 tiles on the joining square. Ch 3, sl st in the space between the next 2 tiles up on the joining square.
Repeat Increase Rows to Last Increase Row.
Last Increase Row: For the last Increase Row, complete in pattern until you reach a joining square. Sl st in the sp between the next 2 tiles on the joining square. Ch 3, sl st in the ch-3 sp of the last tile on the joining square (Image 5). Turn your work. Ch 3, dc 3 times in the same ch-3 space. Continue in pattern to end of the row. Sk the ch-3 of the tile on the joining square. Sl st in the next dc of the same tile (Image 6).
Decrease Rows: Repeat the same Decrease Rows from Square 1. Fasten off when complete (Image 7).
Start Your Year-Long Roll With It Blanket!
Ready to go all in with the C2C JAYG technique and make your own crochet patchwork blanket? Make one with me in 2026 – start your Roll With It Blanket today. Whether you’re stitching from stash or planning a color palette, get ready to roll the dice and ease into this cozy crochet project.
The best part? By the time December hits, you won’t be staring down a mountain of finishing work. You’ll have a 70″ square throw blanket that just needs a border. Get all the details about the Roll With It Blanket HERE, and let’s crochet together!
If you try the C2C JAYG technique, even if it’s not for your year-long blanket, I want to see it! Tag @tlyarncrafts and use #RollWithIt2026 on Instagram to share your progress. And drop a comment below – are you Team Join As You Go, or Team I’ll Sew It Together Later? There are no wrong answers, so what’s your preference?
Let’s make 2026 the year we finish a blanket without the finishing drama! Happy stitching, my loves 🙂
C2C JAYG Common Questions
// What does C2C JAYG mean in crochet? C2C JAYG means Corner-to-Corner Join-As-You-Go. It’s a crochet technique where you join C2C squares together while crocheting the next square. My method uses a slip stitch to make the joins.
// Is join-as-you-go better than sewing crochet squares? For many crocheters, JAYG is faster, cleaner, and eliminates the headache of seaming your project after you make all of the squares. It’s not necessarily better, but it keeps projects like crochet patchwork blankets manageable because the blanket grows as you go.
// What stitch is used in C2C JAYG? In this method, C2C squares are made with double crochet, and squares are joined using slip stitches, placed as the edge of each C2C square where the tiles meet.
// Will the join look different on the front and the back? Yes, slightly. The slip stitch looks slightly different on the front and back, but both sides are neat and presentable.
// Can I use this technique to make a crochet scrap yarn blanket? You sure can! C2C JAYG is perfect for stash-busting because you can change colors constantly and still keep the construction clean. Give it a try!!
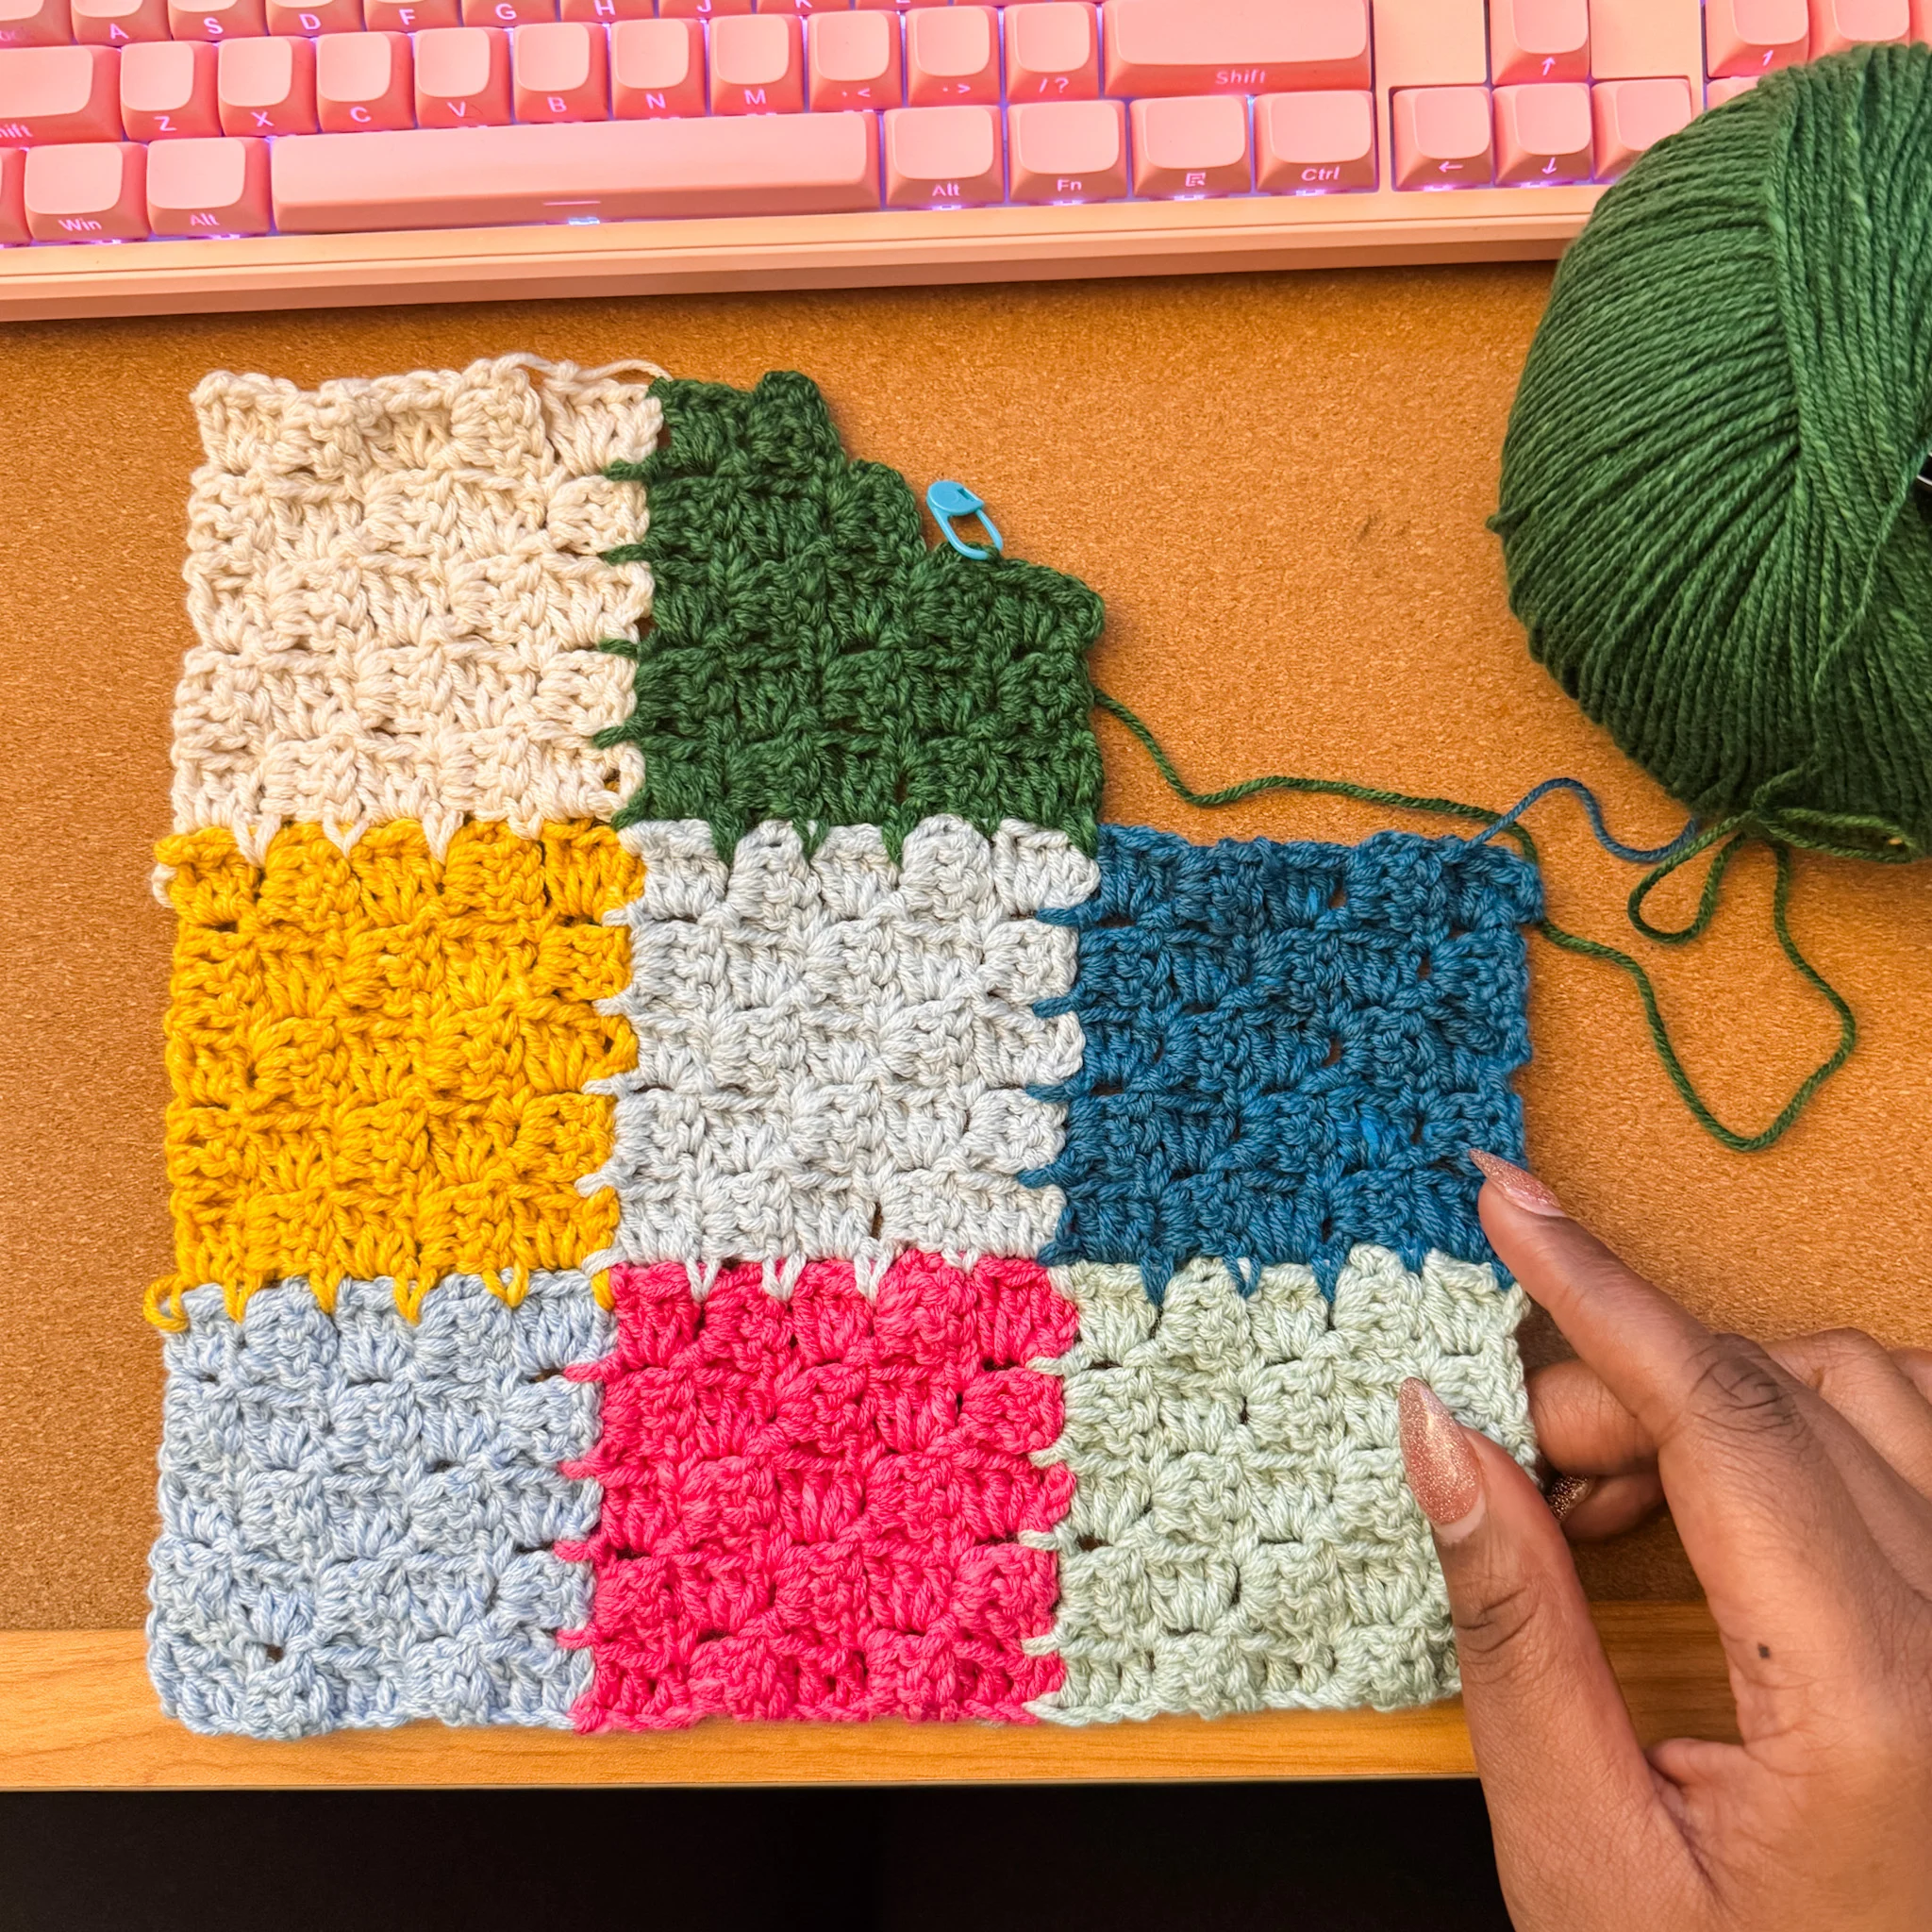
// How many squares are needed for a year-long blanket? For my year-long blanket, I’m doing 19 rows with 19 squares each. This helps me reach 361 squares. The final 4 colors will go into the border.
// Is C2C JAYG beginner-friendly? Once you understand normal C2C, C2C JAYG will be a breeze! You can learn the entire technique using this tutorial video.


Where can I find your crochet hooks
Hi darling! My crochet hooks are currently sold out, but they will return in the end of February. When they do, you’ll be able to find them HERE
Hello Toni! I do believe I found a mistake at the beginning of the 2nd square. Here goes:
“Yarn over and pull through the fabric and loop on the hook to join. Ch 3, dc in the 4th ch from the hook and each of the 2 remaining chs (Image 2). ”
Shouldn’t it be ” Ch 6, dc in the 4th ch…” ?
Thank you!
You’re absolutely right! Thanks for catching that. I’ve made the update 🙂
Hi Toni I just wanted to say thank you for this wonderful pattern. I can’t believe how far I’ve gotten on my Jayg blanket. You’ve made it so easy to do. Thank you again for sharing this wonderful pattern
Hi Toni. It’s Henrietta. I’m in Cape Town, South Africa. I’m busy with my Roll with it blanket. But want to order some happy place yarn. But i would like to know the colour number attached to the yarn that you used.
Hey there, Henrietta 🙂 The colors Toni used are: Crystal (19), Scarlet (02), Eden (10), Tangerine (04), Dreamy (13), Ochre (06), Cobalt (12), Espresso (28), Orchid (17), Herb (08), Almond (26), and Harbor (14). The link to buy can be found here. Happy stitching!
If you ever decide to make this a paid pattern, I will be the first in line to buy it. I love that you offer freebies, but really love ad free downloads! xoxo
Hey there, Robyn! Duly noted 🙂 I will pass along to Toni. We love freebies and ad free downloads!
I get con fused as to where to go after doing the block of 4 to make the blanket can you help me
Hey there, Diane 🙂 I would check the tutorial video for a little explanation around minute 2. Essentially, if you are working next to square one on the same row, you will do square 2 over and over. If you are working on top of square 3 in the same column, you will do square 3 over and over. If you are working along the row with 3 and 4 on the same row, you would work 4 over and over. Let me know if you have any other questions!
I would pay for this pattern. I loved making this afghan.
Hey there, Charlotte 🙂 Yay! Thank you so much for the support and community. We appreciate you!