This Crochet Ribbing Technique Will Blow Your Mind!

I’ve always been partial to top-down crochet beanies but I never loved the go-to ribbing options most crocheters use. Here’s my favorite technique for a crochet ribbing that rivals the beauty of knit.
Pin it now, read it later
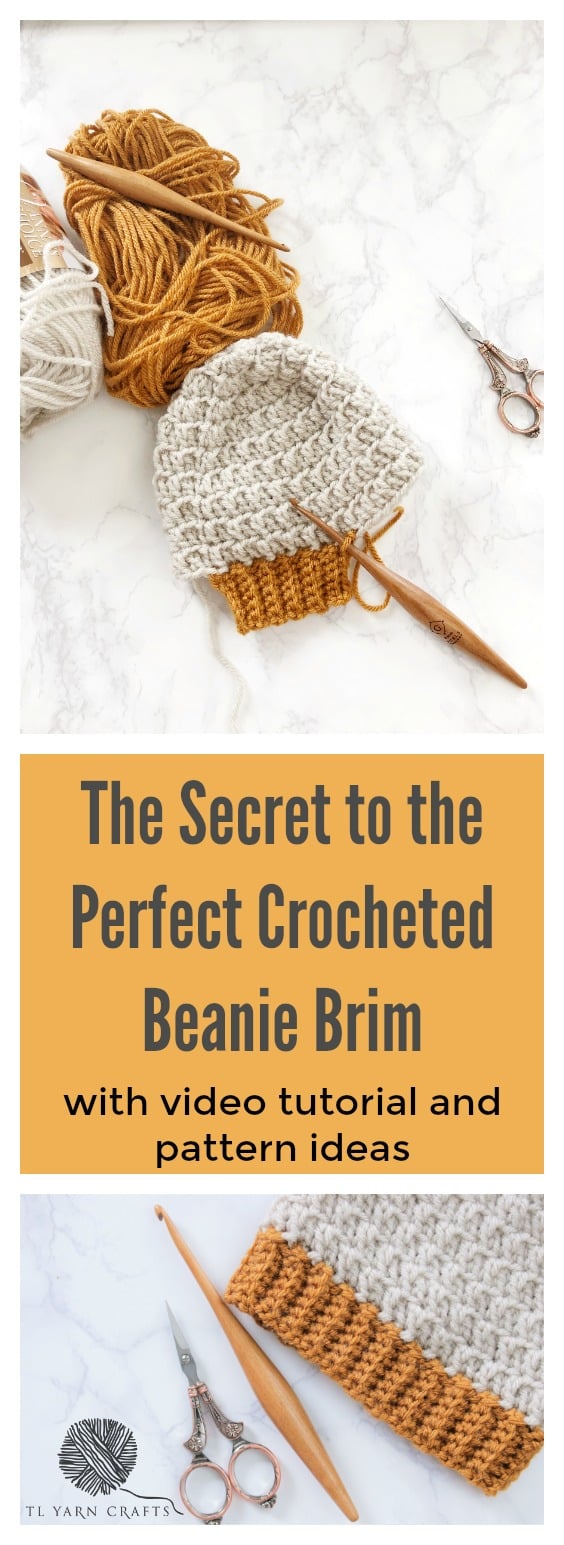 When I was on the hunt to add just the right elements to design the perfect slouchy beanie, a snug ribbed brim was a must. I’d seen many ways ribbing was done in crochet, but they all ended up looking very obvious or bulky to me. I poked around Pinterest and found a lovely ribbing technique that gradually attached itself to the bottom of a top-down beanie using slip stitches. I am far too lazy to slip stitch a hat with 70+ stitches on the bottom, so I opted for single crochet stitches.
Ladies and gentlemen, we have a winner! This crochet brim technique is absolutely perfect for beanie, but you can also use it for the ribbing on sweater hems, cuffs, and necklines. It’s super easy, lays flat every time, and and looks beautiful. But I can show you better than I can tell you. Here’s a tutorial from TL Yarn Crafts TV on YouTube showing my favorite ribbing technique, step-by-step:
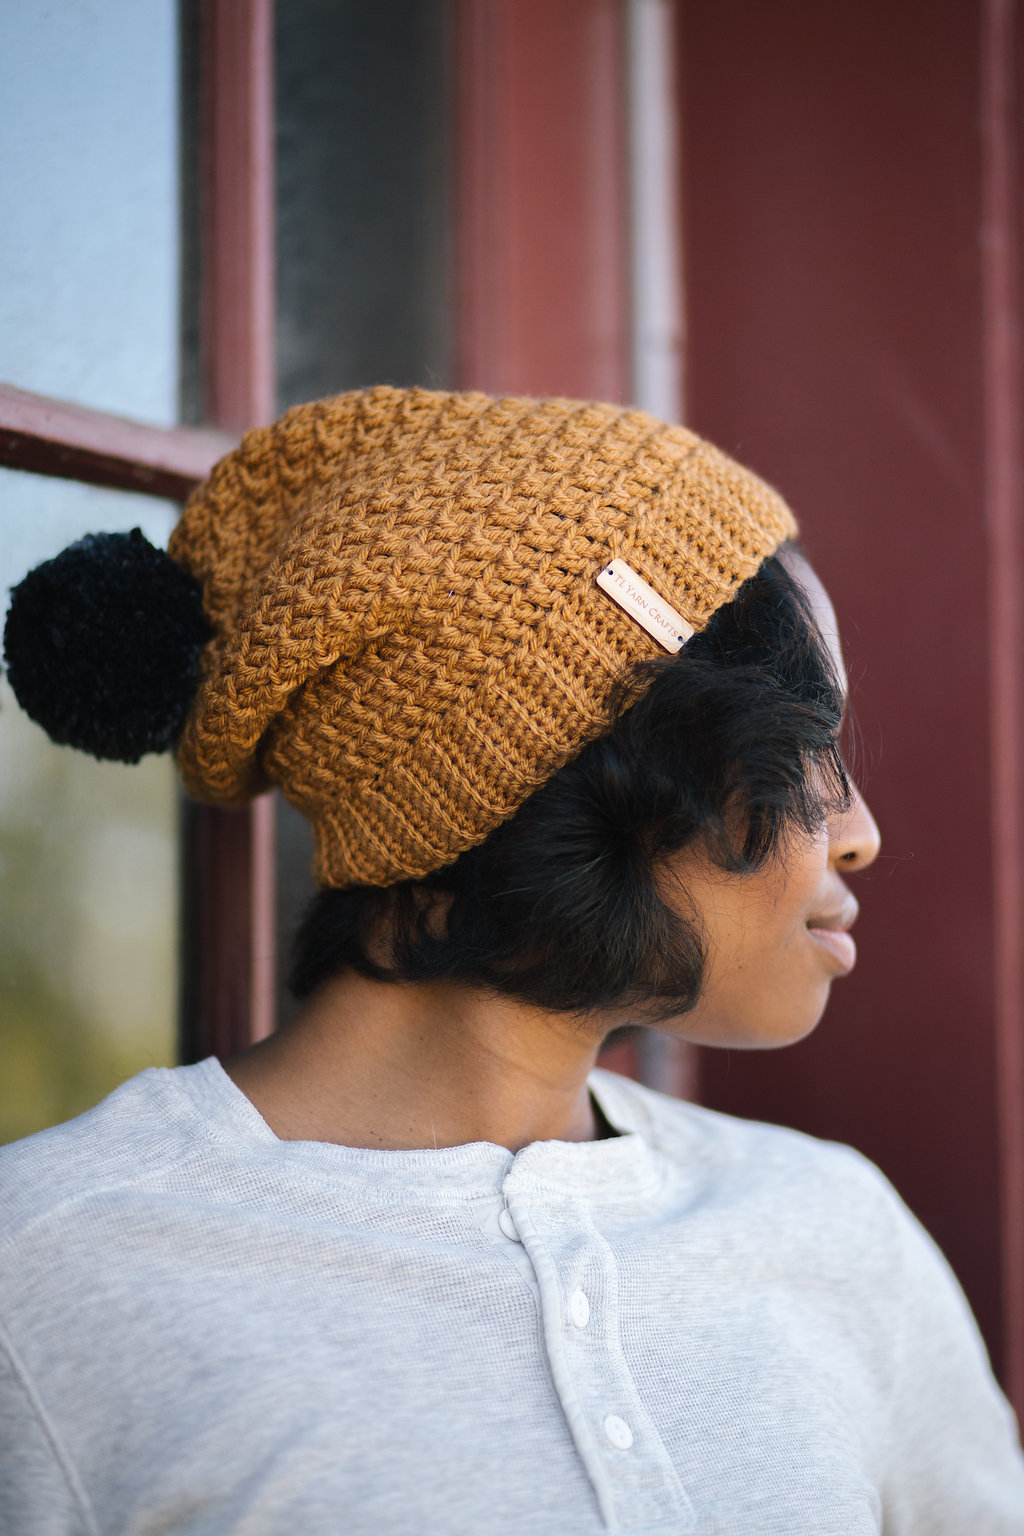
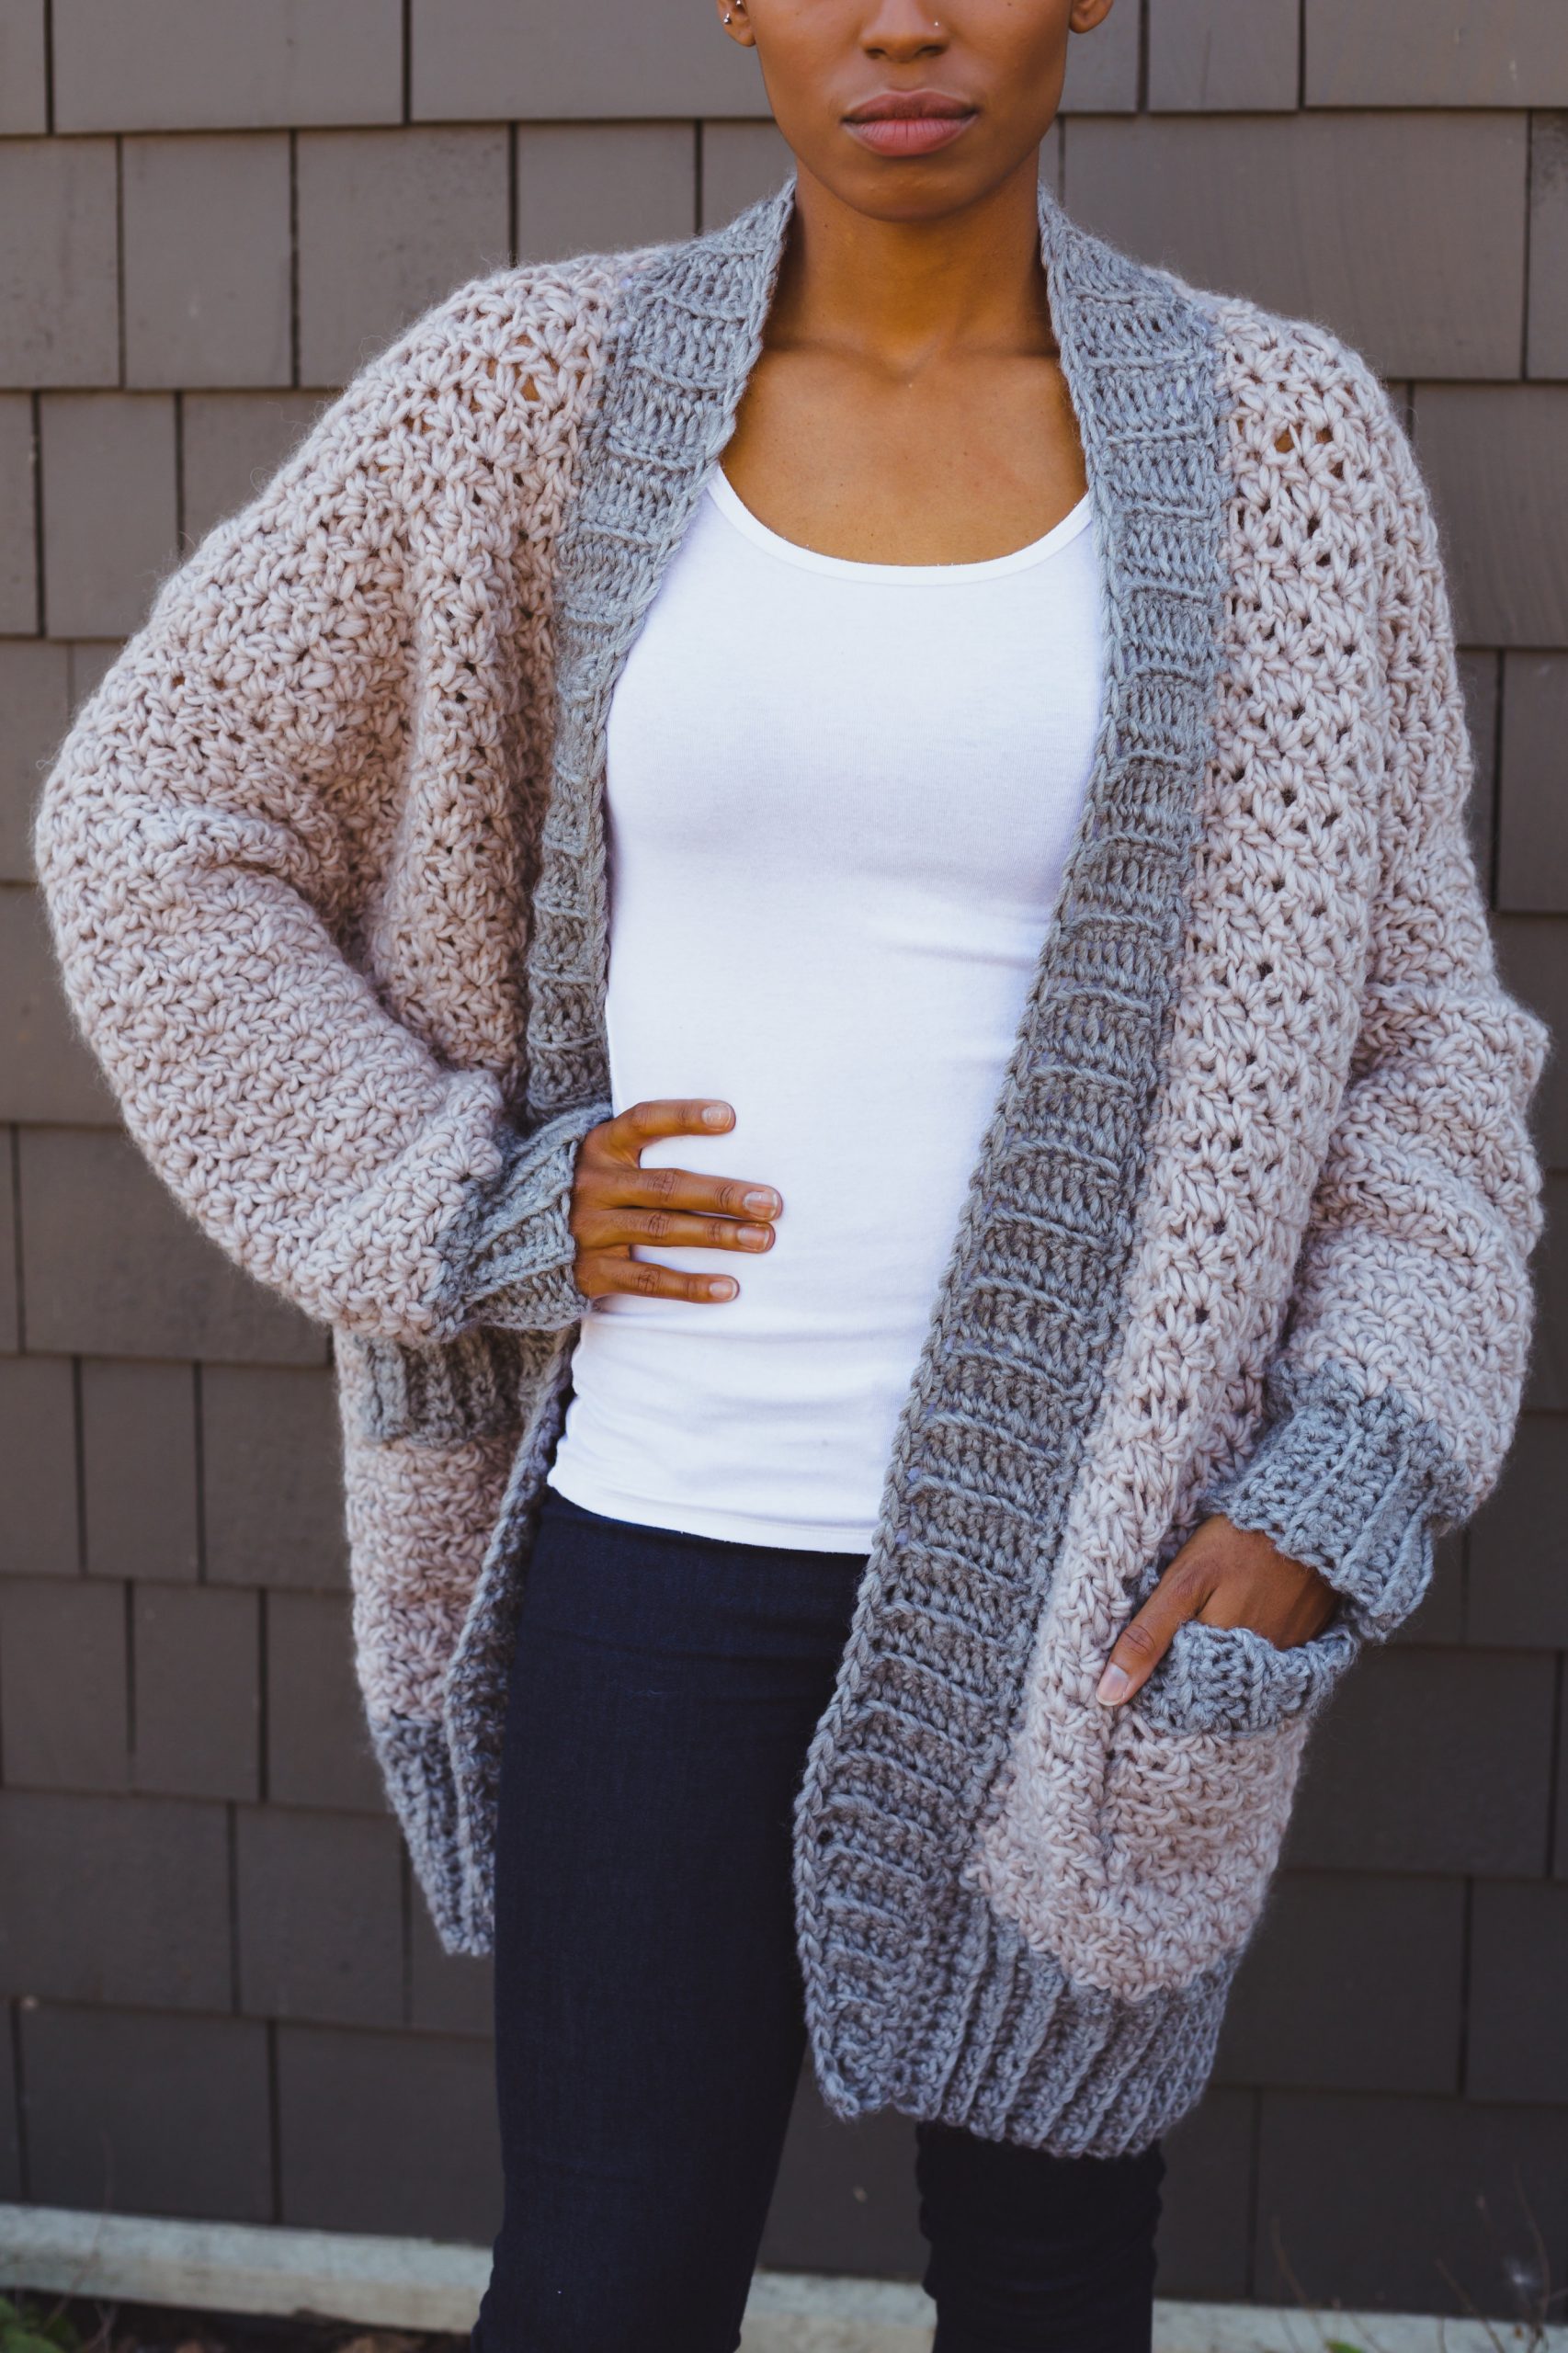
It’s just so good, I couldn’t stop using it! Here are some of my favorite TL Yarn Crafts designs featuring my favorite ribbing technique:


I absolutely love the quality of your work! Your tutorials are enjoyable to listen to & interesting for those that have crocheted for years. Well done. Thank you for sharing your talents!
You are so very kind, Marti! I love crochet so much and want others to also. I’m so honored to share the craft from my perspective 🙂
love it
OMG! This this is what I’ve been needing. I have always hated the rim options. I’m crocheting hats for women in a homeless shelter for this winter season. Everyone will have this nice and snug rim. Thank you for taking the time to create, video, and share this with us.
I’m so very glad this tutorial was helpful. It really is my favorite way to do brims on hats and it looks great on everyone. Have fun!
Thank you, thank you, THANK YOU!! I only like doing top down hats as well but love the look of a ribbed brim. I hated creating a brim first then trying to fit stitches around in the rough edge. It always looks messy and has gaps or holes. I actually had thought of trying to do what you’ve shown but when I tried I got very confused lol. I’m so glad I came across this on Pinterest. I was working on a shell beanie tonight and was going to do several blo sc rows to finish but it was too tight. Then I remembered this video so going to give it a try. Your hats are simply gorgeous! I can’t wait to browse around and try a few. 💖
I’m so glad you found this tutorial at the perfect time! I’d love to know how it turns out! Feel free to tag me on Facebook and Instagram – @TLYarnCrafts. Happy hooking!
I love this. It makes the beanie look so much nicer. Thank you for sharing this video!
Thank you soooo much for this video tutorial , I made a pair of baby pants and got to the point of the waste band and could not figure it out . I looked for a video to explain how to do this tho of stitch it and just couldn’t find anywhere , I gave up on the pants and made something else .. so thin you so much for this video it has helped immensely , I love your patterns and work.. so neat.. thanks again☺️
I’m so glad you found the tutorial – it would be perfect for a waistband! 🙂
I love this technique! I was seriously considering learning to knit ribbing or paying my niece to to it for me. I’ve seen the blo sc ribbing before, but not as the finishing to the piece. ❤️❤️❤️ Thank you for making the video.
you are a very good teacher thank you
Love this! It looks so easy. Can’t wait to try it out sometime soon.
This method completely changed how I crochet. I really hope you love it!
This is amazing! Thank you so much!! You have literally rocked my crochet world!!! Blessings to you!!! Cyn
Thank you so much for your tutorial! Such a simple idea, but really makes a difference in the look of the hat. I will keep this technique in mind on my next hat. You are such a lovely person to listen to and your explanations are very clear!
Wow!! was goin to try something like this today…my husband has a knitted hat his Mom made for him years ago…its his favorite….still fits around the head but keeps coming up over his ears….she passed 6 yrs ago so she can’t make him another one…i’m more of a crochetter so i was goin to add a ribbing to lenghten the ribbing so his fav. hat fits again…TYSM!!!
Ok. Now I want to unravel any brim I’ve ever made and redo it like this. You’re right; it is so stinkin’ cute!! Great work.
Thank you soooo much Crystal! This technique changed my crochet life forever. I’m so glad you like it!
I love this! I was debating what to do with the border on a top down hat and this was SO EASY!
So so sooooo glad this was helpful. It’s my favorite technique – I use it all the time now 🙂
OMG! I’m going to start following you right now. I stopped crocheting hats because of the brim.😀
Yay! I’m so glad this is helpful. You’ll never want to stop making hats now!
You are so talented! This is a smart way to do it. I can’t wait to give it a try.
I hope you love it! I tried it and just couldn’t keep this technique to myself. Let me know how it goes!
Love this awesome technique……that you so much for sharing!🙏
So glad it’s helpful! Thanks for dropping by!
Such a good tutorial Toni. Thank you!!! I will be using this technique on beanies I’ve been making for a couple of charities.
Thank you!!!! I’ve used several different ribbing patterns but this one is now my favorite! It turned out beautifully.
I’m so glad it was helpful! Thanks for checking out the post!
Just what I have been looking for to finish my beanies. Thank you, you have gained a new fan.
Awwwww, yay! Thank you so much! I’m really glad the tutorial was helpful 🙂
Beautiful hat and very profesional, well done video. Thank you for taking the time to teach us. Making this time of profesional videos is too much work. I have tried and it is not easy.
Thanks so much for your kind words and understanding! It is a lot of work to make these videos, but so fun! 🙂
Very very helpful video. Thank you very much!!!
Very helpful video. Thank you very much!!
This is amazing. Love the brim effect but hated doing the brim first. So hard to get the right number of stitches. This is so cute and easy. Love love. Thanks so much. Glad I found you.
I’m so very happy the tutorial is helpful, Robin! Thanks for dropping by 🙂
Thank you so much for sharing. I haven’t crocheted in awhile, but now I feel the need to make hats. Great tutorial.
Thank you for posting. I had found your video in YouTube then from Pinterest to this blog. I actually did sc instead of the slip stitch in between the blo sc. It just felt natural to me. I believe this will be my favorite as well. I made a skirt with it and next is a pair of pants. Thanks again!
Hi Toni!
I’m Sooo Glad I found your site this morning! You have Beautiful patterns and Awesome tutorials!
Thank You for sharing your creativity!
Kind Regards and Happy Crocheting!
I’m so glad the tutorials are helpful. Thanks so much for your kindness and for stopping by 🙂
I have already done my first crochet cardigan but was struggling with ribbing for a looooong time. finally learned how to do it. Thank you so much for this tutorial.
Thank you, Toni, for this tutorial! I’ve used this ribbing pattern for years, but have always done it bottom to top. Yours has a much cleaner finished look; I love it!
Toni,
I have been crocheting for over 40 years and I have to say, this is probably the BEST tip I’ve ever seen. I tried it once and have used it several times already. Even shared with a crochet friend and she loves it too. Thank you so much for sharing your idea with us and for the video to show how easy it is. Hugs and Happy Holidays!
Hi Shelley – I’m so grateful that my video was helpful. And thanks a million for sharing it 🙂 Happy holidays to you and yours!
Thank you SO much for making this tutorial! Your ribbing looks fantastic! I cannot wait to try it out and finally make my beanies look complete!
Hi Susan! I’m so glad you found my tutorial, and I hope it’s helpful 🙂
Hi, Toni.
Love your ribbed edge. I do a lot of baby caps for donation so I want to try it out. What is the stitch on your cap in your tutorial. It looks very nice.
Thx, Connie
Hi Connie! I’m so glad the tutorial will be helpful. The hat pattern I used for the video is the Mega Pom Beanie. You can find the pattern (in sizes for the whole family) at this link: http://bit.ly/MegaPomBeanie
Thank you so much for this tutorial! I always wished there was a way to add the ribbing without having to make it separate and then sew it on.
I had an idea about finishing a top down hat for great granddaughter..and never dreamed I would stumble on your method immediately!! Very good directions and though I’ve been crocheting 70 years, this method to make ribbing was totally new to me. Thank you so much for taking the time to make the video. Wish I could upload a photo of my cute little ponytail hat
Wow – that means so much that such an experienced crocheter can learn something new from me. I’m so glad you found my post 🙂
This is a fantastic technique. Just tried it on a baby knot beanie and it’s so cute. Thanks so much for sharing.
I’m so glad it was helpful, and that it looks great on a knit beanie as well!
I love this ribbing so much! Thank you for your beautiful tutorial; it’s so much more elegant than what I was using before. Could you help me with one thing? My ribbing works up way too tight– I can’t fit the hat on my head anymore! Should I try using the same hook as the rest of the hat instead of one millimeter smaller? Or are my slip stitches too tight? I’d really appreciate any tips you can give!
Hi Rebecca! I’m really glad you enjoyed the tutorial 🙂 For the ribbing, make sure the stitches of the ribbing are single crochet and only the stitches that join the ribbing to the hat are slip stitches. This could be a problem. If not, then try using the same sized hook as the rest of the project and see if that works.
I know I’m late to the game, but I found your post and I want to thank you!! I find it very difficult to get the sizing right on bottom-up hats, and this ribbing technique solves all my problems! I can now make top-down hats and still have a great ribbed brim. Thank you for sharing and for your easy-to-follow instructions.
Genious! Thank you so much for sharing your video.
Hi Toni,
This is a great technique and I can’t wait to give it a try.
Random thought/question, most bottom up hats usually say – fit x amount of stitches around the brim – if I were to chain the same amount of stitches and make the hat bottom up and then put the brim on later as per your method – do you think that would still work out ok ? I hate doing the brim first – but there are some lovely bottom up hat patterns around.
Your beautiful crochet work is an absolute inspiration
Cheers
Kelly
Sure, that could work! It’s definitely worth a try 🙂
Hi Toni! Thanks so much for this tutorial. I know this is a few years old now but I was wondering – if I want to turn up the brim on my beanie should I crochet in front loops only instead of BLO?
Hi! This technique creates a mirrored brim, so it will look the same flipped down or up – you shouldn’t need to change anything 🙂
Hi Toni, great video, thank you! I didn’t know a brim like this was possible on a top down hat. I wondered if you can help… do you have any tips on how to avoid the little gaps you get at the end of the row (where you chain, then turn) when doing a hat brim. I try pulling the yarn a little tighter but doesn’t seem to help. And sometimes I get the gap and other times I don’t, even on the same piece of work! 🤷🏼♀️ thanks again, Gemma
Hi Gemma! My best recommendation would be to turn your work in the opposite direction after your chain. That might help to make that gap a little smaller.
This Brim construction is perfectly perfect! After 45 yrs of hooking with yarn, you have given me the answer! Bless you!
Will use this tut. many times now for 13 grandchildren! Thank you Sweetheart!
Does anyone know how many stitches to cast on for larger size hat brims?
I believe she used 7 for a tiny baby.
What about: 6 mo, toddler, child, teens, adult women, adult men??
Thank you!!
Hi! There are details on different sizes of the Mega Pom Beanie in the paid pattern, if that’s what you’re looking for. That pattern is top-down though. Are you looking for the starting chain for a bottom-up hat?
Game Changer!!!!!!!!! Thank you so much for sharing this, it opens up a ton of new possibilities for projects I didn’t want to do because I hat sewing things on afterwards. You are the best!
Love this idea. At the beginning of your video above- you’re holding two beanies- I really love the gray one on the right. Do you have a pattern for that beanie? Thanks
Hi! So glad you like the video + tutorial. The pattern you’re looking for is the Bubble Wrap Slouch – you can find it here.