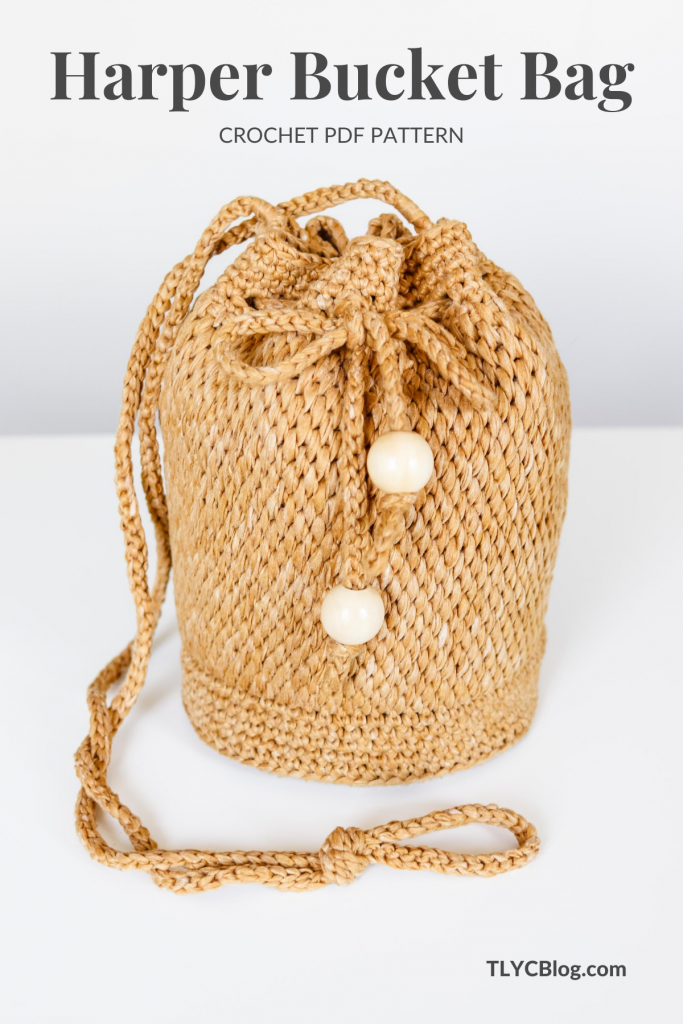
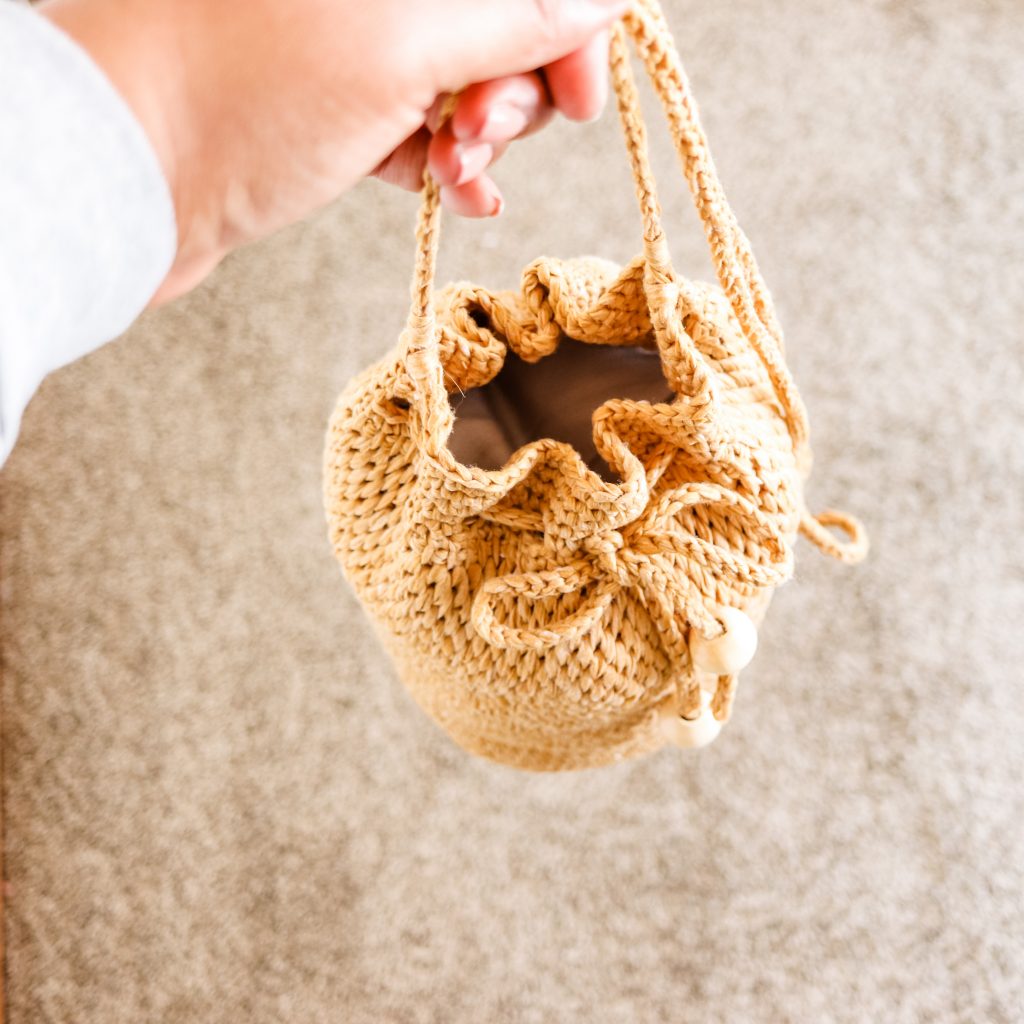
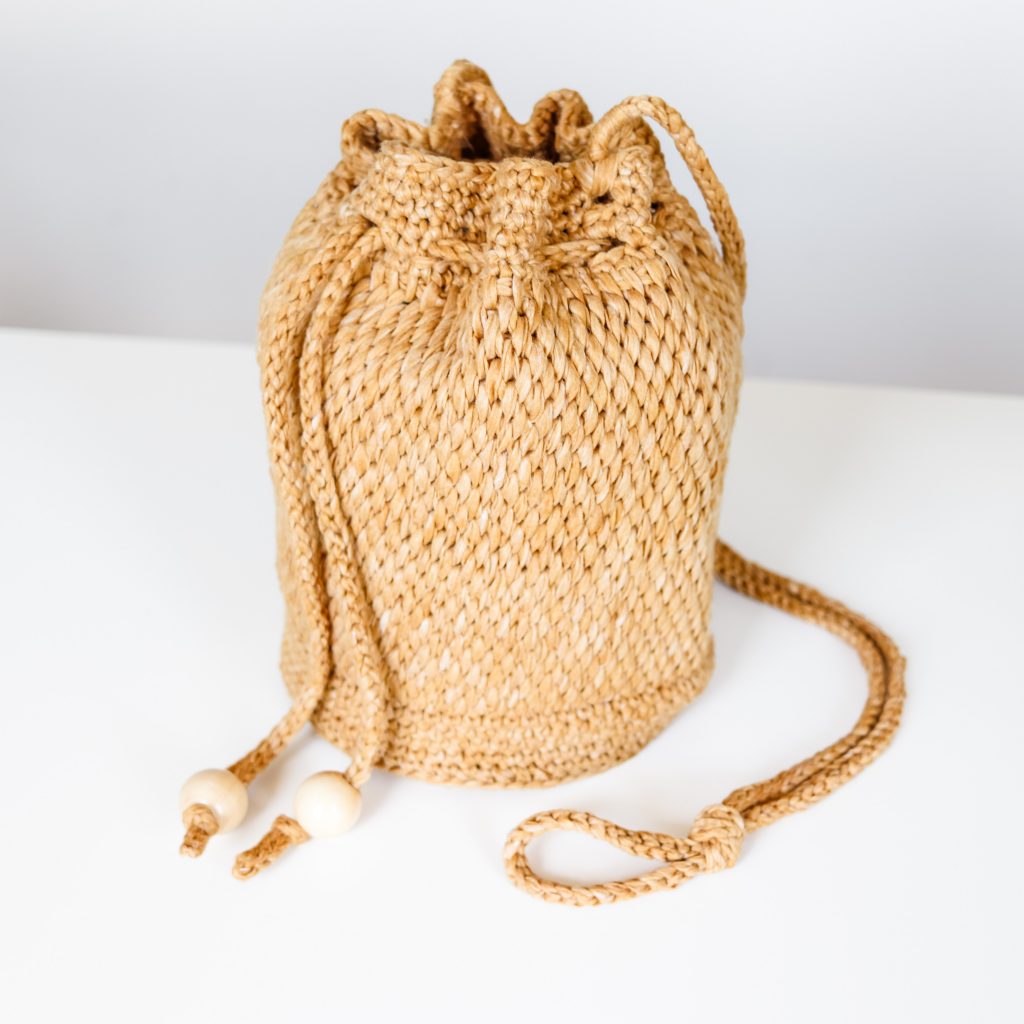
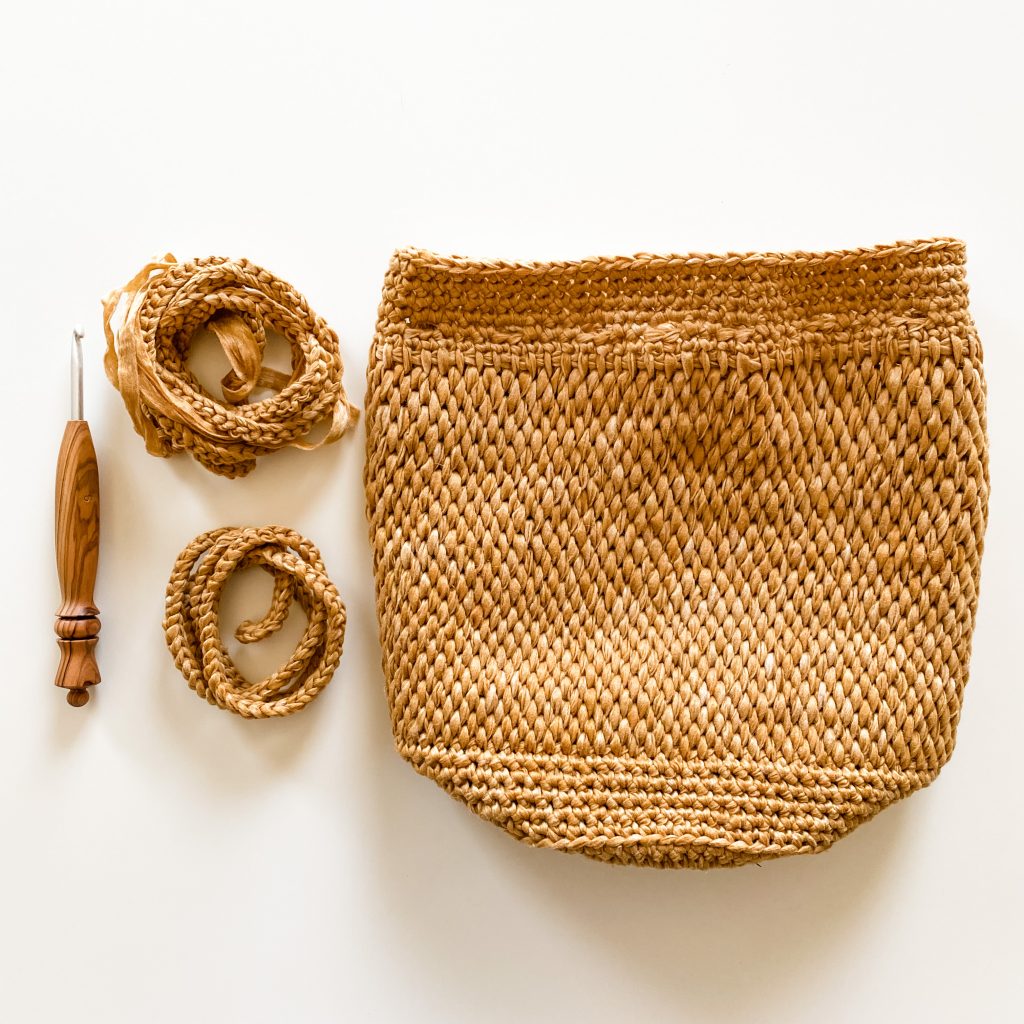
Harper Bucket Bag, a free crochet summer drawstring bag pattern

Put yourself in a boho frame of mind when you make the Harper Bucket Bag, a free crochet pattern designed in collaboration with Lion Brand.
My quest for crafting the perfect summer essentials will never end. I love making fun accessories and wearables when the weather heats up. The Harper Bucket Bag was inspired by the latest trends in raffia purses, but I’ve never been a huge raffia fan. Enter my new favorite yarn, Rewind from Lion Brand, and the Harper Bucket Bag is here. Incorporating traditional AND Tunisian crochet, this is one project you won’t want to put down.
This post contains affiliate links that support the content on TLYCBlog.com. All opinions are my own. Find my Privacy & Disclosures Policy here.
Pin It Now, Make It Later!
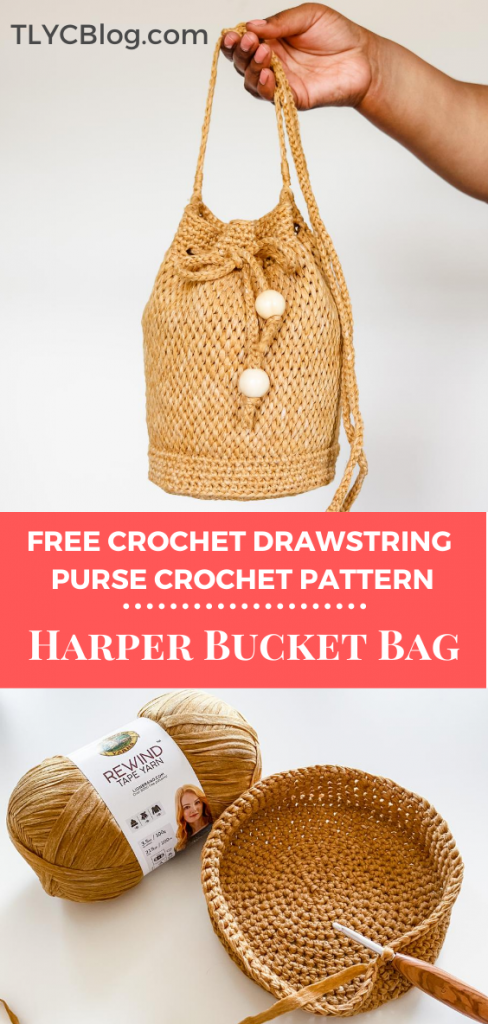
Find a printer-friendly version of the Harper Bucket Bag on Ravelry and TLYarnCrafts.com. The PDF version includes 6 pages of easy-to-read instructions plus helpful assembly photos.
Get the all-in-one kit for the Harper Bucket Bag from Lion Brand NOW! Kit includes all of the yarn you need for this project AND a PDF version of the pattern. Explore the Harper Bucket Bag and all TLYC x Lion Brand crochet kits here.
Keep scrolling for the FREE version of the Harper Bucket Bag.
Blending Traditional and Tunisian Crochet
I’ve loved crochet since I was a teenager. And, while my love for Tunisian crochet only goes back a couple of years, it’s just as strong. I’ve got several patterns where I let these individual crafts shine. For the Harper Bucket Bag, I wanted to challenge myself to combine these crafts into one project, using them both thoughtfully and intentionally.
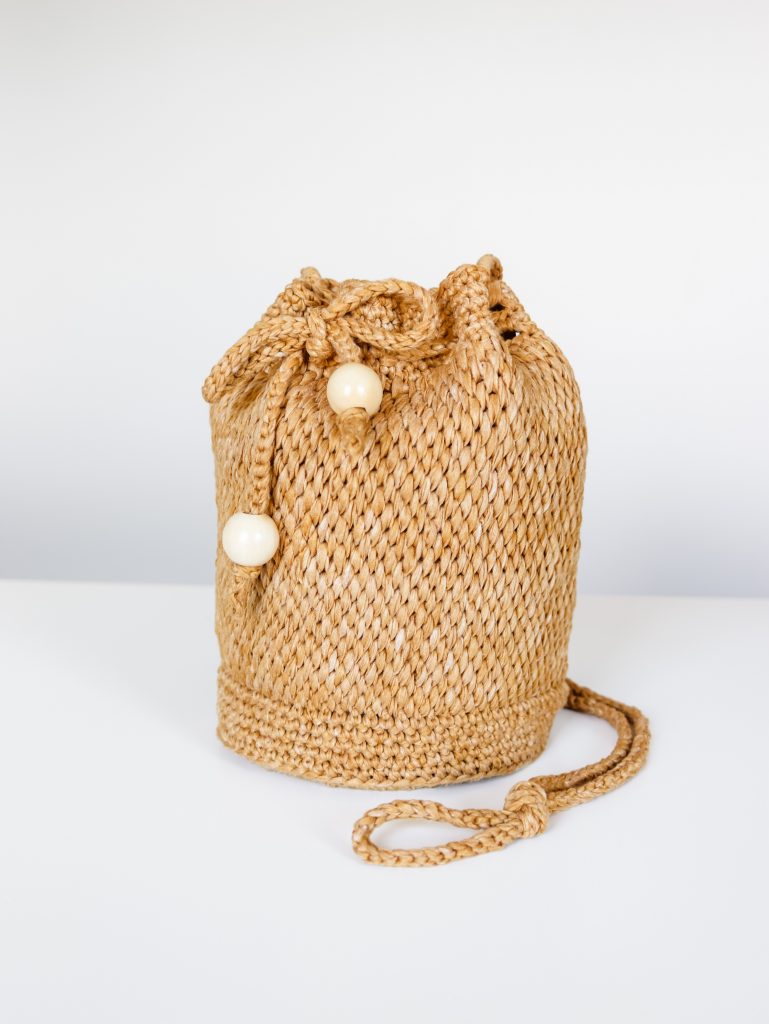
I used traditional crochet in the Harper Bucket Bag in a practical way. It makes up the base, which is worked in a spiral, as well as the top section to hold the drawstring and the strap. These applications give the bag some much needed structure and shape.
On the other hand, I pulled in one of my favorite Tunisian crochet stitches for aesthetics and smooth texture. The Tunisian full stitch makes up the body of the Harper Bucket Bag, really letting the yarn take center stage. The combination of these two techniques makes this project both fun to make and easy to use.

My Summer Romance With Rewind Yarn
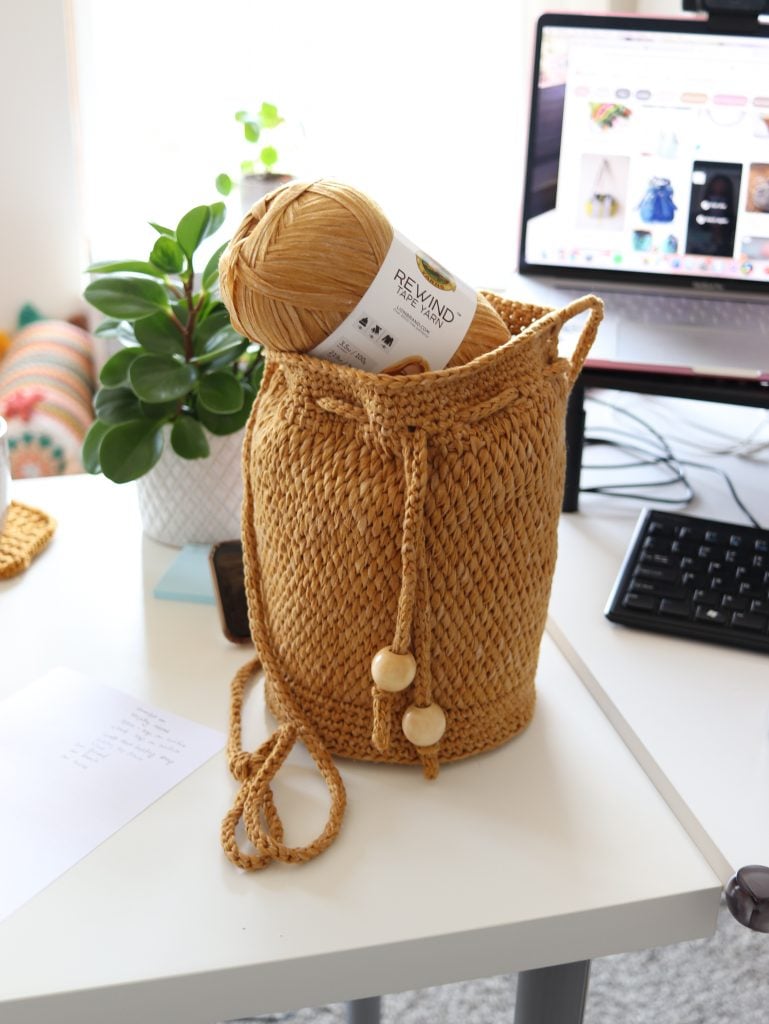
One of my favorite things about being a designer is playing around with new yarns. While browsing the Lion Brand website to find the perfect yarn, I stumbled upon Rewind, a buttery soft bulky weight tape yarn. And, boy, am I glad I did!
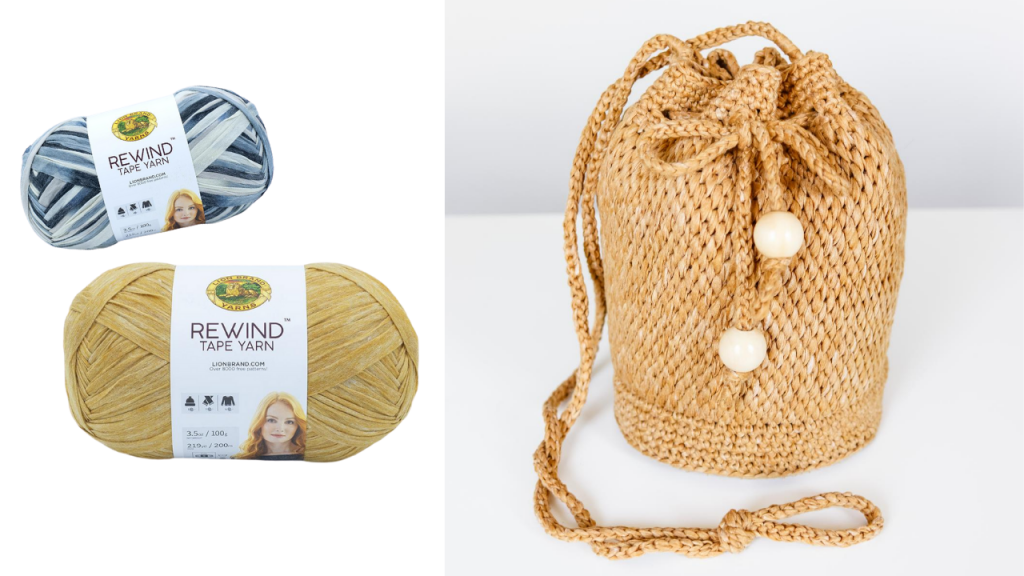
Rewind has a texture and construction unlike anything I’ve ever seen. While some tape yarns can be shiny or slippery, Rewind is smooth and silky. The polyester blend feels like pliable suede and crochets like raffia. Since it’s a flat tape yarn, it bends easily into the shape needed to make uniform, smooth stitches.
Get the Harper Bucket Bag all-in-one kit from Lion Brand.
The Harper Bucket Bag lends itself to many different kinds of yarn. If Rewind isn’t your jam, try holding two strands of worsted weight cotton or acrylic together, or try a cotton tube yarn like Bernat Maker Home Dec. And don’t be afraid to dive into your stash for great options give your Harper Bucket Bag a unique flair.

I’m so glad I was able to get a few testers to try out the Harper Bucket Bag. Each one is unique and so cute. Please take a moment to drop by their Instagram feeds and show them some love.

Top Row: @carrieperlf; @_nuime_; @imoestitches
Middle Row: @hannahwilliams463; @hookedonserendipity @va1erie
Bottom Row: @yarnoverfloyd; @capital.crochet; @thewishfulstitch
Interested in pattern testing for TL Yarn Crafts? Just fill out this form!
Click Here to Pin This Post
If you’re ready to start stitching the Harper Bucket Bag, keep scrolling for the free version of the pattern. Or, find a printable version on TLYarnCrafts.com and Ravelry. You can also get the all-in-one kit from Lion Brand at this link.
Click here to get the Harper Bucket Bag pattern on Ravelry!
Click here to explore more FREE crochet patterns on TLYCBlog.com!
Harper Bucket Bag Details
MATERIALS:
- Lion Brand Rewind, 2 balls in the color Citronella
- 5mm crochet hook
- 5.5mm Tunisian crochet hook with 28″ cord
- Scissors
- Tapestry needle
- Locking stitch markers
- Large wooden beads (optional)
FINISHED SIZE:
Base is 6.5″ in diameter; 9″ tall
GAUGE:
Base measures 4.25″ in diameter after Round 8.
ABBREVIATIONS:
BLO = back loop only
Ch = chain
Lts = last Tunisian stitch (see Special Stitch under Notes section)
MR = magic ring
Rem = remaining
RetP = return pass
Sc = single crochet
Sk = skip
Sl st = slip stitch
Sp = space
St(s) = stitches
Tfs = Tunisian full stitch
NOTES:
- Portions of this pattern are written in crochet shorthand. For example – “sc 2” means to single crochet in each of the next 2 stitches, while “2sc” means to place 2 single crochet stitches in the next stitch or space.
- Numbers in parentheses at the end of some rounds indicate the total number of stitches in that round.
- Return Pass (RetP): Ch 1, *yarn over, pull through next two loops on hook; repeat from * until 1 loop remains on hook.
- Special Stitch: Last Tunisian Stitch (Lts) – This abbreviation references how to work the last stitch on the forward pass in Tunisian crochet. Insert hook under BOTH loops of the last stitch, yarn over, pull up the loop.
Harper Bucket Bag Pattern
Need some help making your Harper Bucket Bag? Check out this step-by-step tutorial video!
Base
Base is worked in a continuous spiral. Do not join at the end of rounds. Place marker at the beginning of the round and move up as needed.
ROUND 1: With 5mm hook, sc 6 in MR, close ring. (6)
ROUND 2: (2sc in next st) around. (12)
ROUND 3: (2sc, sc 1) around. (18)
ROUND 4: Sc 1, (2sc, sc 2) 5 times, 2sc, sc in last st. (24)
ROUND 5: (2sc, sc 3) around. (30)
ROUND 6: Sc 3, (2sc, sc 4) 5 times, 2sc, sc in last st. (36)
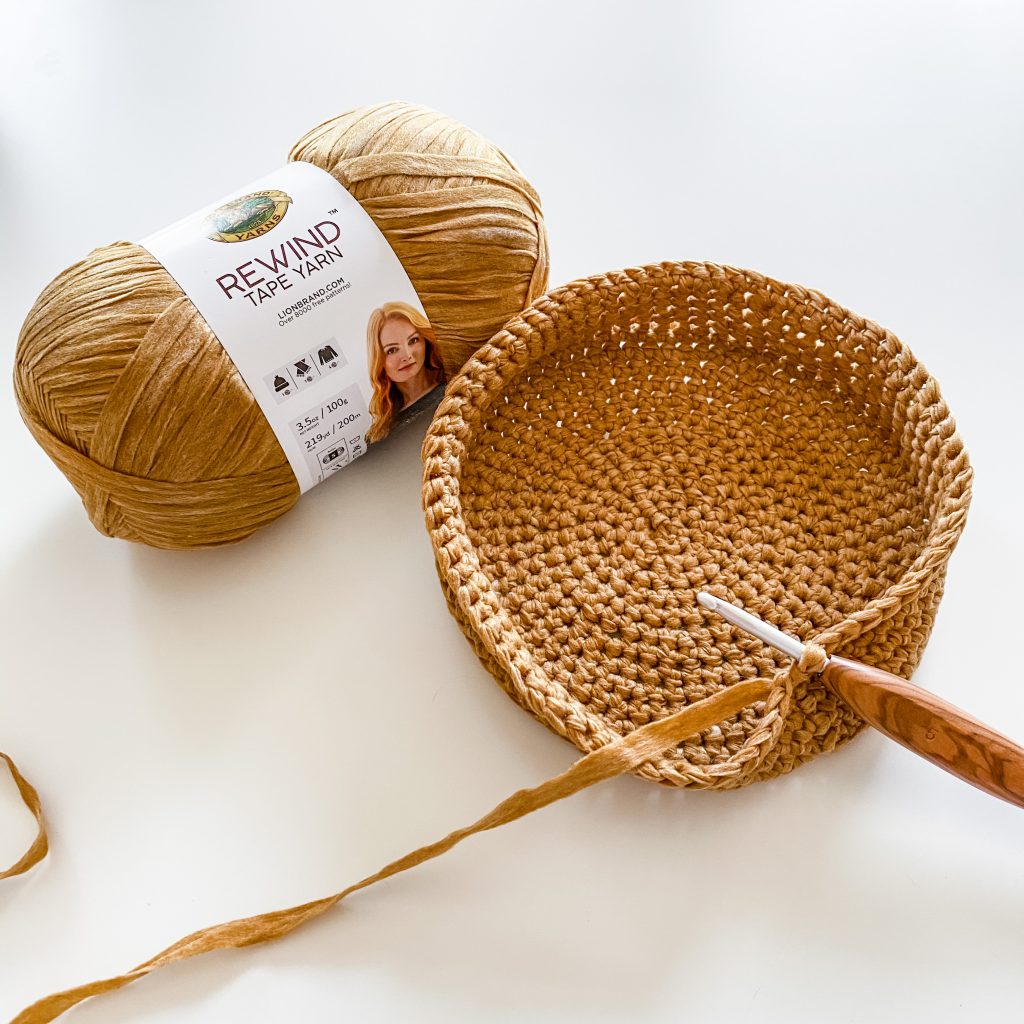
ROUND 7: (2sc, sc 5) around. (42)
ROUND 8: Sc 4, (2sc, sc 6) 5 times, 2sc, sc 2. (48)
ROUND 9: (2sc, sc 7) around. (54)
ROUND 10: Sc 5, (2sc, sc 8) 5 times, 2sc, sc 3. (60)
ROUND 11: (2sc, sc 9) around. (66)
ROUND 12: Sc 6, (2sc, sc 10) 5 times, 2sc, sc 4. (72)
ROUND 13: Sc in each st around.
ROUND 14: Sc blo in each st around.
Remove marker.
Body
Body is worked in joined rounds to start, then in Tunisian crochet rows, and finished with joined rounds again. Do not try to join Tunisian crochet rows – seaming is referenced in the Finishing section.
ROUND 1: Sl st in next st, ch 1, sc in same st, sc in each st around, join with sl st in first sc of round.
ROUND 2: Ch 1, sc in same st as join, sc in each st around, join with sl st in first sc of round.
ROUNDS 3-4: Repeat Round 2.
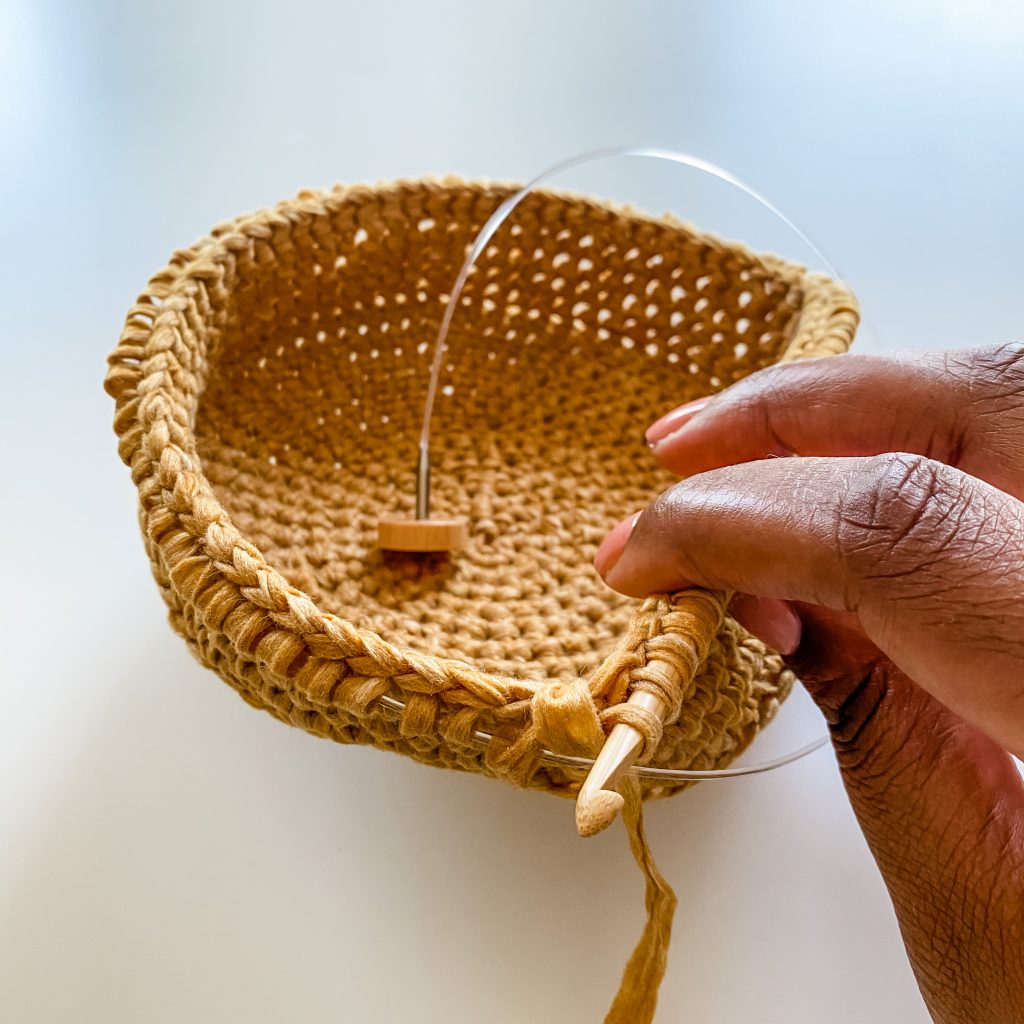
ROW 1: With 5.5mm corded hook, ch 1, sk first st, pull up a loop in the next st and each st around, RetP. (72)
ROW 2: Tfs in the sp between the 1st and 2nd st, tfs in each sp across row to sp before last st, sk last sp, Lts, RetP.
ROW 3: Tfs in the sp between the 2nd and 3rd st, tfs in each sp across row, Lts, RetP.
ROWS 4-29: Repeat Rows 2 and 3.
ROUND 5: With 5mm hook, ch 1, insert hook into sp between 1st and 2nd st, *pull up a loop and complete a sc; repeat from * in each sp between sts to the sp between the last 2 sts, sk sp, sc through both loops of last st, join with sl st in first sc of round. (72)
ROUND 6: Ch 1, sc 1, (ch 2, sk 2, sc 3) 6 times, (ch 2, sk 2, sc 2) 2 times, (ch 2, sk 2, sc 3) 6 times, ch 2, sk 2, sc in last st, join with sl st to first sc of round. Use a locking stitch marker to mark the 8th space made.
ROUND 7: Ch 1, sc in each sc and 2sc in each ch-2 sp around, join with sl st in first sc of round.
ROUND 8: Ch 1, sc 16, ch 2, sk 2, sc 36, ch 2, sk 2, sc 16, join with sl st in first sc of round.
ROUND 9: Repeat Round 7.
ROUND 10: Sc in each st around, join with sl st in first sc of round. Fasten off.
Drawstring
ROW 1: With 5mm hook, ch 145 loosely, sl st in the back bump of the 2nd ch from hook and each ch across. Fasten off and weave in ends.
Strap
ROW 1: With 5mm hook and leaving a 15” tail, ch 165 loosely. Fasten off, leaving a 15” tail.
ROW 2: Leaving a 15” tail, sl st in the back bump of each ch across row. Fasten off, leaving a 15” tail.
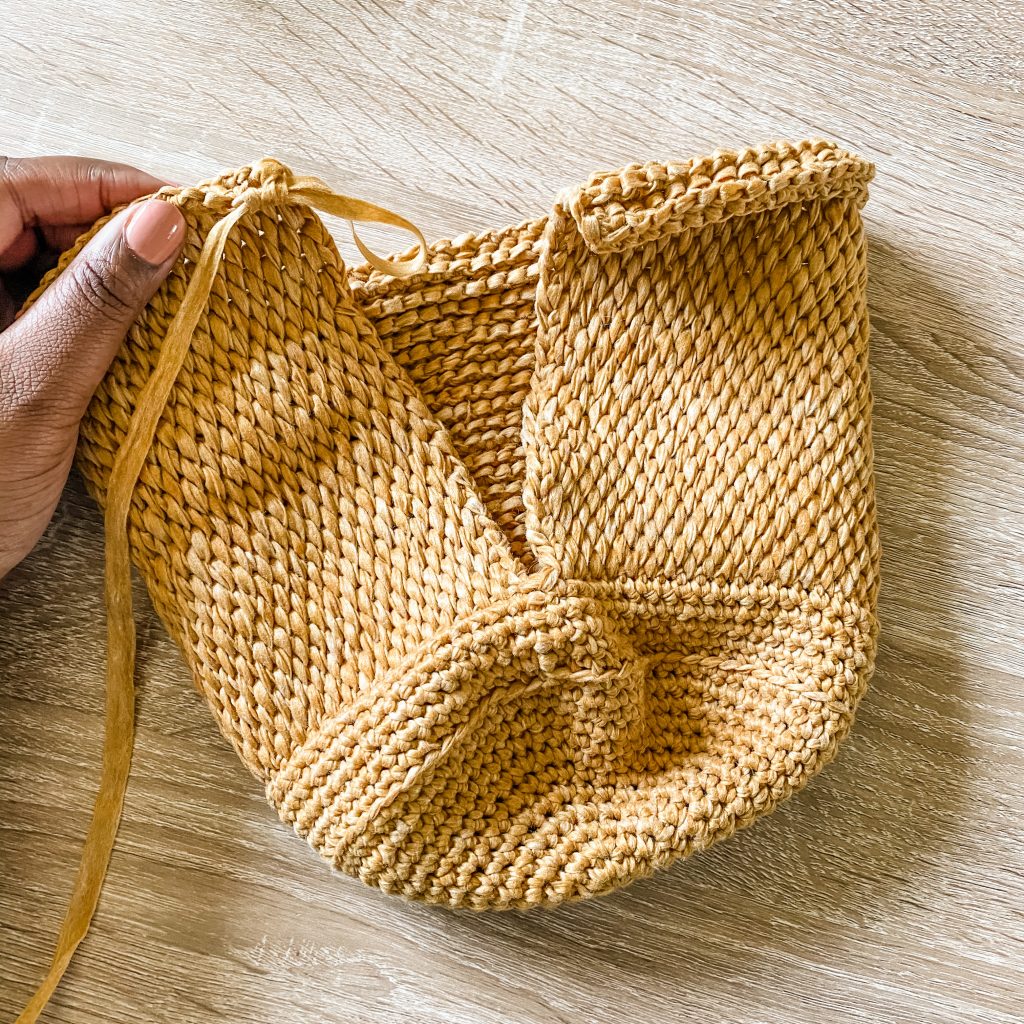
Finishing
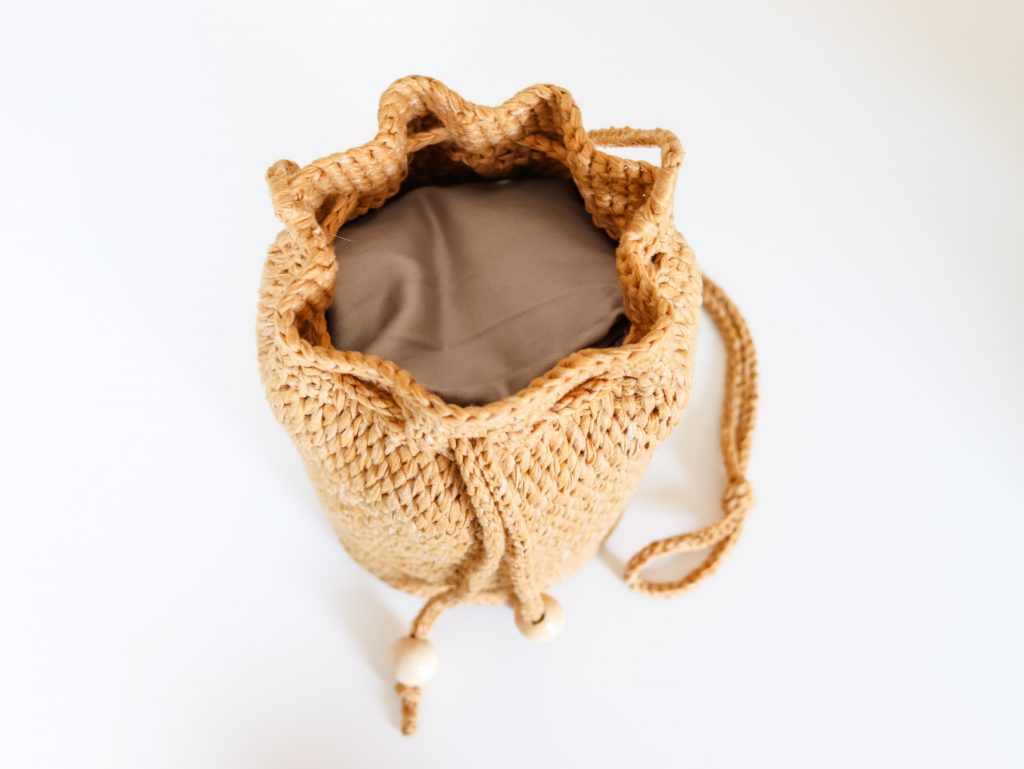
STEP 1: Turn bag inside out. Seam opening at the back of bag closed using a whip stitch.
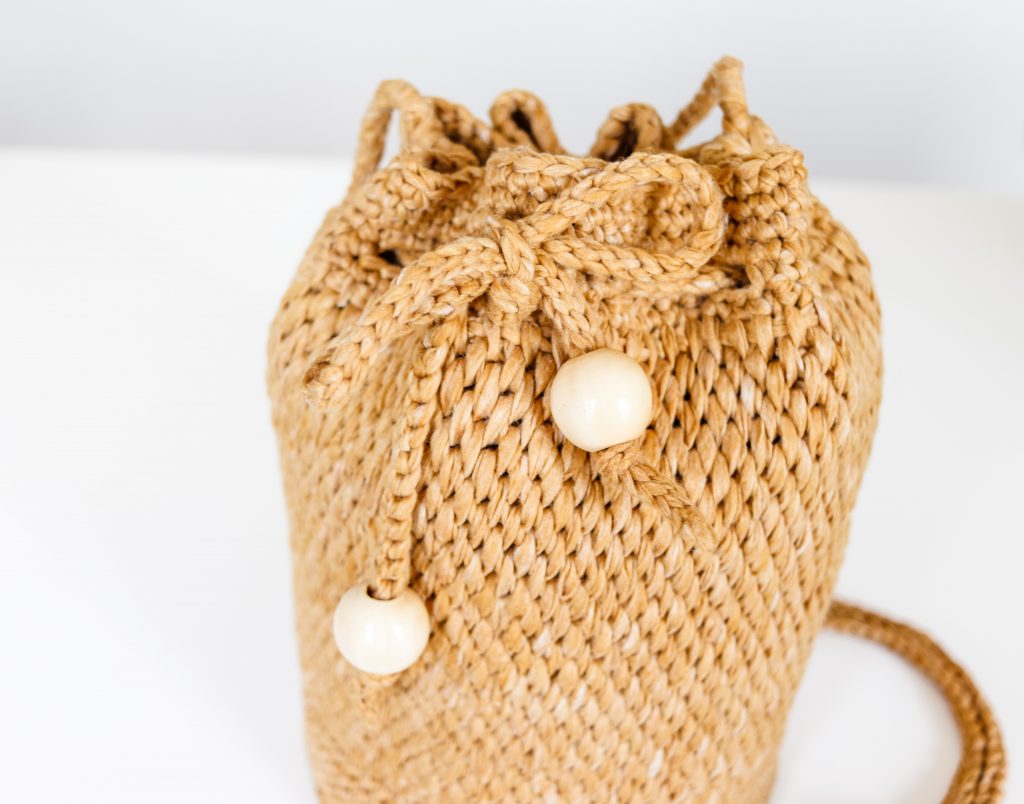
STEP 2: Turn bag right side out. Beginning at the marked space on Round 6, weave the drawstring back and forth through the spaces of the same round. Finish when both ends are sticking out of the marked round at the front of the bag. Remove marker.
STEP 3 (OPTIONAL): Place large wooden beads near the tips of the drawstring and loosely knot the drawstring at the base of the beads. If you don’t have or don’t want beads, simply knot the tails of the drawstring without the beads.
STEP 4: Now it’s time to attach the strap. This can be a little tricky. Here’s how I did mine.
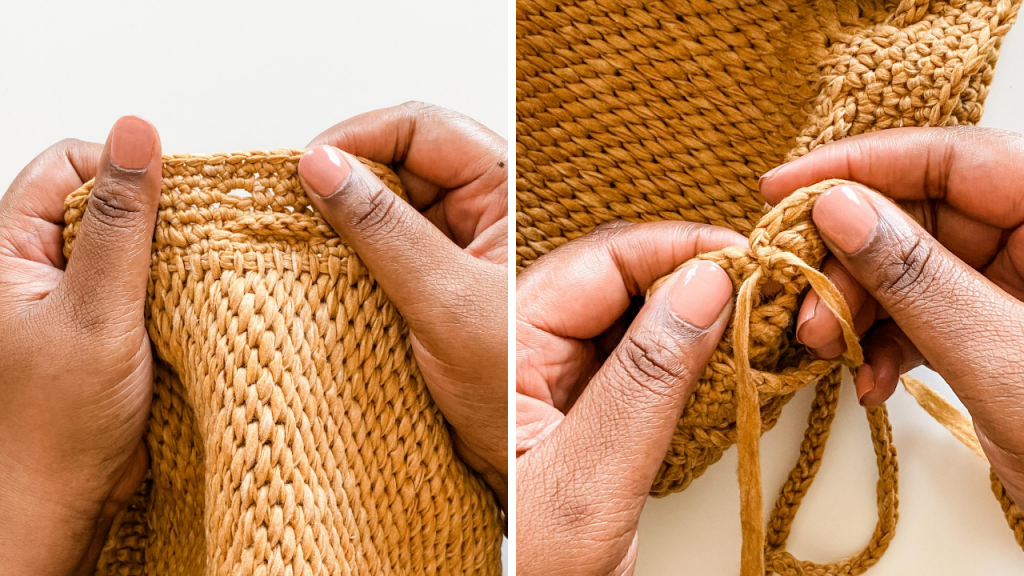
Begin by finding one of the chain spaces on Round 8. Use the tails of the strap to tie an overhand knot around the space on the inside of the bag.
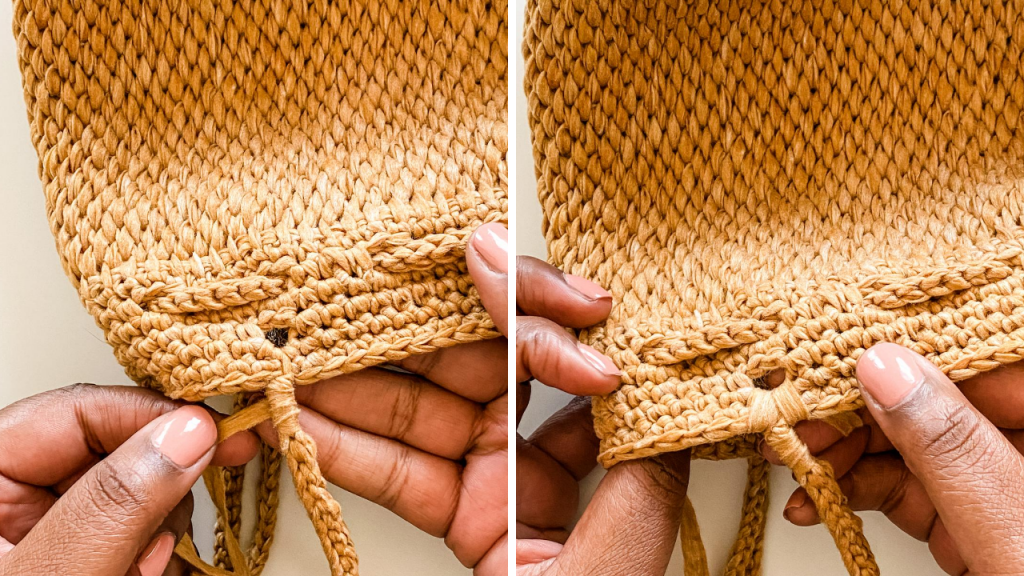
Wrap the tail around the strap for about one inch. Wrap that same tail around the chain space several times on either side of the strap. Overhand knot the tails together on the inside of the bag.
STEP 5: Weave in all remaining ends.
And that’s all, folks! Your Harper Bucket Bag is complete and I’m doing a little happy dance just thinking about it. Special thanks to my friends at Lion Brand for sponsoring and inspiring this project. For more of my collaborations with LB, browse my crochet kits here.
Please take a moment to upload your projects to Ravelry and don’t forget to PIN this pattern to Pinterest so you can share it with friends. I’d love to see your projects on social media – share them on Instagram using the hashtag #HarperBucketBag then head over to the TLYC Makers Facebook group and share it there too!
Ready to crochet your wardrobe? Try these patterns:


This bag is sooo cute. Will definitely get the LB kit. I love your patterns and love watching you on PBS Knit and Crochet Now. Your voice is wonderful and you explain it all so well.
You are too kind! Thanks for picking up the kit. I can’t wait to see how your project turns out 🙂
Hi! I’m looking for a summer shawl in lace with Tunisian crochet.
You might be thinking of the Party Punch Shawl. That pattern releases Friday, October 31st here on the blog 🙂
so far, loving the Harper bag AND the Rewind Yarn! Will be starting the Tunisian stitch in a few more rows – I’m nervous but you do such a great job with your tutorials that I’m hoping my stitch will look as good as yours!
You got this! I’m sure you’ll breeze right through it 🙂
Loving this pattern so far! Quick question, I ended up going up one full hook size ( to a 6mm) for the base to meet gauge. Should I go up one full hook size for the Tunisian part as well?
It’s worth a try. It all depends on your gauge. You’ll be able to tell pretty quickly if it’s not going to work.
Your videos on Tunisian crochet got me into it and I really like it. Thank you! I’m now ready to try this pattern but I have a question: I have a 24″ cord and the next one up is 32″ (knitter’s pride). Do you think a 24″ will be long enough? Should I get the 32″?
Hi! I think it’s a great idea to have both in your collection is you’re able. If you’d like to just get one size, I’d go for the 32″ – it’ll be much more versatile.
Hi Toni,
this is a wonderful pattern, I really love it. As always it’s clear and easy to read and follow and the video tutorial is helpful too.
I tried to make this bag with Hobbii Ribbon Yarn, I think it might be too bulky and heavy but I will finish it now. Just ordered the Lion Brand Yarn which was not too easy to get in Germany. Hope it will arrive soon.
The first two or three rows of Tunisian Full Stitch were a bit tricky to work with the heavy yarn and the big needles (I went up to 6mm normal hook and 7mm tunisian hook) but after a few rows it got easier and now I nearly reached the end of this section.
Have a wonderful day and thank you so much for this wonderful pattern.
Happy crocheting
Kerstin
Thank you so much for this pattern! I always like the look of crochet bags but I worry they need to be lined to be totally functional. This one has such nice tight stitches that isn’t at all a concern. You also inspired me to try Tunisian again!
Good day I love in the Netherlands, we only have bulky yarn like the lion brand or Ice tube on 8 mm is this still a possibility?
Sure, it is. You’ll need to adjust the number of stitches, though, to ensure that your bag doesn’t turn out too big.
Hello! I am loving the pattern so far, but I’m worried that it’s going to be too small for my purpose. I was wondering if I can make this bag bigger around. I’m using Rewind yarn in the color Citronella. Love this yarn, too!!
Making it for a dear friend who needs a little more room in a bag! ❤️
Thank you in advance for your help!
Hi! Of course, you can make it bigger 🙂 Just add more rounds to the beginning circle. The larger that circle, the larger the bag.
I made this using the kit in Hawaiian Ocean and I love it! The blue goes great with denim. I could not have done it without your tutorial!!! Please keep doing what you do so well. The bag is great for running to the store or errands. So cute and unique. Thank you!
Hi!
I was looking for a pattern to recreate a very expensive bag I saw at a retail shop and this bucket purse is very similar. Because the colors I need (brown and orange) are not available in your suggested yarn, I wanted your input on suggestions for any other yarn that could be used for this project, and which will come in my desired colors.
Thank you!
Hi darling! I can’t think of any yarns off the top of my head, but look out for tape yarns, or chainette nylon yarns. These are great for bags because they’re not stretchy. Happy hunting!!