Hexis in Springtime, a free crochet hexagon motif blanket pattern

Add love to every stitch when you crochet Hexis in Springtime, a FREE pattern designed in collaboration with WeCrochet.
My love for motif projects in never ending, especially when they’re baby blankets. There’s just something about taking my time, working each motif, placing them just so, and assembling them into something precious and timeless. Hexis in Springtime is my homage to the crochet hexagon motif and was a joy to make using Brava Worsted, a premium acrylic yarn from WeCrochet.
This post contains affiliate links that support the content on TLYCBlog.com. All opinions are my own. Find my Privacy & Disclosures Policy here.
Pin It Now, Make It Later

Find a printer-friendly version of Hexis in Springtime in my Ravelry Shop and on TLYarnCrafts.com. The PDF version includes 7 easy-to-read pages of instruction as well as schematics without watermarks.
Keep scrolling of the FREE version of Hexis in Springtime!

Not Just Another Hexagon Blanket
If you’re a fan of crochet motifs like me, you know that there are gorgeous hexagon blankets all over the internet. As much as I like those projects, I wasn’t able to find one that really spoke to me. Then I found out what was missing – clean lines.

Hexagons have 6 sides. To make them fit well together, you have to stagger their construction. And, if you don’t make half-hexis for the sides, you’ll have uneven corners and edges. Call me a stickler, but I like a straight line.
When designing Hexis in Springtime, I took the time to create even rows and columns, filling the empty spaces with triangles and diamonds. I was able to achieve a design that looked classic, clean, and easily took on the border I added.

An Heirloom On Any Budget
When it comes to making baby blankets, I believe that the beauty and effort of something handmade will shine regardless of how much you spend on materials. Hexis in Springtime is designed with Brava Worsted, a premium acrylic yarn from WeCrochet. At only $1.99 per ball, you can make Hexis in Springtime for less than $20!
Brava Worsted has a vast collection of colors, over 45 in total. The color combinations for Hexis in Springtime are endless. I went for a combination of peach, mint, and gray. But I could also see this blanket made in a classic soft gray and white combination, rainbow, pastel, or even a modern palette of neutral greens and golds. Let your creativity lead you to the perfect palette.
Check out the full collection of Brava Worsted on the WeCrochet website!
Click Here To Pin This Post

If you’re ready to start making Hexis in Springtime, keep scrolling for the free version. Or, find the printable PDF on TLYarnCrafts.com and Ravelry.
Click here to get the Hexis in Springtime PDF on Ravelry!
Click here to explore even more FREE crochet patterns on TLYCBlog.com!

Hexis In Springtime Details
MATERIALS:
- WeCrochet Brava Worsted or other comparable worsted weight yarn. Sample made with 3 balls Dove Heather (MC), 1 ball Seashell (CA), 2 balls Tranquil (CB), and 3 balls Mint (CC).
- 5mm crochet hook. Find my favorite crochet hook set here!
- Scissors
- Tapestry needle

FINISHED SIZE:
41.5″ long x 35″ wide
GAUGE:
One hexagon, measures from one ch-2 space, across the center, to the opposite chain-2 space, measures 6.25″
ABBREVIATIONS:
Cam = camel stitch (hdc in 3rd loop of next hdc)
Ch = chain
Dc = double crochet
Hdc = half double crochet
RS = right side
Sl st = slip stitch
Sp = space
St(s) = stitches
Tch = turning chain
Tr = treble crochet
WS = wrong side
MAKING YOUR BLANKET:
Step 1: Make all motifs using the instructions below along with the schematic and table.
Step 2: Seam all motifs together using the schematic on Page 6, using MC to create a whip stitch seam worked through the back loops only. Ensure the right side of all motifs are facing up.
Step 3: Weave in all ends.
Step 4: Complete Border Section.
Step 5: Complete Finishing Section.

Hexis In Springtime Pattern
Schematic & Table
Use this schematic and table to make the correct number and color of motifs in the blanket.


Motif A (Hexagon)
ROUND 1 (RS): With accent color, ch 4 (counts as center ring + dc), [dc 1, ch 2 (dc 2, ch 2) five times] in 4th ch from hook, join with sl st in top of tch. DO NOT TURN.
ROUND 2: Ch 2 (counts as first dc here and throughout motif), dc in next st, (dc, ch 2, dc) in ch-2 sp, [dc in each of the next 2 sts, (dc, ch 2, dc) in ch-2 sp] five times, sl st in top of tch.
ROUND 3: Ch 2, [dc in next st and each st to ch-2 sp, (dc, ch 2, dc) in ch-2 sp] six times, dc in each remaining st to tch, sl st in top of tch.
ROUND 4: Rep Round 3. Change to MC.
ROW 5: Rep Round 3. Fasten off.
Motif B (Diamond)
ROUND 1 (RS): With accent color, ch 5 (counts as center ring + tr), [tr 1, dc 3, ch 1, dc 3, tr 2, ch 2, tr 2, dc 3, ch 1, dc 3, tr 2, ch 2] in 5th ch from hook, join with sl st in top of tch. DO NOT TURN.
ROUND 2: Ch 2 (counts as first dc here and throughout motif), [dc in each st to ch-1 sp, (dc, ch 2, dc) in ch-1 sp, dc in each st to ch-2 sp, (dc 2, ch 2, dc 2) in ch-2 sp] two times, join in top of tch. Change to MC.
ROUND 3: Ch 2, [dc in each st to ch-2 sp, (dc, ch 2, dc) in ch-2 sp] four times, dc in each remaining st to tch, sl st in top of tch. Fasten off.

Motif C (Triangle #1)
ROUND 1 (RS): With accent color, ch 6 (counts as center ring + tr + ch 1), (tr 2, dc 3, ch 1, dc 3, tr 2, ch 1, tr 1) in 6th ch from hook, turn.
ROUND 2 (WS): Ch 4 (counts as dc + ch 1 here and throughout motif), dc 2 in ch-1 sp, dc in each st to next ch-1 sp, (dc 2, ch 2, dc 2) in ch-1 sp, dc in each st to tch, dc 2 in tch sp, ch 1, dc in 5th ch of tch, turn. Change to MC.
ROUND 3: Ch 4, dc in ch-1 sp, dc in each st to ch-2 sp, (dc 1, ch 2, dc 1) in ch-2 sp, dc in each st to tch, dc in tch sp, ch 1, dc in 3rd ch of tch. Fasten off.
Motif D (Triangle #2)
ROUND 1 (RS): With accent color, ch 5 (counts as center ring + dc + ch 1), (dc 3, tr 2, ch 2, tr 2, dc 3, ch 1, dc) in 5th ch from hook, turn.
ROUND 2 (WS): Ch 4 (counts as dc + ch 1 here and throughout motif), dc in ch-1 sp, dc in each st to ch-2 sp, (dc 2, ch 2, dc 2) in ch-2 sp, dc in each st to tch, dc in tch sp, ch 1, dc in 4th ch of tch, turn. Change to MC.
ROUND 3: Ch 4, dc in ch-1 sp, dc in each st to ch-2 sp, (dc 1, ch 2, dc 1) in ch-2 sp, dc in each st to tch, dc in tch sp, ch 1, dc in 3rd ch of tch. Fasten off.

Border
CROCHETING EVENLY ALONG EDGES: Where instructed, “hdc evenly along edge” means the following:
- Place 1 st in each dc
- Place 1 st in each ch-sp
- Place 1 st in the center ring of each triangle
- Place 2 sts in the side of each dc
- Place 3 sts in the side of each tr
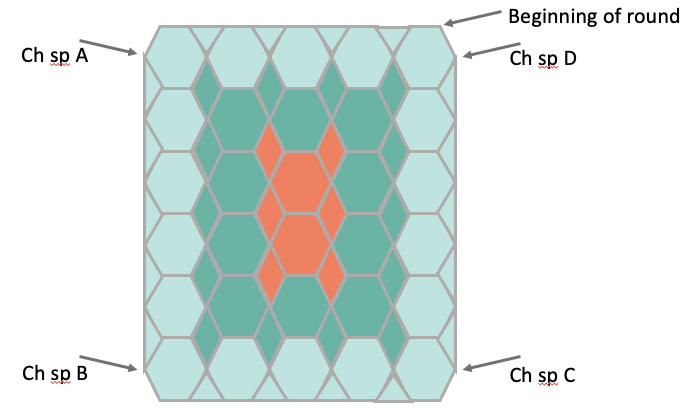
ROUND 1 (RS): With right side facing up and MC, join with a sl st in dc left of marked ch-2 sp as shown in the photo below.

Ch 1, hdc in same st, hdc evenly along top edge to next ch-2 sp, (hdc 1, ch 2, hdc 1) in ch-2 sp, hdc in each dc to ch-sp A (shown below), hdc in ch-sp A, ch 1, hdc evenly along left edge to ch-sp B, ch 1, hdc in ch-sp B, hdc in each dc to ch-2 sp, (hdc 1, ch 2, hdc 1) in ch-2 sp, hdc evenly along bottom edge to next ch-2 sp, (hdc 1, ch 2, hdc 1) in ch-2 sp, hdc in each dc to ch-sp C, hdc in ch-sp C, ch 1, hdc evenly along right edge to ch-sp D, ch 1, hdc in ch-sp D, hdc in each dc to next ch-2 sp, (hdc 1, ch 2, hdc 1) in ch-2 sp, join with sl st in first hdc of round. DO NOT TURN.
ROUND 2: Ch 1, cam in each hdc around, maintaining pattern for all ch-1 and ch-2 sps. After last ch-2 sp, cam next hdc, join with sl st in first hdc of round.
ROUND 3: With CA, ch 1, cam in each hdc around, maintaining pattern for all ch-1 and ch-2 sps. After last ch-2 sp, cam in each hdc to first hdc of round, join with sl st in first hdc of round.
ROUNDS 4-6: Repeat Round 3 with the following color sequence:
- Round 4: CB
- Round 5: CC
- Round 6: MC
Fasten off after last round.
Finishing
- Weave in all remaining ends.
- Steam block to finished dimensions, minding the final shape as shown in the schematic above.

We did it, friends! I really hope you enjoyed making Hexis in Springtime as much as I did. It’s a labor of love, but well worth the effort. Special thanks to my friends at WeCrochet for sponsoring and inspiring this project. Find more of my collaboration projects with WeCrochet by clicking here.
Please take a moment to upload your projects to Ravelry and don’t forget to PIN this pattern to Pinterest so you can share it with friends. I’d love to see your projects too – share them on Instagram with the hashtag #TLYCMakers, then head over to the TLYCMakers Facebook group and share it there too!
Looking for more crochet baby blankets from TLYC? Try these FREE patterns:

Sweet Granny Baby Blanket // Sweet Gingham Baby Blanket // Bias Tunisian Baby Blanket


This is such a beautiful pattern! I plan on making one for my new Grand niece. I was wondering if it was possible to make it bigger? My son really likes the design. I have followed you for several years now and I have never been disappointed!