How to Crochet the Tunisian Crochet Honeycomb Stitch – VIDEO TUTORIAL

Beautiful and simple, the Tunisian Honeycomb Stitch is sure to become one of favorites.
This post contains affiliate links that support the content on TLYCBlog.com. All opinions are my own. Find my Privacy & Disclosures Policy here.
CLICK TO PIN THIS POST
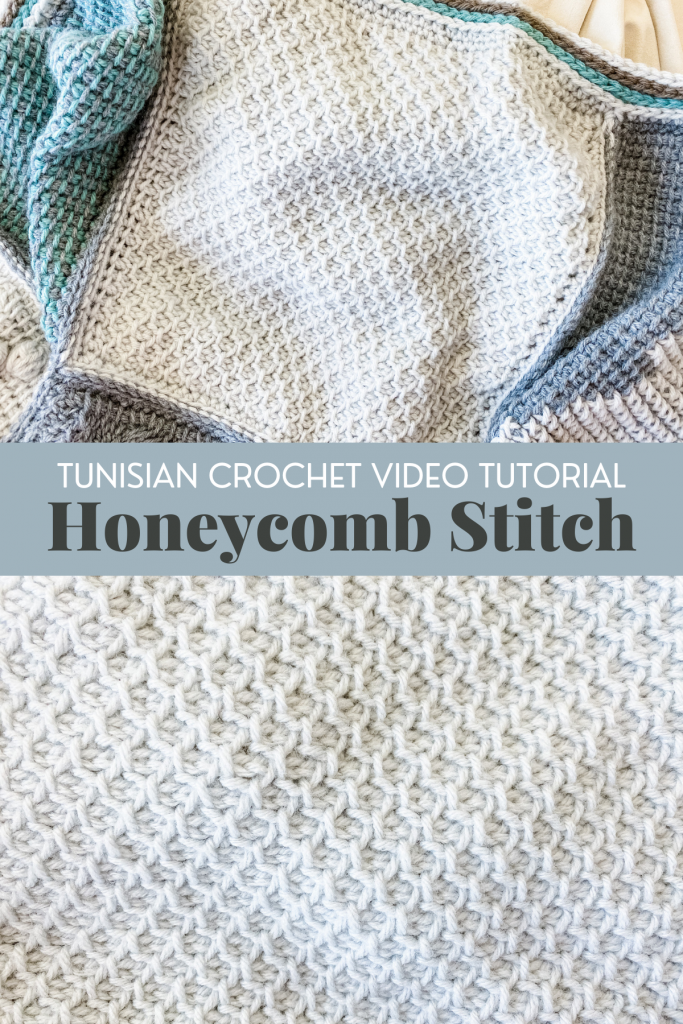
If I had to pick one Tunisian crochet stitch to use forever on a desert island, it would have to be the Honeycomb stitch. The texture of this basic stitch pattern is the entire reason I pushed myself to really get into Tunisian crochet. I’ve never seen a stitch that looked like this in traditional crochet or even knitting. And the best part? This stitch doesn’t curl! It’s about time you tried the Honeycomb Stitch!
The Honeycomb Stitch combines Tunisian simple stitch and purl stitch for a beautifully textured fabric. The force of these stitches pulling in the opposite direction means this stitch lays flat and doesn’t suffer from the curling you’ll see in most Tunisian crochet stitches.
It’s time to learn the Tunisian Crochet Honeycomb Stitch! Grab your crochet hooks and watch this video:
Learn even more Tunisian crochet with these helpful videos:
- Tunisian Crochet for Absolute Beginners [watch here]
- How to Choose and Use Tunisian Crochet Hooks [watch here]
- 5 More Tunisian Crochet Stitches to Try [watch here]
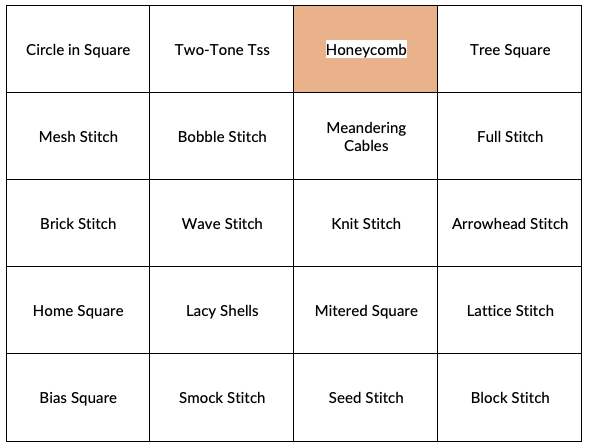
Holiday Tunisian Sampler Blanket – Honeycomb Stitch Square Pattern
This tutorial was made as a supplement to the Honeycomb Stitch Square as part of the Tunisian Holiday Sampler Blanket. Find the full pattern to make your square below.

Join the Holiday TCAL 2020 event! This free crochet along to make the Tunisian Holiday Sampler Blanket runs from October to November 2020. Get full details in this blog post and join the fun!
Honeycomb Stitch Square Pattern
*Get the printable PDF version of the Tunisian Holiday Sampler Blanket pattern HERE.
MATERIALS
- Worsted weight yarn – color C
- 6.5mm Tunisian crochet hook with 16″ cord
- 6mm crochet hook
- Scissors
- Tapestry needle
FINISHED SIZE
12 x 12 inches square after blocking
GAUGE
The gauge varies for each square of the Tunisian Holiday Sampler Blanket. Reference the starting chain stitch multiple to make adjustments to your square. All squares should measure about 11.5″ square before the border is added.
ABBREVIATIONS
- 2sc = 2 single crochet in the same stitch (increase made)
- Ch(s) = chain(s)
- Lts = last Tunisian stitch (see Special Stitches below)
- Rep = repeat
- RetP = return pass
- Sc = single crochet
- Sc2tog = single crochet 2 together (decrease made)
- Sk = skip
- St(s) = stitch(es)
- Tps = Tunisian purl stitch
- Tss = Tunisian simple stitch
- Yo = yarn over
SPECIAL STITCHES
- Last Tunisian Stitch (Lts) – insert hook under BOTH vertical bars of the last stitch and complete as for Tunisian simple stitch
- Return Pass (RetP) – ch 1, (yo, pull through the next 2 loops) until only one loop remains on the hook
STITCH MULTIPLE
Work the Honeycomb Stitch over any even number of stitches.
BORDER NOTES
To ensure that all squares of the Tunisian Holiday Sampler Blanket will join evenly, apply the Standard Border. All squares need to have 35 single crochet stitches on each size. This means you will have to increase the number of edge stitches in some cases, and decrease the number of edge stitches in other places.
- To increase the number of stitches along an edge, evenly place 2sc increases along the edge where needed.
- To decrease the number of stitches along an edge, evenly place sc2tog decreases along the edge where needed.
INSTRUCTIONS
ROW 1: With C and 6.5mm corded hook, ch 40, pull up a loop in the back bump of the 2nd ch from hook and each remaining ch, RetP.
ROW 2: *Tss, tps; rep from * across to last st, Lts, RetP.
ROW 3: *Tps, tss; rep from * across to last st, Lts, RetP.
Rep Rows 2 and 3 until square measures 11.5” tall. My square had 31 total rows.
Slip stitch loosely in each vertical bar across the last row to bind off. Continue to the Standard Border.
STANDARD BORDER
- Change to 6mm crochet hook and ensure the square is facing right side up.
- Ch 1 (does not count as a stitch), single crochet 35 stitches evenly across the first edge of the square, placing increases and decreases where needed. At corner, ch 2 and rotate to work along the next edge.
- Single crochet 35 stitches evenly across the edge, placing increases and decreases where needed. At corner, ch 2 and rotate to work along the next edge.
- Repeat Step 3 for the remaining 2 sides. At the end of the round, join with a slip stitch in the first single crochet of the round. Fasten off and block your finished square to 12″ x 12″.
Click HERE to access stitch patterns for the other squares in the Tunisian Holiday Sampler Blanket.
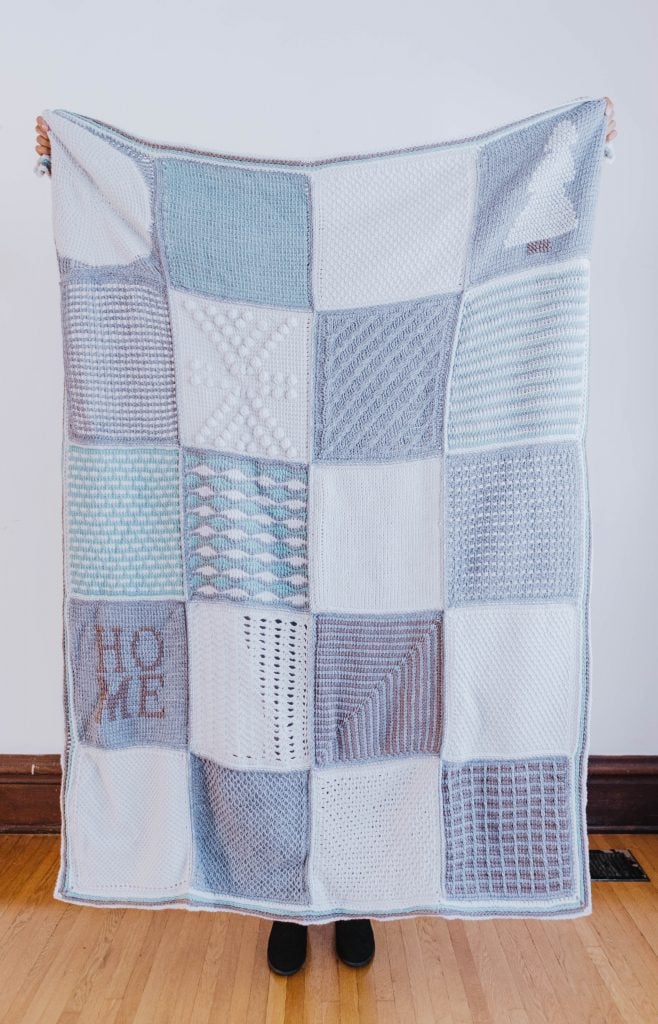
Tunisian Holiday Sampler Blanket Layout
Get the printable PDF version of the Tunisian Holiday Sampler Blanket here.


Toni,
While doing the squares for this blanket, I have come up with a question. Are you able to tell me the reason why sometimes when we do a slip-stitch bind off we start with a chain one and sometimes we do not use the chain one. I have noticed this dichotomy among other makers as well as you. Please reply.
Hi! Starting with a ch-1 for the bind off gives you an additional stitch to work into for your border. This can also be a way to add height to your bind off row if you need it.
So, I combined this pattern with the bias pattern to make textured dishcloths using Caron Cotton Cakes yarn. They provide a great texture and look AMAZING!! To do this, I start with the chain of three, do the three simple stitches. I put a stitch marker in the middle stitch so I know where the bottom corner is for the border. Then for row three, I do the increase, purl, increase, chain, and return. Each row starts with the increase and a purl, ends with a purl and increase and chain. I do this until I have 51 stitches on my needle. I use a stitch marker in both the first and last chains on this row for the border as well. For the first decrease row, I stitch two together (purl and “knit” stitch) and then purl the next one, until the last three stitches, 2 together (last “knit” and purl) and then the last chain. Once I have the last three stitches done, I chain two and work a half-double crochet in each stitch around working three hdc in each corner, except the starting corner. In the starting corner, I do one hdc, chain ten, then another hdc, to create a hanging loop to allow for drying. Work hdc all the way back to the starting chain two and slip stitch it to the last triple hdc in the last corner. They look beautiful.
I absolutely loved the video tutorial on the Tunisian Honeycomb Stitch! The step-by-step instructions made it so easy to follow along, and the final result looks stunning. Can’t wait to try this out on my next project – thank you for sharing!