3 Easy Ways to Add Yarn to Your Crochet Project
")
Did you run out of yarn in your crochet project, and you need to add a new skein? Or, maybe you want to jazz up your project with some playful stripes. Read this post to learn how to add yarn to your crochet projects in any scenario.
This post contains affiliate links that support the content on TLYCBlog.com. All opinions are my own. Find my Privacy & Disclosures Policy here.

Click To Pin This Post
Reasons to Add Yarn to A Crochet Project
There are multiple reasons why you would want to add yarn to your crochet project. Perhaps you were stitching along and came to the end of the skein. You now need to add a new skein of yarn to continue your project.
You may want to change color in your project. Color change techniques like intarsia and stranded colorwork involve changing color in the middle of the row. Or, if you want to create stripes, you will change color at the start of the row.
One reason I add yarn to my crochet projects is to deal with knots in the yarn. Manufacturing yarn can result in breaks, and factories will often knot the yarn together to continue making the skein. I never trust manufacturers’ knots and always cut them out before continuing with my project.
How To Add Yarn to A Crochet Project
Option 1: Magic Knot
The magic knot is one of many knot techniques that crocheters use. It leaves a barely perceptible and secure knot. You can use this technique to add a new ball of yarn to your project when you run out, or knot different colors together to make a Magic Ball to use up scraps.
The main drawback to the Magic Knot is that it doesn’t work for every type of yarn. Slippery yarns like alpaca and silk may work their way out of the knot, so I recommend Option 2 for those types of yarns. Heartier yarns like wool and acrylic work perfectly in this application.
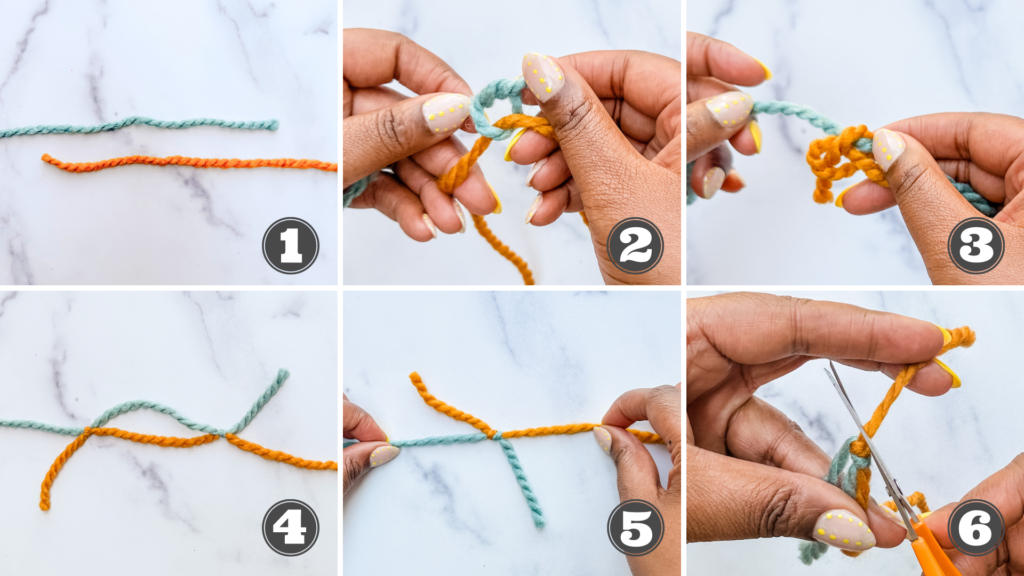
- 1: Lay your yarns as shown. This application is typically used to attach the same color to a project, but I’m using two different colors for this demonstration.
- 2: Tie an overhand knot with Color A (aqua). Pull the knot tight over Color B (gold).
- 3: Tie an overhand knot with Color B. Pull the knot tight over Color A.
- 4: This is how the yarns look after tying both knots.
- 5. Grab each strand – the one from the new skein and the one from the project – and pull. The knots will travel down the yarn and meet in the middle. Pull all four strands tight – this is what secures the knot.
- 6. Snip the tails close to the knot. I like to tug the knot a bit more to make sure the knot is secure.
Here’s what the final knot looks like. It is very small, and you can barely see the knot when joining the same yarn. From here, you can continue to crochet over the knot.
If you’d like a closer look at the Magic Knot, check out this tutorial video from one of my favorite crochet instructors, Sarah-Jayne of Bella Coco Crochet.

Option 2: Changing Color
This method involves adding a new ball of yarn like you would change color in your project. To complete this method, proceed to the stitch where you want to change color. Work the stitch until the last step, then complete the stitch with the new color. Continue stitching with the new yarn and remember to deal with the remaining yarn ends later.
One drawback to this method is that it leaves you with two yarn tails – one from the old yarn, and one from the new yarn. To solve this problem, simply crochet over the yarn tails, effectively hiding them within the fabric of stitches.
Toni’s Notes: This is my favorite way to add yarn to a crochet project. Failing knots is one of my biggest crochet fears, and this method ensures that none of my ends will work their way out of the project.
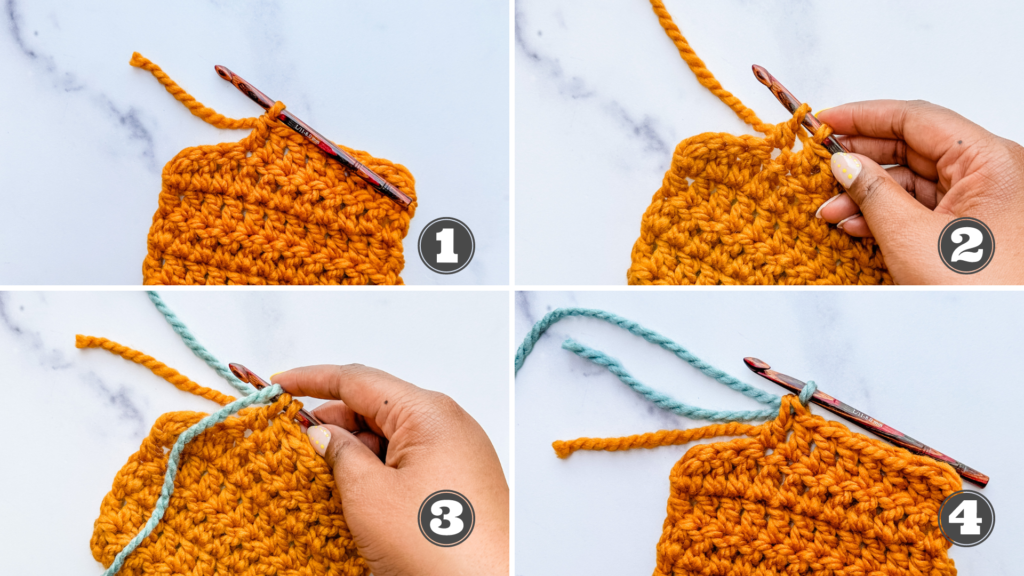
- I’ve reached the last stitch I can make with my yarn. Drop the hook and remove the last stitch made.
- Work the stitch until the last step. In this case, I am working double crochet stitches, so I will complete my stitch until there are 2 loops left on the hook.
- Yarn over the hook with the new yarn, leaving a tail long enough to weave in later.
- Pull through the loops on the hook with the new yarn. You’ve now completed the stitch in the old yarn and set yourself up to make the next stitch with the new yarn.
Option 3: Standing Stitch
The standing stitch is a great way to add yarn at the beginning of a row. It’s ideal when creating stripes or moving into a new color block. I like using a standing stitch instead of turning chains. Standing stitches look like, well, stitches. They blend into the fabric better than chains do.
The main drawback here is that you can only use standing stitches at the beginning of a row. Standing stitches do not attach to the previous stitch, so they will be out of place in the middle of a row.
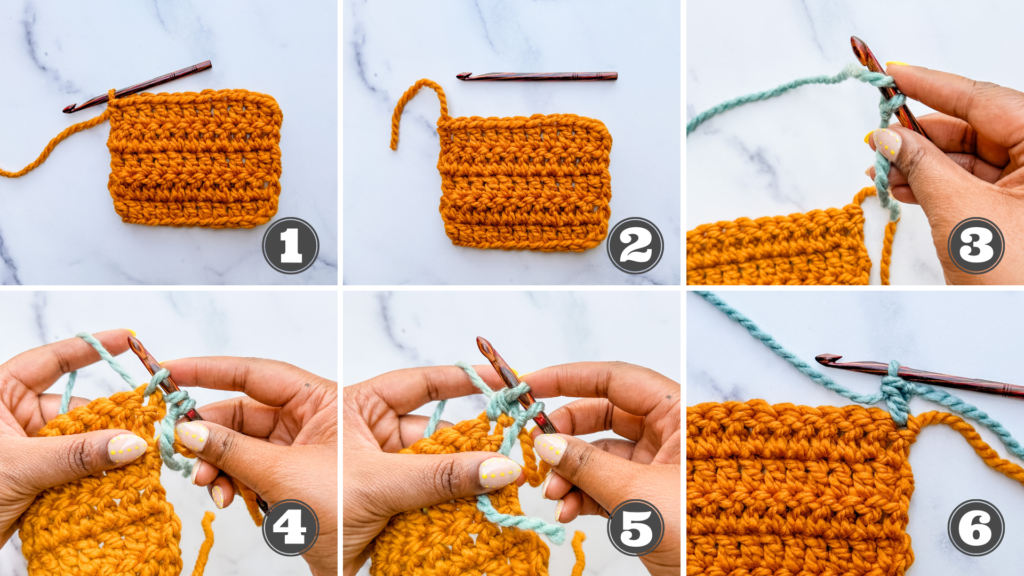
- I’ve reached the end of my row and I want to use my new color for the next row.
- Start by fastening off the old color and pulling the loop out of the work. Turn the work.
- Make a slipknot with the new yarn and place it on your hook. I’m making a double crochet, so I need to start with a yarn over.
- Pull up a loop in the first stitch of the row. It helps to hold onto the loops on the hook to keep everything in place.
- Next, I’ll complete the double crochet as normal.
- I am now set up to complete my row with my new yarn. The standing stitch looks exactly like a double crochet!
If you’d like a closer look at standing stitches, check out my video tutorial HERE.
I hope this article has shown you just how easy it is to add yarn to any crochet project, allowing you to unlock your creativity and imagination. Give each method a try to decide which you like best!
Did I miss a method that you prefer? Head to the comments and let me know your favorite way to add yarn to a crochet project.


Thank you so much for teaching & sharing.