Crochet Finishing: Don’t Skip These 3 Steps
")
You finally finished your crochet project—congrats! But before you dive right into using it, there’s one last (and very important) step: finishing. Crochet finishing refers to the steps you take between the final stitch and actually putting your project to use. These three finishing steps will help preserve all your hard work and ensure your piece stands the test of time. As tempting as it is to skip ahead, don’t miss this step—it makes all the difference!
This post contains affiliate links that support the content on TLYCBlog.com. All opinions are my own. Find my Privacy & Disclosures Policy here.
CLICK HERE TO PIN THIS POST

I’m going to shoot straight with you – finishing is every crocheter’s least favorite part of the process. Crochet finishing can be tedious, time-consuming, and some steps might seem pointless. But I can assure you, every tip I offer in this post works toward taking your project from done to polished and complete. Make time for finishing your projects so you can have a piece that you are truly proud of.
Step 1: Fastening Off

Fastening off is a fancy term in crochet finishing for disconnecting your project from the ball of yarn. You do this by measuring out a length of yarn, about 6″ or so, then cutting the yarn that is attached to your project. Finally, lift the live loop until the yarn end pops out of your work. You can then move onto Step 2.
There is some debate about whether to knot the yarn before fastening off. I find that you don’t need to knot the yarn most of the time and it’s not a practice that I’m in the habit of. But it can help if you use a slippery yarn or just want an added level of security in your crochet. After finishing your last stitch, chain 1. Then fasten off and lift the live loop up and out of your work. Gently tug the tail to tighten the knot. You can then move on to Step 2.
It is important to leave a long tail before you head into Step 2. If your tail is too short, it will be hard to weave in your ends. Short ends can pop out of your work, or even worse, loosen and ruin your stitches. Pro Tip: If you’re not sure how long of a tail to leave when fastening off, always leave more than you think you need. It’s easier to weave in an end that’s too long than one that is too short.
Step 2: Weaving In Ends
After you complete Step 1 of Finishing, you will have 2 or more ends that need to be woven into your work. Ends are the loose yarn tails, usually found at the start and end of your work. If you’ve added multiple balls of yarn or have multiple color changes, you might have more than 2 ends to weave in once your project is done. For a seamless finish, weave ends into their like color.
The goal of weaving in ends in crochet finishing is twofold: (1) make sure the ends are secure and don’t work their way out of the project and, (2) make sure the ends are hidden so they are not obvious to the naked eye when wearing or using the crocheted piece. You can’t overdo it when weaving in ends, but you can underdo it. Take your time and make sure the ends are truly secure.

Every crocheter has their own way of weaving in ends. Here’s my preferred method for securing the ends:
- Turn your work so you are looking at the back, or the “wrong side” of the project.
- Thread the yarn tail onto a metal tapestry needle.
- Find the base of a row of stitches near the yarn end. Thread the tapestry needle through the loops at the base of several stitches in one direction.
- Prepare to work under the same loops in the opposite direction. Skip the very first loop, and thread the tapestry needle through the loops after it.
- Snip off any remaining yarn close to the project, being careful not to cut the project itself.
- Massage the stitches to further hide the yarn end.
If you are working with a slippery yarn, thread your yarn under as many stitches as you need to feel secure. Simply move to the row of stitches above or below the row you just worked into and repeat these steps with the same yarn end.

Step 3: Blocking
Once you’ve fastened off and your ends are secured, it’s time to block. Crocheters will debate the need for blocking until the cows come home. In my studio, blocking is 100% necessary for crochet finishing. Items like amigurumi (crochet dolls), baskets, and rugs may not need to be blocked. But blankets, wearables, motifs, and accessories should be.
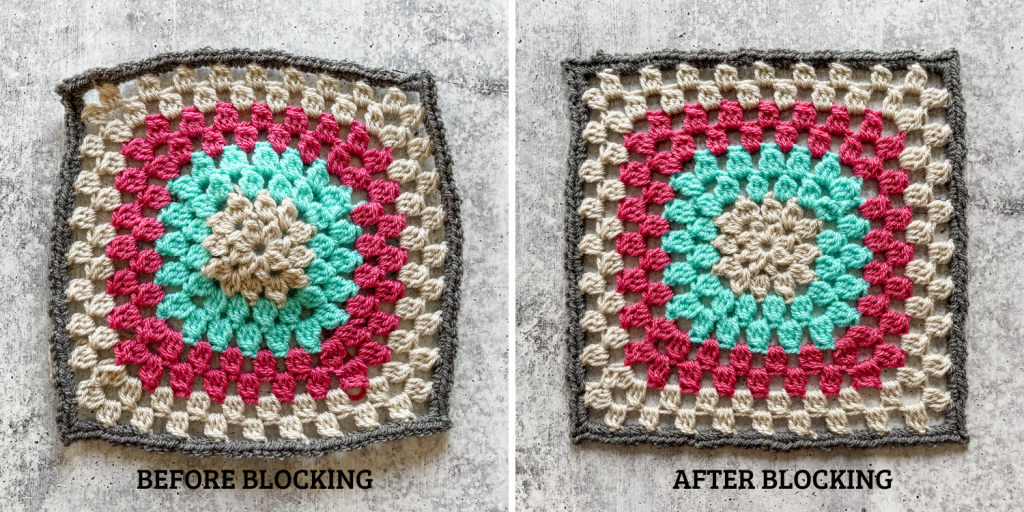
What is blocking? Blocking is the process of introducing water, shaping, and dry time to your crochet projects.
What does blocking do? Blocking achieves the following:
- Restore your fibers to their intended glory. Blocking allows fibers to expand into their natural shape, reintroducing some of the bounce and softness they might lose in the stitching process.
- Clean the fibers. Dirt, oil, and odor may have come in contact with your project while it was in progress. Add a small amount of no-rinse soap to your blocking process to thoroughly clean your makes and add a pleasant scent.
- Aid in shaping. Introducing moisture (and sometimes heat) to your project makes it more pliable, thus making it easy to manipulate it into the shape you want. This is helpful for lace projects and items that need to be coaxed into a particular shape.
- Softens and conditions crochet fabric. If you’re looking for next-to-skin softness, blocking is the way to go. Yarn manufacturing can make fibers rough and irritating. Blocking can loosen or remove any irritants that are covering up the softness of your crochet fabric.
How does blocking work? Blocking has three components: water, shaping, and drying. If you do these three things, you are indeed blocking. You can use different methods and even complete these steps in a different order. Your preferred methods will change based on project type, fiber, and desired outcome. With so many variables, there’s no cut-and-dry answer for how to block your specific project. Use the info below and go with your gut.

What supplies do I need for blocking? It’s a good idea to have the following items on hand so you can be prepared to block any project, anytime.
- Blocking pins are used to hold your project in place while it is drying. Look for rust-proof sewing pins or T-pins. For more efficient blocking, grab a set of Knit Blockers, which allow you to place multiple pins in one easy motion.
- Blocking mats or blocking boards are interlocking foam mats that you pin your project to. The foam receives the pins well, but it won’t take on unnecessary moisture, allowing your project to dry quickly. You can use dedicated blocking mats or look for kid’s playroom mats instead.
- Blocking wires (not shown) are thin metal wires that are extremely helpful for blocking projects with long edges. Weave these flexible wires along the length of the edge, then pin the project in place. You’ll use less pins and get a straighter edge with blocking wires.
- A spray bottle is helpful for spray blocking. You can control the direction and amount of moisture you are adding to your project without oversaturating it.
- A garment steamer is a crocheter’s best friend. Steaming is my preferred method for crochet blocking and a garment steamer makes the process quick and painless. Look for a steamer that can be tilted downward without leaking (like THIS ONE!).
- No-rinse soap like Eucalan or Soak helps to clean and refresh the yarn. Soap is not always necessary, but it’s a nice touch and aids in softening the finished project.
- Keep a towel close. I have a dedicated bath sheet that I like to use for blocking. It’s not pretty, but it gets the job done and is very absorbent.
- A fan can help speed up the drying process if you’re in a pinch or if your project is taking longer to dry than expected.
Spray Blocking
Spray blocking is the least aggressive form of blocking, and it’s a great place to start if you’ve never tried blocking before. When spray blocking, you introduce moisture gradually, making the stitches more pliable without over-stretching them. Spray blocking cuts down on dry time and is useful for projects that require minimal manipulation. I’ve found this form of blocking most agreeable with animal fibers.
- Fill a spray bottle with lukewarm water. Optional: Add a touch of no-rinse soap to the bottle for added for freshness.
- Spray the project on all sides until it is damp to the touch.
- Pin the project to blocking boards using rust-proof pins. Pay close attention to any straight edges and avoid peaks in your work. Add more pins as necessary and/or use blocking wires.
- Allow the project to dry thoroughly before unpinning it from the mats.
Steam Blocking
Steam blocking is a middle-of-the-road method that works for just about any project and fiber. If I were Goldilocks, this would be my “just right” crochet finishing method. Steaming introduces heat AND moisture to your projects, further aiding in refreshing the fabric and relaxing the stitches. It makes stitches pliable, but not too pliable, and it has a pretty short dry time depending on the fiber. Steaming works for animal- and plant-based fibers, and it works especially well to soften and shape acrylic fibers.
- While still dry, pin the project to blocking boards using rust-proof pins. Pay close attention to any edges and avoid peaks in your work. Add more pins as needed and/or use blocking wires.
- Fill your garment steamer with water. Let it heat up. If your garment steamer has settings, adjust it to meet the needs of the fiber you are blocking. DO NOT add no-rinse soap to your garment steamer. Optional: You can use a steam iron instead of a garment steamer. Just be careful not to let the hot plate come in contact with your crochet fabric.
- Apply steam to your pinned project, working slowly and allowing the fabric to become damp to the touch. Pay close attention to seams and edges to ensure they are crisp and straight. Refill the steamer as needed for large projects.
- Allow the project to dry thoroughly before unpinning it from the mats.
Wet Blocking
Wet blocking is the most aggressive form of blocking, but don’t let that scare you. If your fiber can handle it, wet blocking is the most effective way to reveal drape and softness in your crochet fabric. Wet blocking involves submerging your fabric in water to let the individual stitches soak thoroughly.
Consider wet blocking for projects no larger than a pullover sweater (baby blankets would be a yes, but throw size blankets would be a no – go with steam instead). Wet blocking is effective for animal and plant fibers, but not on acrylic (this is largely debated in the crochet community, but in my experience, the plastic in acrylic will snap back into shape after wet blocking, making it ineffective). Wet blocking works well for small stitches like single crochet, but can overstretch tall stitches. Overstretched stitches are great for achieving drape, if that’s what you’re going for. Finally, wet blocking is excellent for opening lace and mesh stitches.
Keep in mind that wet blocking can be a little unpredictable. If you only need a little bit of stretch and drape, fold your project before adding it to the water and keep it folded until you stretch it onto the blocking mats. You can also wet block AFTER you’ve tried other methods, but it is nearly impossible to go back.
- Fill a sink or bowl with warm (not hot!) water. Optional: Add a touch of no-rinse soap to the basin for added for freshness.
- Add your project to the water, pressing gently to coax water into all of your stitches. You may see tiny air bubbles float to the surface. This means that water is displacing the air, thoroughly soaking your stitches.
- Leave the project to soak in the water for at least 20 minutes but no longer than a few hours.
- Lift your project out of the water and gently press out the excess water. Be careful not to wring or twist the fabric – this can permanently distort your stitches.
- Place your project onto a towel. Roll the towel around the project and gently press out more excess water. I like to do this by setting the rolled towel on the floor and stepping on it.
- Arrange your blocking boards to the desired size.
- Lay your project onto the blocking boards and pin it into place with rust-proof pins or Knit Blockers. Be sure to lay seams flat so you don’t have any unexpected creases in your blocked work.
- Allow the project to dry thoroughly before unpinning it from the mats.
Crochet Finishing Q&A
Is crochet blocking permanent?
Short answer: It depends. Yarn fibers have “memory”, which means some fibers will bounce back to their original shape if not blocked aggressively enough.
Plant fibers (cotton, linen, bamboo) have low memory, which is excellent for drape.
Animal fibers (like wool and alpaca) have more memory, which means they can stand up to blocking and hold shape better—though alpaca tends to drape more and bounce back less than wool.
Acrylic yarn has the highest memory and benefits from steam blocking. (just be careful—too much steam can permanently ‘kill’ acrylic).
Do I need to block my crochet blanket?
If you want it to look pretty and crisp, 100% YES. No matter what you make your blanket from, it will benefit from some form of blocking. Blocking will add drape, softness, and shape to your blanket. Add a little wool wash to your spray bottle for a clean scent, or lightly mist it with watered-down perfume.
Why does my crochet curl at the corners?
Crochet curls at the corners because of tension. Tension is a natural part of the crochet process and can result in some corners of your work curling toward you or away from you. Don’t dwell on changing your crocheting style too much to correct curling. Instead, plan to block your project as part of crochet finishing. Blocking will address the curling as well as the fabric drape, softness, and freshness.
Can you block crochet with just water?
Absolutely! You can spray block, steam block, and wet block with just water. Adding heat or no-rinse soap to the process has some added benefits, but they’re not always necessary.
How can you block without blocking mats?
If you don’t have blocking mats, lay towels on top of a thick quilt or blanket. Pin your wet blocked project to the towels, or pin down the project you plan to spray/steam block. Complete the blocking process and let the project dry thoroughly. This method won’t have as much ventilation as working on blocking boards, so I recommend using a fan to speed up the drying process.


Hehehe, block on knits/crochet and ironing of fabric are actions I’m never feels needed. I don’t give a damn about crumples 😂😂.
But just from curiosity do you have to blocking after every laundry?
If I make a granny square blanket do I block the squares as I go or at the end? If I don’t have an area large enough to spread the blanket out after finishing, can I block a section at a time?
Hi! You can block the individual squares, or join in sections and block the sections. Whatever it takes to get the job done 🙂
Wonderful post!
I’ve started blocking recently and can see the benefits!
Quick question regarding blocking – if my piece is too big for my blocking blocks, is it ok to wet half of it, do half, and do thr 2nd half later?
I have a shawl that is too big for my 9 blocks due to its triangular shape. Unsure how to go about blocking it to reveal it’s true glory!
Thanks in advance 😘
Absolutely you can block in stages 🙂 Great solution.
Toni, I really enjoyed the video on blocking. I have never blocked before because I didn’t feel comfortable in doing it and I didn’t think it was that important but now I see how it can make my work more polished. Also you must have read my mine because I was wondering if I would have to block again but you answered my question. Thank you so much and Congratulations on your new book.
Great information! Can’t wait to finish my first project and block it. Just ordered the steamer you recommended. Thanks!
Can you talk about how to fasten off ends where I changed a ball of yarn or color mid row? Those ends are just hanging there and I feel like if I tie them together in a knot there will be this hard knot where I don’t want one. As far as blocking goes, I don’t have space or enough counter/table top to block off a twin sized blanket…I think we are just going to have to live with the ruffled edges created by the scallop border I gave it.
Sure! You can use the same method that I mention changing the ball when you have a knot. Instead of adding back the ball you had, you’d just add a new ball of yarn. Made sure you leave long enough tails to weave in the ends later. I don’t tie my ends before weaving them in – I just weave them right in. For blocking a blanket, you can “spot block” with a steamer – just hit the areas that are a little curly. The center likely doesn’t need to be blocked.
Thanks Toni, this was great information and I learned a! lot! The question that I have is how do you block projects like hats and sweaters? Congratulations on your book getting published! I ordered a copy today! Thank you so much!
Great as always! One tip I can give for an alternative for blocking board. Is an exercise mat. Dependant on the project size of course but it worked well for a scarf or small item.
Could you use a drop of fabric softener instead of the drop of dish soap for wet blocking?
Hi! You certainly could. Though, I would recommend a bit of dish soap AND a bit of fabric softener. One to clean, the other to condition.
Hi Toni,
Do you have any tips on blocking sweaters?
I tried blocking two using your video, followed all of the steps, but it took a couple days under a fan to actually dry because it has 2 layers of fabric.
They both super-stretched out after the soak, and I ended up putting them on air-dry in my dryer for 20 min to aid in the drying. One felted, the other is okay, but I’m scared to ever try this with sweaters again.
Hi! There are three options for blocking, and it sounds like you needed something a little less intense for your sweaters. I would recommend steam blocking next time. Pin the project first, steam one side and let it dry, then flip it over and do the other side.
Hi Toni. Thanks for this great information. How would I block hair accessories like ear warmers and headbands? Thanks again!
can we normally wash (machine wash) any type of crochet blanket, cardigan at regular intervals?
Hi! It depends on the fiber. Check the ball band of the yarn you bought to better understand how to care for your finished projects.
Thank you, Toni! For some reason I feel like I’ve had a hard time finding straightforward, complete info on blocking (so I’ve kind of avoided it) but this answered all my questions!
To block a big project, I use one or two clean towels on top of a carpet in a bedroom! I pin my work through the towel and the carpet, spray and then close the door so that the dogs and cats can’t find it! Works like a dream.
Thoroughly enjoying Crochet Academy and practicing like crazy so I can keep up with the upcoming Crochet Along. Thank you, Toni — and CONGRATS on your published book! So cool and, of course, I ordered your book because that is how I originally found you – Tunisian crocheting!
This post was freaking amazingggggg!!!!! Honestly, I can say that about all of your posts in the Academy!! Thank you for this one Toni! I used to wonder why my afghans were so misshapen! Anddddd, weaving in ends!!! Awesome tips and techniques!!!! God bless you for this knowledge you’re blessing us with!!!
Hi Toni, I believe I found my answer to blocking accessories. This post was very informative, as I didn’t know all the methods to blocking, cutting knots found in the yarn when crocheting, etc. It goes without saying that there is always something new to learn no matter how long you’ve been crocheting. You are a Godsend to us!! Thank you!!
Toni,
I just finished a chevron blanket for my son. The long edges are rolling (curling). It is a bit longer than a standard twin size blanket (my son is tall). I don’t really have anywhere to lay it out for an extended time. Can I block 1/3 or half at a time? It is made from 100% acrylic. I was thinking steam would require the least drying time? Any advice would be most gratefully appreciated.
Absolutely! It’s totally ok to block in sections. And I would go with steam as well. Just be careful if it’s acrylic – don’t melt the yarn.
Hi Toni! Please forgive me if these questions are, umm, not smart (LOL). 1) Do you wash your yarn before you start a project? I have heard a lot about yarns having chemicals/dirt from the factory and dust from the warehouses, etc. Some have recommended putting skeins in knee-high stockings prior to washing so the skein keeps its shape and doesn’t get all tangled up in the process. 2) If you don’t wash your yarn first, do you wash it once the project is finished? If so, can you wash it (according to band recommendations) and then block it straight from the washer and let it dry? Or is the blocking process with the no-rinse soap the only cleaning you do on a new project? 3) I read what you said about fibers having memory. I am new to wearables and assume they need to be laundered regularly when worn regularly. Do you need to block them after each wash? Is that be dependent on the fiber? Thanks!
Thank you so much for this info! I have always been afraid to block because I didn’t fully trust I knew what to do. I can’t say that now. Your explanation was perfect!
Hi Toni! Thanks for this info! I have actually wet blocked acrylic before and it’s come out beautifully, but maybe I just got lucky. LOL! I was wondering if you could link the steamer again? The link to Amazon gave me an error. Thanks!
Hi! Thanks for checking out the post 🙂 I just updated the steamer link, so it should be working. If it doesn’t work on your phone, please try a tablet or desktop.
Hi Toni! Was curious about how to fasten of yarn that is in between color changes? When I started adding a new color, I left enough to weave in, but when I went back to previous color I was using, there is yarn on the sides of that color from rows below that I didn’t weave in as I connected it to a new row stitches above it, if that makes sense.
Not sure what to do there and I’ve started it with the Scarf in CA
Hi! I’m not 100% sure that I get the scenario, but is sounds like you’d weave those ends into their like color. Feel free to email if that doesn’t answer your question 🙂
Hello, and thank you so much for being such an inspiration to young black women who love to crochet! I aspire to be enveloped in the crochet world as much as you are one day! My first question is, is there any additional security I can give to woven ends beyond going through more fibers? They still seem to pop out of my projects (particularly trebles). Also, could I use essential oils when blocking my final project instead of the other options? Thank you again!
Hello sweet friend! Thank YOU for taking the steps to become your own kind of force here in the fiber world 🙂 Yes, there is another step you can take to make woven ends more secure. Apply a small dab of fabric glue to the end and stick it to your project. Give it a couple days to dry. This will secure the end. Fabric glue is machine washable, so it should be able to hold up over time.
When I started crochet over a year and a half ago, I found your videos. I have (almost) every tool you’ve recommended! I even gave my sister who also crochets a set of knit blockers. She swore she didn’t need them but I said, “yes, you will one day.” Yep, she needed them. Can’t wait to get started on the sweater project.
Loving your Crochet Academy. Any suggestions for blocking a mosaic crochet queen bed sized blanket crocheted in wool. Hoping to finish it up to be a 1st Christmas gift for son and his new wife. I imagine due to it being mosaic crochet and thick it will take some time to dry.
Wow, this sounds like a lovely blanket. I’d recommend steam blocking such a large piece. Place it on blocking boards, if you have that many. Or you can place it on top of another blanket. Steam it lightly, gently stretch it into place, and pin it down. Then steam it more thoroughly. Put a fan or two in the room and let it air dry.
Toby wants a bath now!!! Your video should come with a caution to not play it loud while your dog is present lol, my pup got all excited at the mention of “bath” 😀
I’ve always been apprehensive giving my finished projects a bath for wet blocking, afraid I might ruin it, but now that I’ve seen all the steps I feel a bit better about trying it myself. Usually I block my projects by using a wet dish towel, placing it over my knits, and at a low setting (higher setting for cotton) with my iron I gently hold it it on or over the towel just long enough to get a little hiss and then move on to the next area.
Thank you for all your wonderful, and joyful videos <3
Toni
Loved the music and voice of shawl shimmy,
Hi Toni,
Thank you for the info. I’m LOVING the Crochet Academy! I have a question: When crocheting a garment with multiple pieces, should we block before stitching it together, or stitch it together before blocking?
Great question! I like to block the pieces, then stitch, then do touch ups on the blocking. For a sweater, for example, I’d steam or wet block the pieces, seam them together, then steam over the seams to relax them a bit more. But that’s more personal preference. Blocking the pieces themselves should be enough to achieve what you’re looking for.
Toni,
Can you tell me where the pattern is for the coasters? I wanted to try it and block it.
This post was very helpful. I haven’t done much blocking but determined to give it a whirl. I am teaching myself to make mittens and wonder if I would just follow the blocking steps outlined, depending on the yarn I am using?
Hi Julie – glad you found the post useful 🙂 You should be able to use either of these blocking techniques for your mittens, but the deciding factor will be the fiber – acrylic is better with steam, while animal and plant fibers take well to wet blocking.
Thanks, Toni! This was a very timely post. I just finished making a Daphne blanket for a friend’s granddaughter using acrylic yarn (Lion Brand Mandala and Basic Stitch Anti-pilling). Since it’s for a baby do I steam block it first to set the shape and then machine wash and dry it so that it is clean when I gift it? Or do I machine wash it and towel dry it and THEN pin it to the blocking mat? I just want to make sure that it’s blocked properly and clean. Thanks!
Hi Renee – great question. I’d suggest machine washing it and then pinning it in shape to dry. This will accomplish washing and blocking.
Hi Toni, love your presentations! Thank you for all your knowledge. Can dry cleaning be a substitute for blocking?
Thanks, Toni! I’ll machine wash it with Dreft then block it! Fingers crossed!
Would the steam function on a dryer work?
I’ve never tried it, but I’m always down for an experiment! Let us know how it goes 🙂
Hi Toni! This is the third academy that I’ve done, and I learn something new every time! Now, I do have a question. I’m really good at weaving in ends, or stitching over ends, on solid fabric. I’m working on a lacey thing now (and the party punch shawl, but that’s one skein, so very few ends there!) and I have so many ends and no place to hide them! Any tips? It’s a lot of dc, chain 5 billion, dc stuff going on.
I’m new to crocheting. Can blocking be achieved by throwing the project in the wash and air drying? Do you need to do blocking before you wash the project?
I’m enjoying all your posts and videos and learning something new with each one!
Toni, Thank you so much for sharing these finishing touches! They are SO important to making more “Finished” looking works of art, imo. There are times when I start from the inner square out in pinning because sometimes I just don’t feel like those concentric squares shape up enough. I’m just a little bit OCD. My genetics are creative but then I was adopted by an OCD perfectionist military officer who later became law enforcement, so yeah. It rubbed off. Haha! It’s a bit stressful at times! ; P He was my kidney donor 10 years ago too!!
I have did the spray block with scarves. I put towels down and use a big piece of cardboard. I put my project on top and stick in my pins.
I love the effect that blocking has on my projects and wanted to step it up so I bought some blocking wires. Now I have the wires but don’t really know how to use them. Please do a video on how to use blocking wires.
I have learned so much from the academy. The different blocking techniques are amazing. I have had to do the dunking method for a blanket (single bed size) WIP due to a situation with animal pee and hung it to dry in the shower. Is that a form of blocking? I am just wondering since I don’t have the space or proper tools to do the blocking methods. Thank you in advance.
That is a great question. I would not say that it can be a form of blocking. Hanging crochet items to dry could possible cause the item to stretch. Keep that in mind and only hang things that you either want to stretch or do not care if it stretches.
Hi,
I have an odd question instead of blocking a project can one just send it for dry cleaning? Or does the project needs to be blocked before sending it for dry cleaning?
Hi! Great question. It depends on what you’re attempting to achieve from blocking. If you just need to clean the piece, you can do that at home or send for dry cleaning. If you are looking to adjust the fit or size of your piece, I recommend blocking at home. This allows you to stretch and adjust the piece to the size you want it to be.
I have started steam blocking everything since I started watching your videos. It’s a must for me now!
So glad you find it helpful! It really does give everything that polished look 🙂
Hi Toni! Any tips for weaving in ends on projects that use something like a mesh stitch or other open stitches? I always feel like I don’t have enough solid space to weave in ends when using these stitches. Thanks!
Ahhhh great question! For stitches like mesh and lace, weave in your ends along the post of your stitches and through any chains. This will mask the yarn in with the stitches to make the tail nearly invisible 🙂
Hi Toni – thanks so much for the great blocking videos! I find when I wet block it takes way too long to dry, I can’t seem to get enough water out first. Is it ok to machine wash the project on a hand wash cycle before blocking?
Great idea you have here, but there are lots of factors to consider before you put a piece in the washing machine. It really depends on the fiber and what the items is. If you’re working with superwash wool or acrylic, tossing it in the machine should be fine (though I do recommend a garment bag). Otherwise, when wet blocking, squeeze out as much water as you can before taking the item from the basin, then roll it in a towel and press the water out with your feet. After putting it on the blocking boards, put a fan in the room and close the door if you can. That will make drying faster.
This is what I don’t understand about blocking: do you need to re-block it, including pinning it all around after each washing?
Great question! Generally, no. You would not need to re-block your project. Blocking the first time relaxes those stitches, and most fibers are flexible enough that they don’t revert. For future care, simply lay the item flat to dry – no need to pin it.
Hi, new to crocheting. So far I have only done baby blankets (working on my 4th!). Is it bad that I wash them on a delicate cycle with dreft soap and let them air dry? My fiber has been 100% cotton and I figured this is how people will wash it when their babies are using them.
Hi! That method sounds perfect to me. When it comes down to it, wash your finished items however you like as long as it keeps them looking good and they last a long time 🙂
My blocking mats are probably nothing new to a lot of people, but I’m really pleased with them. (I refused to spend almost $200 CAD on the popular blocking mats with good reviews). Because they do not have the graph lines it requires tape, a ruler, and some ingenuity. You can see in the picture they are rigid styrofoam boards that I purchased at my local Home Depot for $14 CAD. They come 6 in a Handi-pac, .75″ thick x 14.5″ wide and 48″ long. I use packing tape (easily removed) to join them in any configuration I want. They also have a slight pebbled finish that makes them ‘slightly grabby’ to my projects but doesn’t interfere in any way. I hardly ever use T pins on larger projects. I use green masking tape to mark off sections for granny squares or other smaller projects. So there you go, I hope this small idea benefits others.
Hey there, Joanne! Thank you so much for sharing with the community 🙂 We greatly appreciate you!