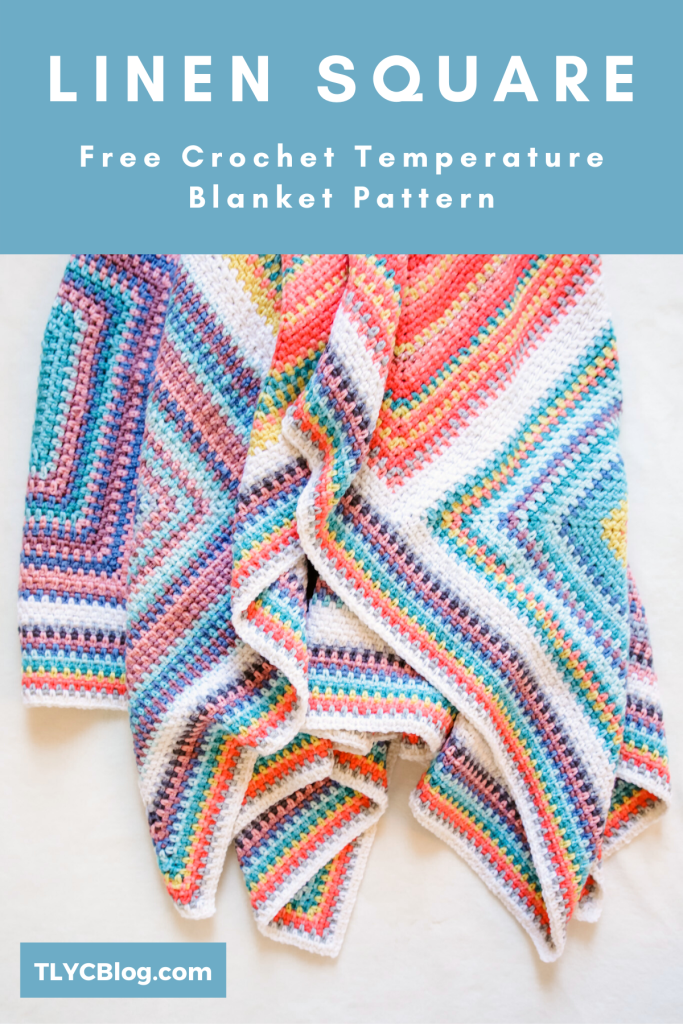
Linen Square Temperature Blanket – free crochet linen stitch afghan pattern
")
2021 is a wrap, and you know what that means. It’s finally time for me to share my Linen Square Temperature Blanket pattern!
This is my 3rd temperature blanket completed in consecutive years and I’m excited that the tradition is going strong. Last year I made the Bias Granny Temperature Blanket and before that was the inaugural Tunisian Crochet Temperature Blanket. Each year’s design is a chance to stretch my skills, play with new yarns, and track my year in the best way I know – crochet! Keep reading for full details on my latest temperature blanket design.
This post contains affiliate links that support TLYCBlog content. All opinions are my own. For more information, see my Privacy & Disclosures policy here.
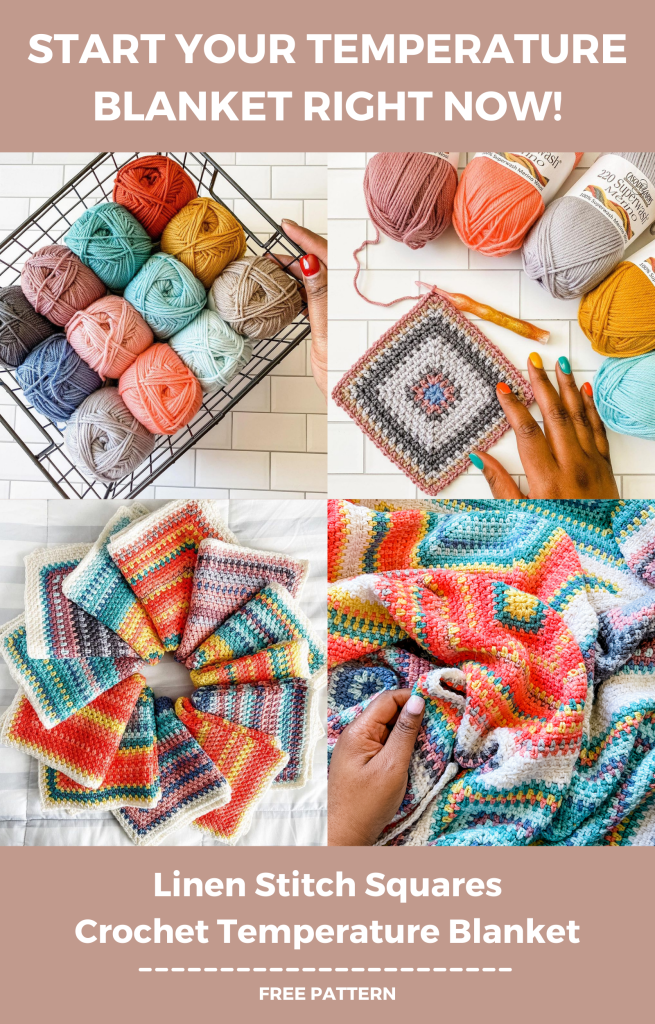
PIN IT NOW, MAKE IT LATER
What the Heck is a Temperature Blanket?
A temperature blanket is a crochet or knit afghan where a series of rows or squares correspond with the day’s temperature. This post is specific to my Linen Square Temperature Blanket, but you can find more specific information about temperature blankets in these posts:
- Plan the Perfect Temperature Blanket
- Picking Temperature Blanket Colors + Yarn
- 15 Knit + Crochet Temperature Blanket Ideas
Still curious about temperature blankets? Sign up for my FREE 5 day email course to learn the ins and outs of planning and executing your next temperature blanket. JOIN THE COURSE!

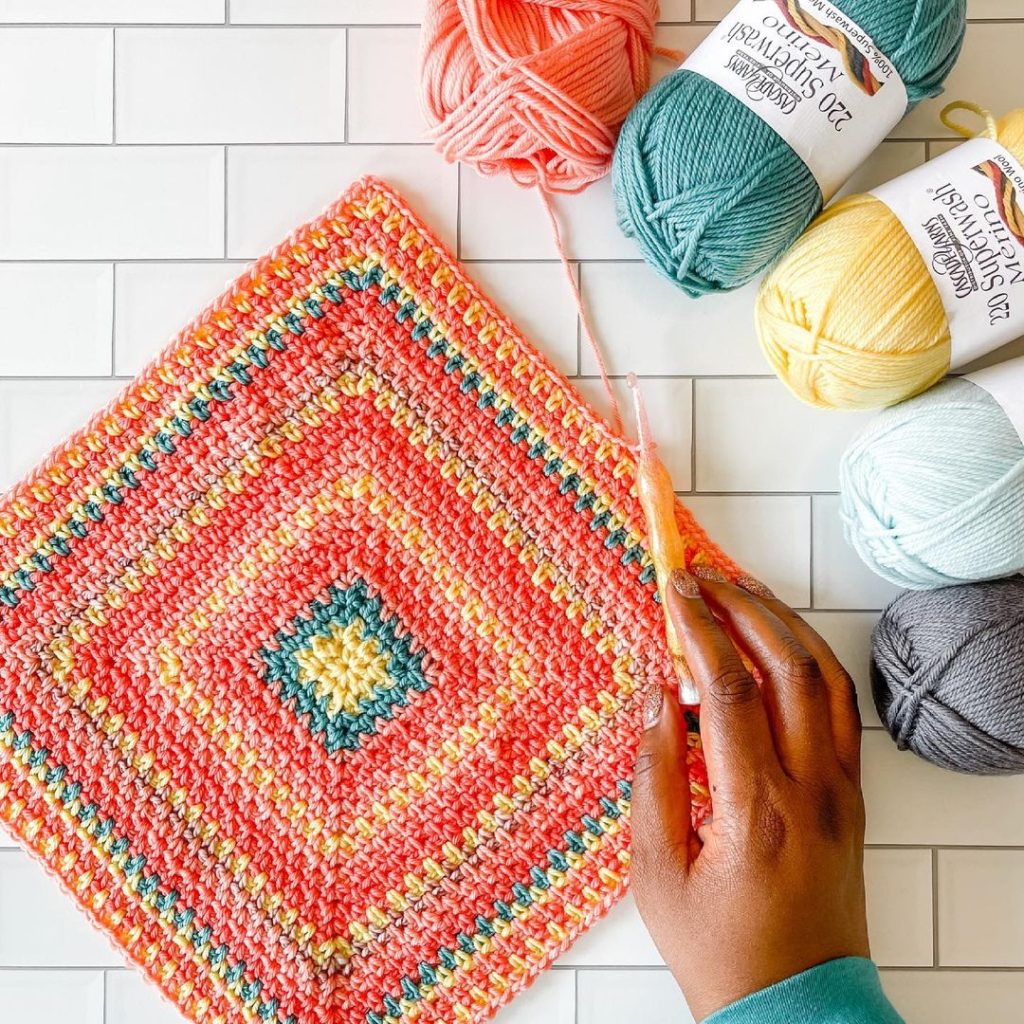
CHOOSING MY YARN + COLORS
Picking colors for a temperature blanket can be pretty daunting. You have to consider the number of colors you want to use, yarn fiber, and availability. With constant supply chain issues circling around the fiber industry, I needed to find a yarn that would be available throughout the year. That meant finding a dependable company that offers high-quality yarn. Enter Cascade Yarn.
Cascade Yarn is a relatively young company (established in the late 1980’s). Their mission of providing high-quality yarns at affordable prices aligned perfectly with the concept of my linen square temperature blanket. I decided to use their 220 Superwash Merino, which is 100% superwash merino wool, available in over 100 solid and vibrant colors. Merino wool is lightweight, springy, and machine washable. This yarn is categorized as a worsted (category 4) weight yarn, but I find that it works up much closer to the gauge of a DK (category 3) weight yarn.
Learn more about Cascade 220 Merino, available from Webs.com and LoveCrafts.com. Special thanks to Cascade Yarns for sponsoring the yarn for this project!

Color helps to establish the mood of the finished temperature blanket. Last year’s blanket focused on a richer, woodsy palette. This year, I wanted to go for a vibrant, happy blanket. I used a series of colors inspired by an exciting summer beach vacation, with plenty of aqua and coral tones, rounded out with warmer neutrals. I placed my colors in order from coolest to warmest in my blanket, starting with a steel gray and finishing with a sweatshirt gray.
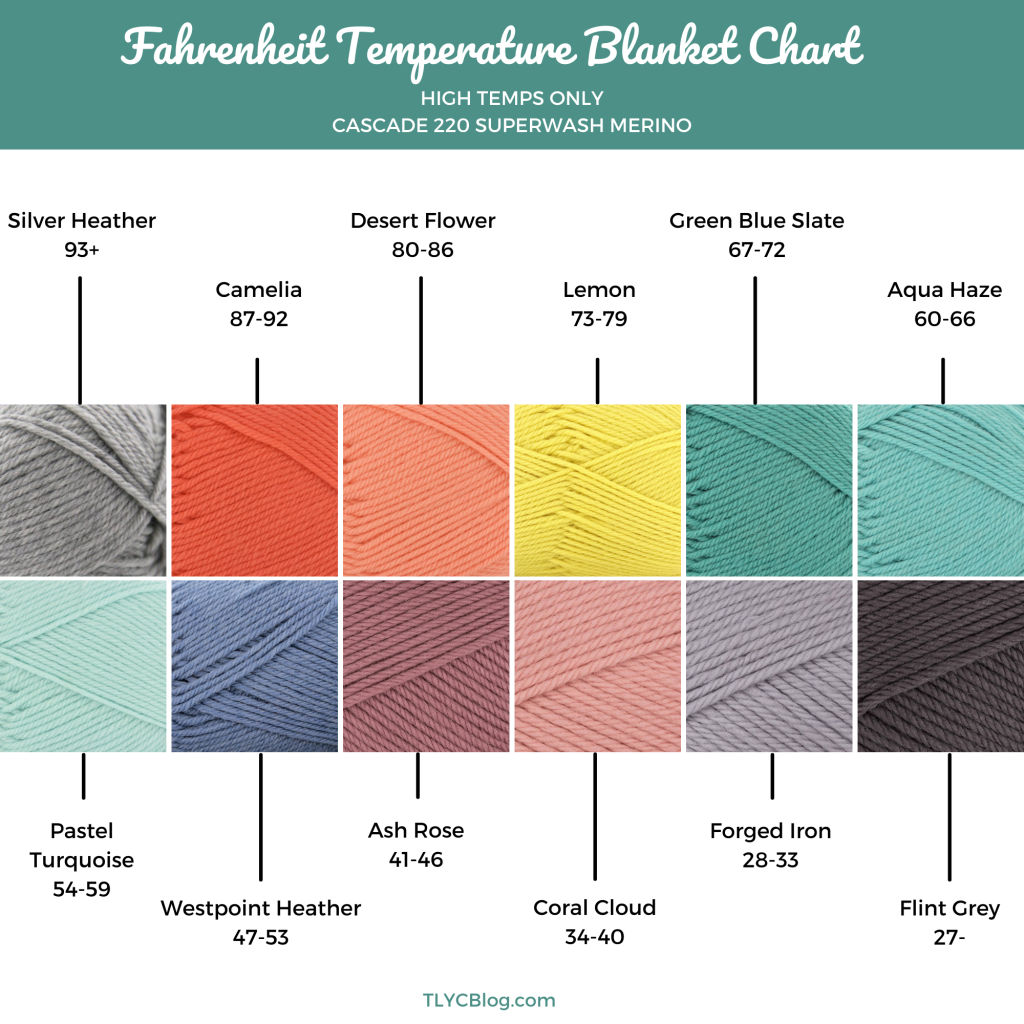
Cascade 200 Merino, available HERE. Listed from coolest to warmest colors:
- Flint Grey – 27 degrees and below
- Forged Iron – 28-33 degrees
- Coral Cloud – 34-40 degrees
- Ash Rose – 41-46 degrees
- Westpoint Heather – 47-53 degrees
- Pastel Turquoise – 54-59 degrees
- Aqua Haze – 60-66 degrees
- Green Blue Slate – 67-72 degrees
- Lemon – 73-79 degrees
- Desert Flower – 80-86 degrees
- Camelia – 87-92 degrees
- Silver Heather – 93 degrees and above
NOTE: I started the year with a gorgeous color palette that I fell in love with. But, when it came time to make my February square, I was very unhappy with how the colors were coming together. I decided to ditch the colors I didn’t like and swap in more suitable shades. This might happen to you as well – yarn in the skein can look different in a project, especially surrounded by other colors. Don’t panic – it’s your blanket and you can change it if you want!

Tools + Supplies
I used a 6mm crochet hook to make my squares and add the border. I always dedicate a notions pouch to this project and this year was no different. I kept my lovely hook from CroChic Styles with me all year. The polished resin hook glides along the soft merino wool, helping me to crochet quickly and consistently. I went with a 6mm hook for DK weight yarn since the linen stitch has a tighter gauge than other stitches.
Also inside my notions pouch was a pair of scissors and a tapestry needle. Like years past, I waited until nearly the end of the year to weave in my ends. Surprisingly, this didn’t feel like a monumental task. Breaking this project into 12 squares instead of 1 large blanket made the whole project feel much more manageable. Last year, I binge-watched The Circle while weaving in ends. This year, I got all caught up on Selling Sunset and even watched all of Selling Tampa. Talk about Grade A reality television. The drama!

After weaving in my ends, I took some time to block my squares. Blocking helps to achieve consistent size in the squares and made them even softer (if you can believe that!). I wet blocked my squares in the sink with a bit of wool wash from Sewrella. I then pinned them to blocking boards and let them air dry. My little girl cat, Sheba the Queen, did an excellent job of quality control once it was all done.

Linen Square Temperature Blanket Details
MATERIALS
- Cascade Yarn 220 Superwash Merino in 12 colors (reference Blanket Chart above) + White (MC)
- 6mm crochet hook (like this one from CroChic Styles)
- Scissors
- Tapestry needle
- Blocking supplies (wool wash, rust-proof t-pins, and blocking mats)
FINISHED SIZE
68″ long x 50″ wide
GAUGE
Finished squares are about 15″ after blocking. This number is not especially important – just try to keep a consistent gauge throughout the project. It helps to have a dedicated hook.
ABBREVIATIONS
This pattern uses standard abbreviations from the Craft Yarn Council. Find a full list of abbreviations HERE.
NOTES
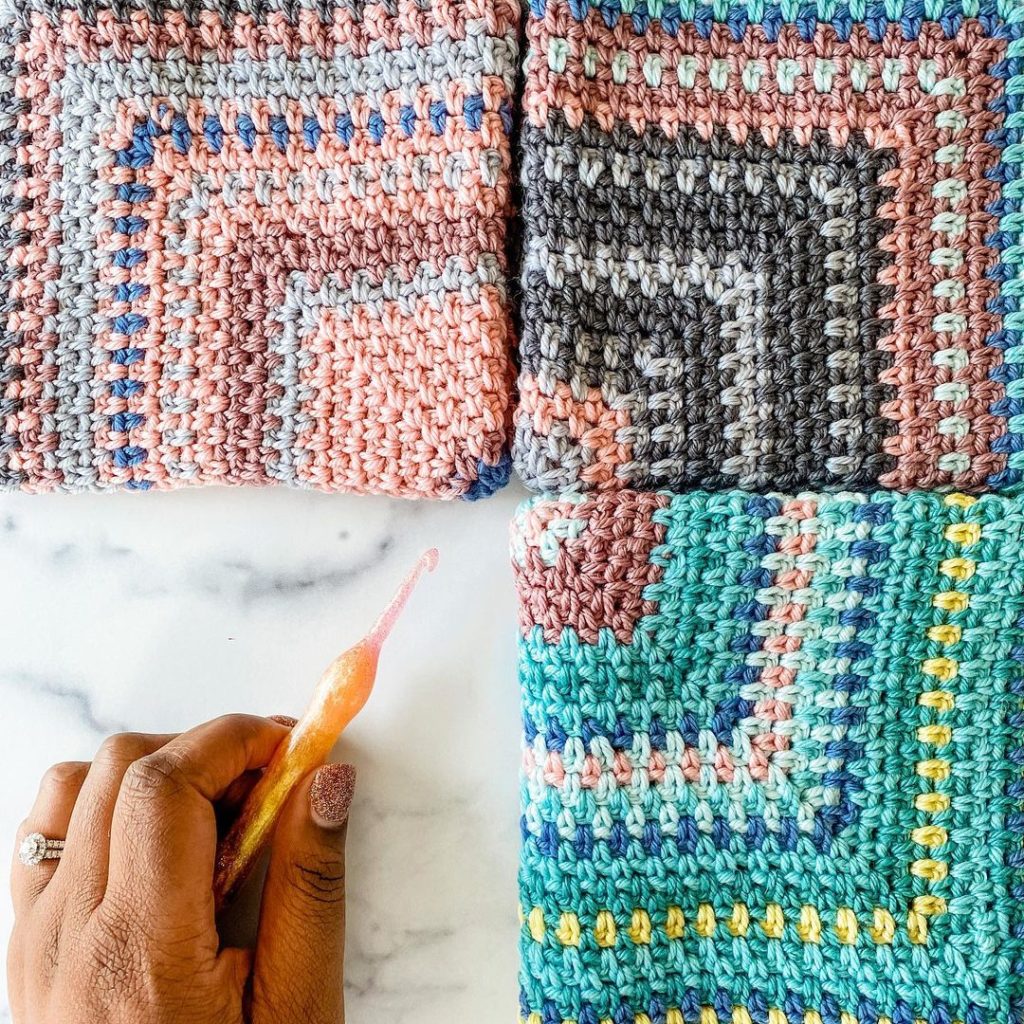
- The Linen Square Temperature Blanket is inspired by the Linen Stitch Square pattern. Squares are worked in turned rounds from the center-out. Each round counts as one day. Each square has 33 rounds – one round for each day of the month, with any remaining rounds worked in white. This acheives the goal of making all squares the same size.
- Odd numbered rows are on the right side of the work.
- I worked my blanket using high temperatures only and pulling the temperatures of Columbus, Ohio. I found historical weather information from Wunderground.com.
- I used a special yarn color for my birthday, which can be seen in the June square (below). I used a DK weight yarn from my stash that I liked. Consider adding an accent round to commemorate special days throughout the year.
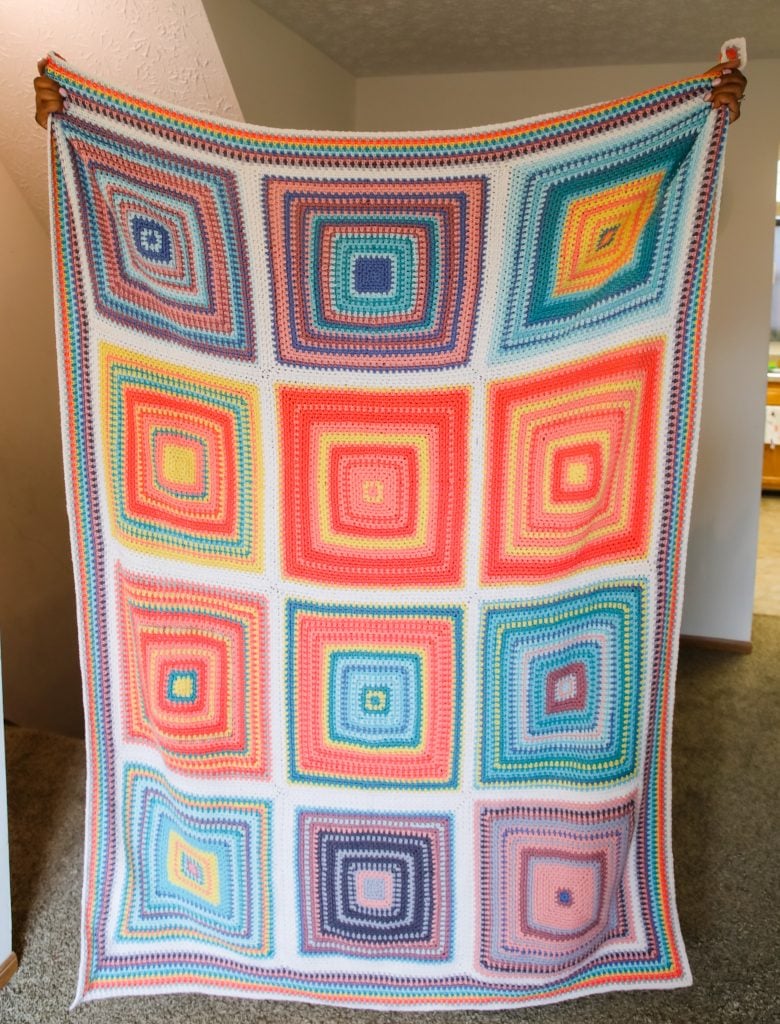
BLANKET LAYOUT
The Linen Square Temperature Blanket is constructed from 12 individual squares representing the months of the year. After all of the squares are completed, the ends were weaved in and the squares were wet blocked. The squares were laid out in the grid below, then seamed together with a whip stitch seam using the main color (White).
After seaming, the linen stitch border was added, with one round of white, then one round for each of the temperature blanket colors in order, and a final round of white. The border is worked in turned rounds.

New to the Linen Stitch Square? Learn it in this video tutorial:
Linen Square Temperature Blanket Pattern
Square Pattern
ROUND 1: [Ch 1, (sc 1, ch 1, sc 1, ch 2) 4 times] in MR, pull tail to close ring, join with a sl st in first sc of round, turn.
ROUND 2: Ch 1, (sc, ch 2, sc) in ch-2 sp, ch 1, sc in next ch-1 sp, ch 1, [(sc, ch 2, sc) in next ch-2 sp, ch 1, sc in next ch-1 sp, ch 1] 3x, join with a sl st in first sc of round, turn.
ROUND 3: Ch 1, *(sc in ch-1 sp, ch 1) to next ch-2 sp, (sc, ch 2, sc) in ch-2 sp, ch 1; repeat from * around, join with a sl st in first sc of round, turn.
ROUND 4: Ch 1, *(sc in ch-1 sp, ch 1)** to next ch-2 sp, (sc, ch 2, sc) in ch-2 sp, ch 1; repeat from * around, ending last repeat at **, join with a sl st in first sc of round, turn.
Repeat Round 4 to 33 rounds, changing color to fit the temperature for each round. After rounds are completed for the month, make the remaining rounds in MC.
After the last round, weave in all ends and wet block to 15″ square. Set aside squares until the end of the year. Repeat for all 12 squares.
Assembly
Arrange squares in rows of three and columns of four, keeping them in order by calendar year. Using a length of MC, whip stitch the squares together, working through the single crochet stitches ONLY, unless seaming the corners. This creates a visually pleasing zig-zag seam that is flexible but still strong.
Weave in all remaining ends.
Border
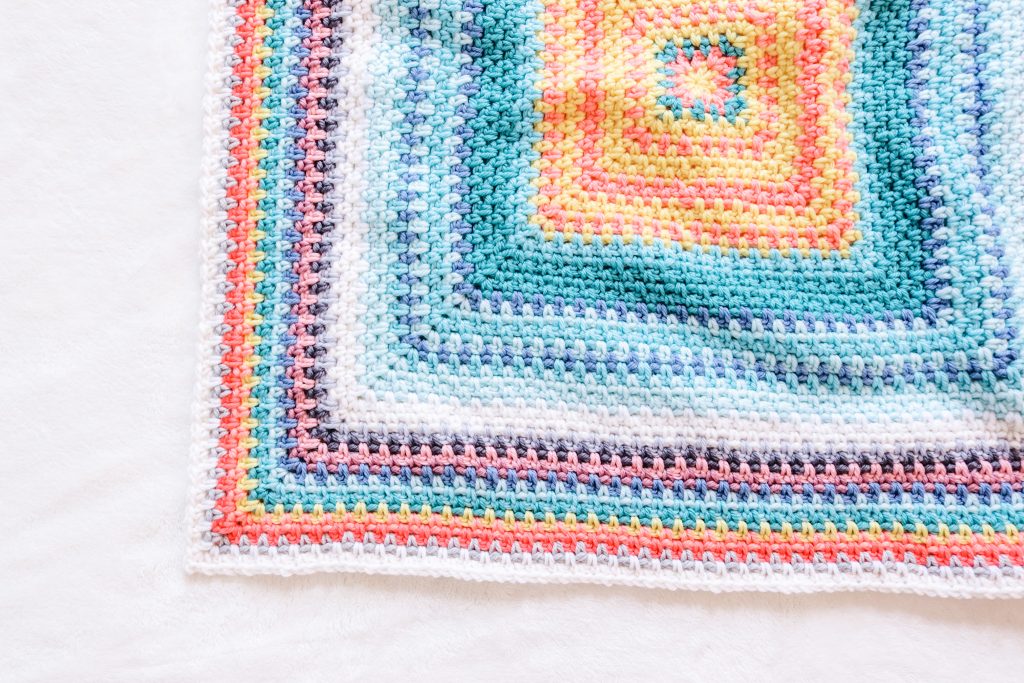
ROUND 1: With RS facing, join MC with a standing single crochet (tutorial) in the middle of the November square. Work in linen stitch square pattern around. At the join of two squares, sc2tog over the two neighboring chain-2 spaces, continue in pattern. At the end of the round, sl st join to the standing sc and fasten off MC. Turn work.
ROUND 2 AND BEYOND: Continue in pattern with turned rounds, working one round of the border in each color of your temperature gauge from coolest to warmest, then a final round in MC.
Weave in all remaining ends.
Finishing
Lay blanket flat to final dimensions. Steam the blanket, paying close attention to the border and all seams. Allow to fully dry before you drool over how gorgeous it is!

Working on My 2021 Temperature Blanket
I seriously had a blast working on the Linen Square Temperature Blanket. I say it every year, but this has to be my favorite design of them all.
One of the hardest mountains to climb when tackling a temperature blanket is how cumbersome it can seem. By working this blanket in individual large squares, your blanket has a small footprint (until assembly) and feels less overwhelming. Also, catching up when you are behind is a breeze. I fell 3 months behind in the summer and was able to catch up over a weekend.
If you are new to temperature blankets, I would highly recommend starting with the Linen Square Temperature Blanket. Here’s a preview of what you can expect when working on your blanket:
Whether this is your first temperature blanket post from me, or you’ve been following this journey since 2019, THANK YOU for being here. This is one of the most fun traditions I have in TL Yarn Crafts, and it means the world to me that you’re interested in my projects. Be sure to join my email list and follow me on Instagram to get updates on my 2022 blanket. I think you’re really going to like it!


Absolutely beautiful! I love the beachy colors you chose and the order you placed them in! Thank you for sharing how you changed colors in February as selecting colors is on the daunting tasks for me.
Absolutely beautiful! I love the beachy colors you chose and the order you placed them in! Thank you for sharing how you changed colors in February as selecting colors is on the daunting tasks for me. Congrats!
how many skeins of each color did you end up using?
I love this pattern and will be making a historical one for my in laws anniversary this year. I’m so excited! How many yards total did you end up using? As always, love everything you touch 🥰
Hi! I’m so glad you like this project. I was in love from Day 1. I didn’t track the total amount of yarn I used for this project. But I started with 2 skeins of each color at the beginning of the year.
This is so beautiful, I’m so excited to see how my blanket turns out (hopefully it is as nice as yours)! I have a question for the border when you say “At the join of two squares, sc2tog over the two neighboring chain-2 spaces” does that mean I do 2 single crochets in the corner, then do a single chain, and then 2 more in the other corner, or is it single crochet in the corner, no chain, then another single in the next corner, and chain one?
Hi! Great question. You will sc2tog over the two corners. Check youtube for how to sc2tog. You’ll see that it’s a decrease method that results in turning those two spaces into one single crochet stitch.
[…] Pattern: Linen Square Temperature Blanket […]
Do you have a tutorial on how to change colour in the linen stitch in the round pls. Mine gets very ugly as I don’t know how to do a neat change of colour. Thank you beautiful
Hi! The tutorial in this blog post shows how to change color. I recommend fastening off after you join, then connecting the new color with a standing single crochet.
So lovely! May I ask about what size is is each month’s square?
They’re just about 4.5″ each 🙂
I’m confused. In the post, you say ‘Finished squares are about 15″ after blocking.’
4.5″ seems very small.
Of course, mine are coming out to be 17″….I guess I crochet a lot looser than you do!
Toni, your linen temperature blanket is beautiful. I’m going to make one. As I’m in Houston, Texas, the weather here is quite volatile, so it should be interesting. Happy New Year.
Thank you so much!
This is gorgeous and I’m excited to begin one, even though I know it was last year’s pattern. Do you have a referral code for the yarn?
Thank you!
So glad that you’re interested in this pattern! I think you’ll love it. I don’t have a referral for the yarn, but thanks for asking. I appreciate the support 🙂
Hello! I’ve just finished my April square but am finding my squares are not the same size 🙁 march is a reaction bigger than Feb and Jan and April is bigger again. It must be a tension issue as I’ve added the border so they should all be the same size. Are there any solutions you can think of to avoid me having to redo the squares to be the right size?? Thank you!
Hmmm, very interesting. Are you using the same hook each time? If all of the squares have the same number of rows/stitches, then you should be able to block them to a similar shape before seaming them together.
I’ve been planning on making this blanket for well over a year but I keep getting intimidated – starting the squares is always difficult for me. But I’m giving it a shot for a birthday gift for my mom.
I have a question about changing colors. Do you change on the slip stitch, or on the ch-1 when you turn the square for the next row?
Thanks!
Great question! I actually cut the yarn before changing colors. I’ve got a tutorial video for this square that spells out exactly how to change colors 🙂
Thank you for offering this pattern and idea. I am just starting back after several years of not being able to crochet due to arthritis and carpal tunnel. I’m now able to crochet for short periods without pain, and this project seems ideal, just one round per day. (if I keep up, which I’m sure I won’t) Also there is no heavy blanket to hold onto. Usually I do rounds without the slip-stitch and turning but I’m taking your advice. I’m not liking the lumpy line, though, and I don’t see it in yours. I bet you did an invisible join. I’m going to switch to that starting today. It’s a joy to be crocheting, again.
So glad you can get back to your hooks, and this project is much less stress. If you’re having issues with the line in the middle, try doing your joins in the corner. That’s what I’ll be doing with my temp blanket this year 🙂
Hi Toni
First of all, you are Darling!
Thanks for the inspiration and motivation to finally get started on the temp blanket I’ve been planning for several years. I’m excited to start January!
I’ve been looking for a pattern that really seems to fit, and I have found it! I love the idea of a square per month instead of row by row. So much more creative, and I will end up with a much more manageable size blanket.
Thanks for sharing! And I look forward to getting to know you with your other patterns and posts.
All the best!
Laura
Thanks for this amazing pattern and tutorial! I am just finishing the last round of the border for my 2023 temperature blanket. 2023 was the year I learned to crochet, and you made this so approachable and easy to follow. Kudos and thank you!
Are rows one to four part of the 33 days or are they separate in your pattern you said starting on row four begin with my temperature colors so I’m a little confused. I look forward to working the pattern!
Hi! The temperatures for the day start in Round 1 and go through the month. Whatever days are left through round 33 are done in your accent color. For example: February colors of the day are worked in Rounds 1-28, then Rounds 29-33 are worked in your accent color. Does that make sense?
I know I’m a bit behind but I’d love to start this. Do you have a video tutorial about how to start, or do the first few days? I’m such a visual person and your videos seem so clear but I just would love to see how you start and do the first few days. Thank you!!
Hey darlin – there’s a tutorial video linked in the blog post 🙂
I want to make this for a grand baby due before the end of May, how do you suggest I make it for his 1st year? Should every square begin on the day he is born?
Awww, how sweet! I love the idea of each month beginning on his birth day. I still recommend using no more than 31 days for each month. Alternatively, you could have the blanket start with May 2024 to represent his birth month, and use a special yarn color for his actual birth day. Have some fun with it! And congratulations 🙂
Your project inspired me to make my first temperature blanket. I’m using the Cascade 220 for this one, but I was wondering if you have any yarn recommendations that are a bit more budget friendly, but not acrylic?
A wool/acrylic blend could be a good choice. I really like Yarn & Colors Serene – that’s only $5 per 50g ball and 100% merino wool. There’s also Willow & Lark Ramble, 100% wool for about $8 per 50g ball. You likely won’t find wool for too cheap unless it’s straight from the farm. A cotton acrylic blend would be nice also. Paintbox Cotton Dk is $3.75 per skein. Hope that sets you on the right track 🙂
What if I’m using the same color for several rows – how can I turn and continue with the next round without cutting the yarn just to re-join the same color?
Great question. If you’re using the same color, simply turn after the join and continue in the pattern 🙂
Hi, thank you so much for your pattern. I have a question about the corners, I seem to pick up an extra stitch and it’s getting bunchy? Do you use the single chain space directly before the corner chain 2 space and after?
Hi darling! I think I know what you mean. There’s a sc just before and after the ch-2 of the corners. I do use the ch-1 before/after that sc. Is that what youre asking? It may help to take another peek at the tutorial video 🙂