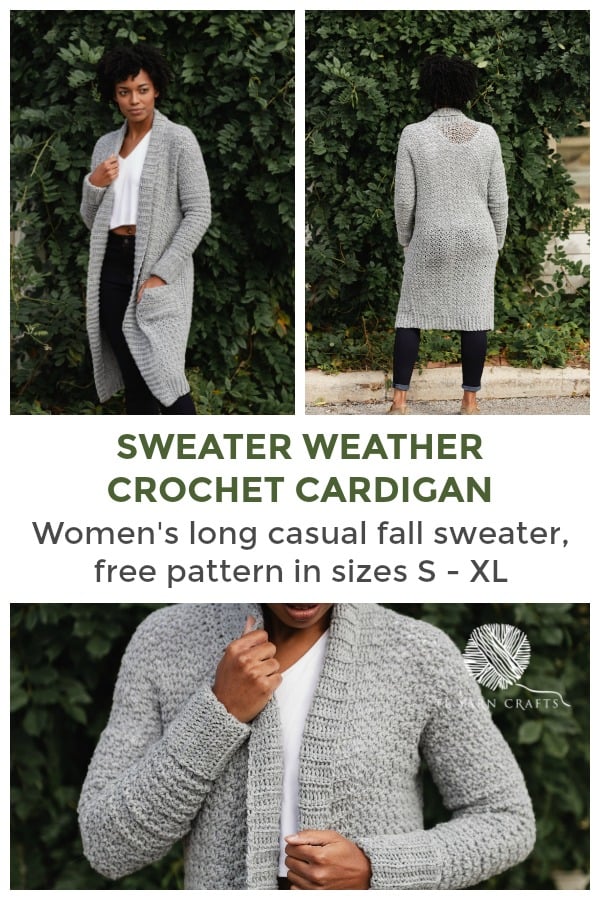
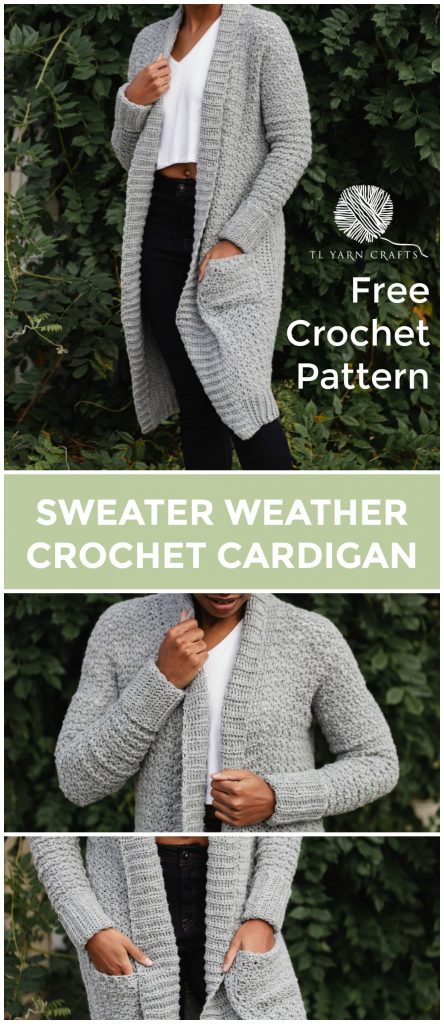
The Sweater Weather Cardi, a Long Modern Cozy Crochet Cardigan Pattern with Pockets

**Update** The Sweater Weather Cardi is now available as a kit from Lion Brand, including a printed pattern and all the yarn you need. Click for your kit!
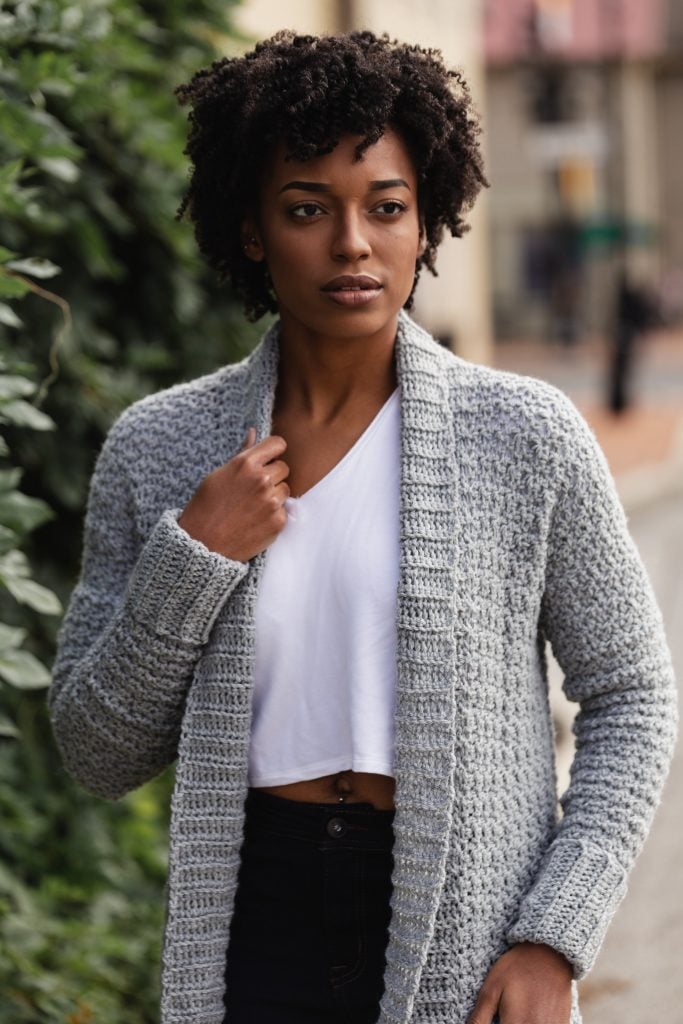
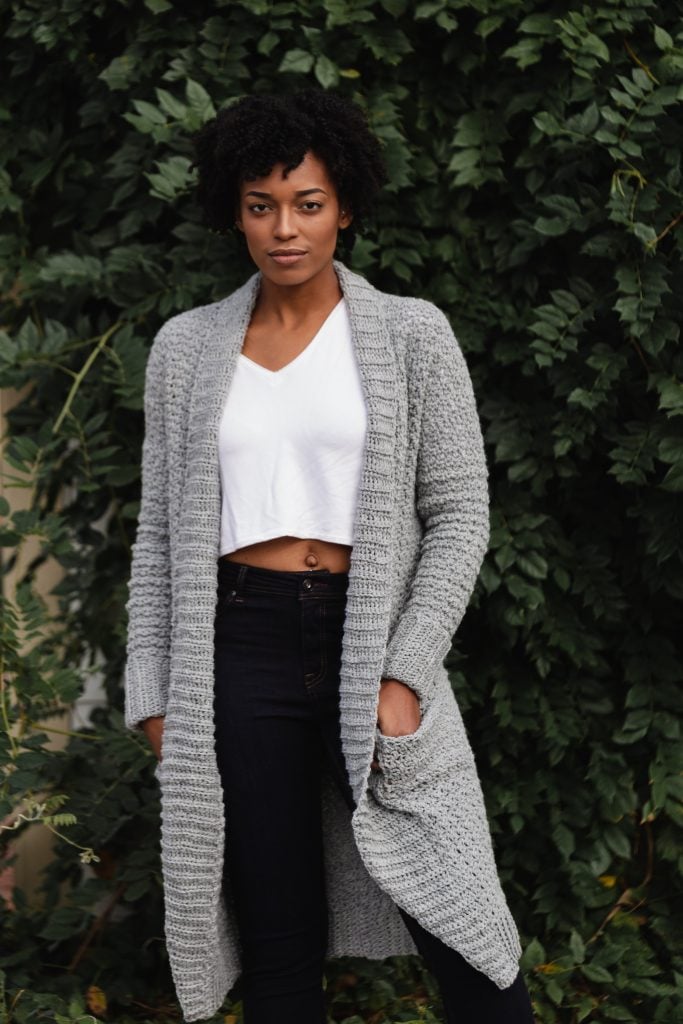
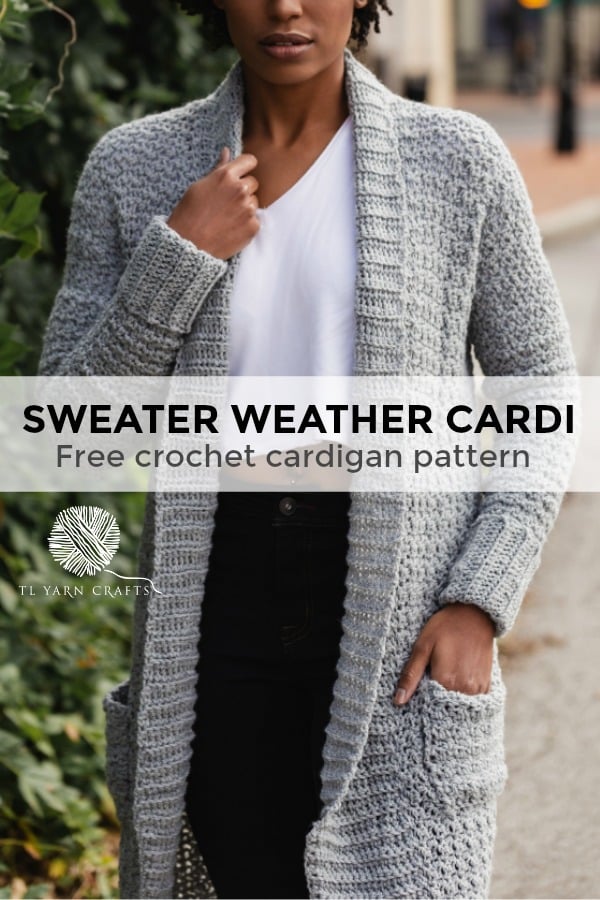
Addictive stitches and thoughtful design elements come together to make the ultimate mid-Winter layering sweater, the Sweater Weather Cardi!
Thanks to my friends at JOANN, this latest collaboration brings in the chill of winter with style. Getting to wear layers is one of my favorite parts of ushering in cold weather. In the past, I’ve had my Veronica Cardi and Astrid Ruana to keep me warm. I’m so excited to add the Sweater Weather Cardi to the lineup, especially as a FREE PATTERN!
This post contains affiliate links that support TLYCBlog content. All opinions are my own.
PIN IT NOW, READ IT LATER
**UPDATE** The Sweater Weather Cardi is now available as a kit from LionBrand.com, including a printed pattern and all the yarn you need! CLICK HERE FOR YOUR KIT!
Find a printer friendly, PDF version of the Sweater Weather Cardi in my Ravelry shop and on TLYarnCrafts.com. PDF version includes full-color, 6 page instructions and helpful schematic with no watermark.
Favorite this pattern and share your projects with me on Ravelry – click here!
Fall is a crochet designer’s favorite season. We can finally start playing with warm, heavier weight yarns and incorporating long silhouettes into our maker library. I saw some really cute long cardigans while shopping at one of my favorite trendy clothing and thought this was the perfect time to design my ideal cardigan!
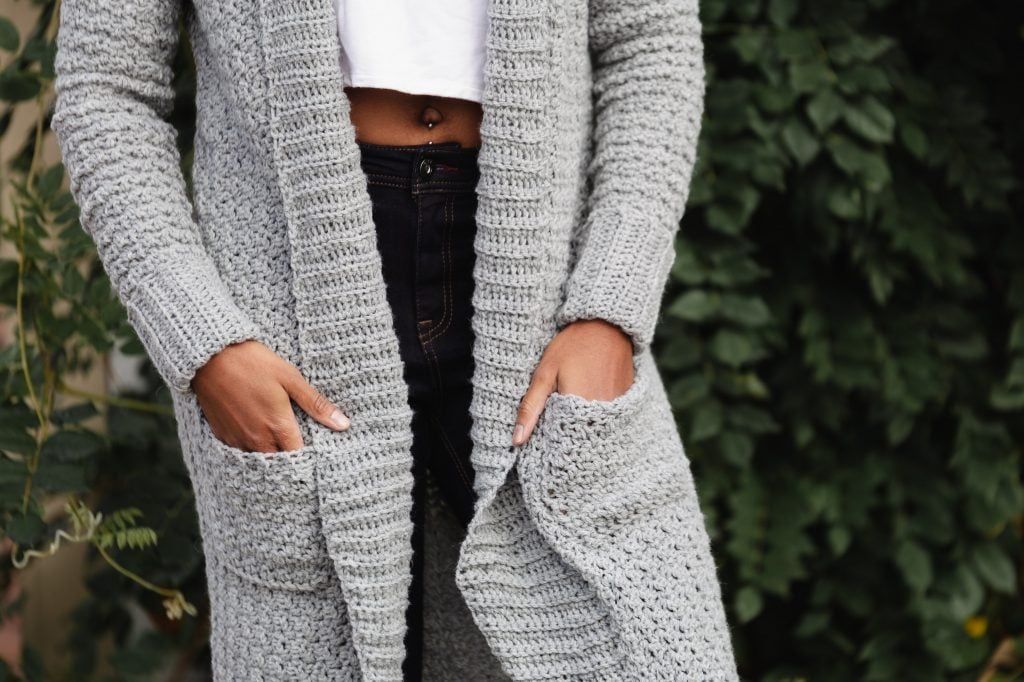
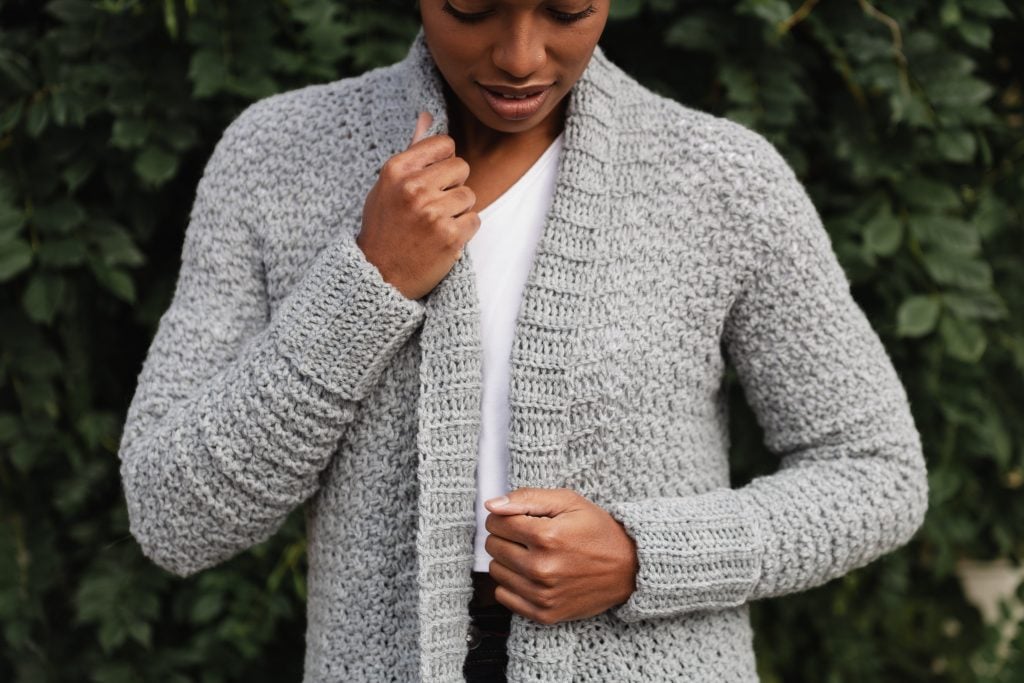
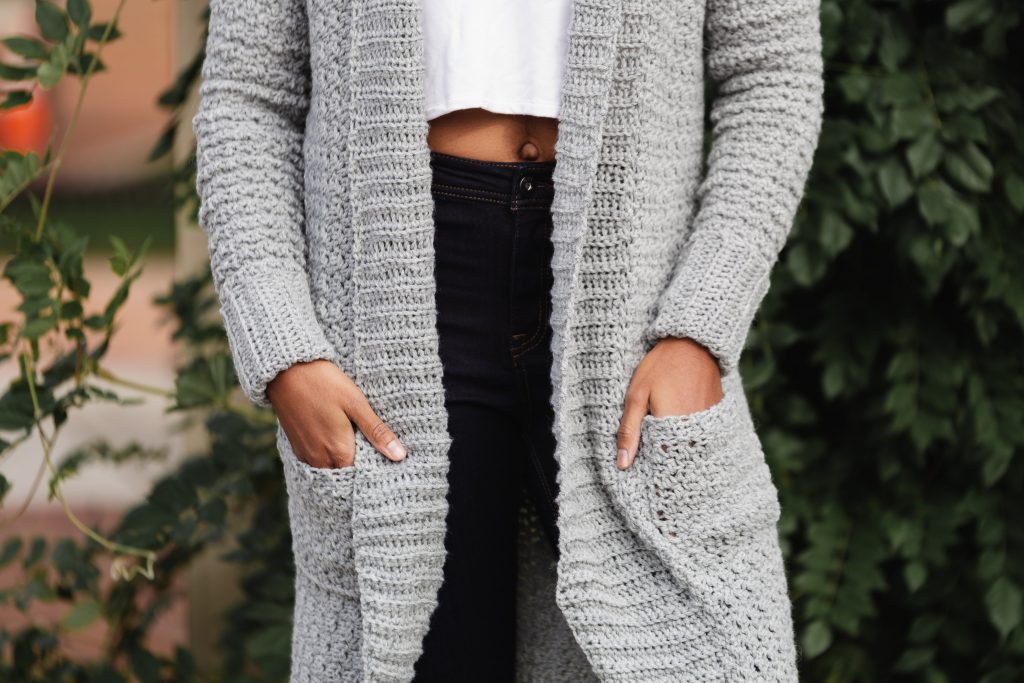
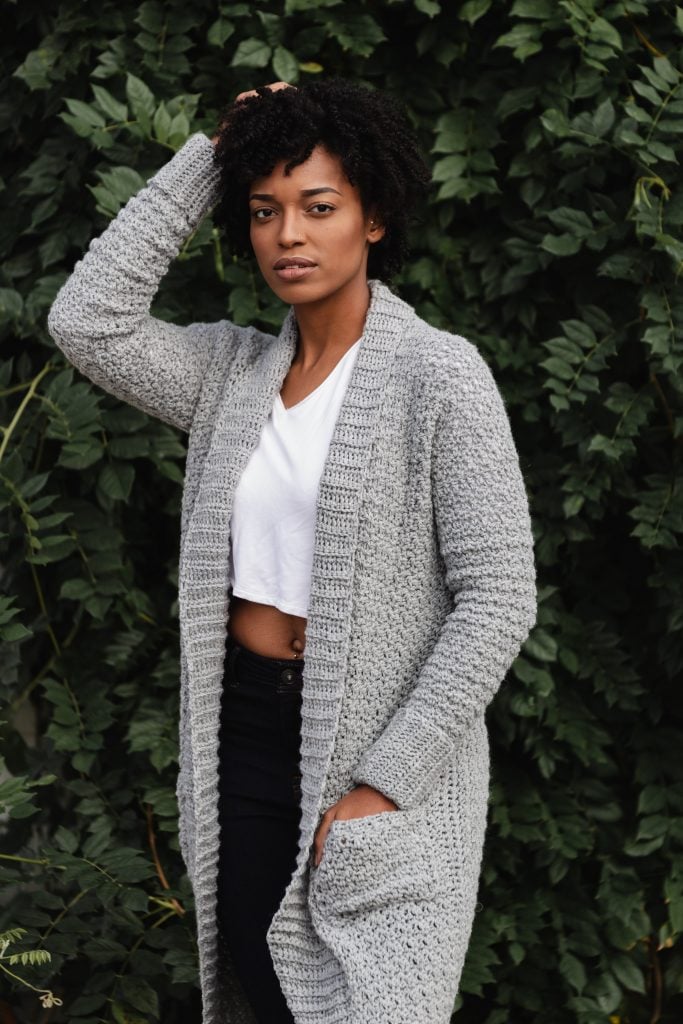
I made a long list of what I’d want my ideal cardigan to look like: long length, a wide, dramatic collar, solid color, pockets (of course!), and plenty of texture. Thus, the Sweater Weather Cardi was born!
The Sweater Weather Cardi is the kind of piece you’ll never want to take off. We’re in the midst of the holidays right now and I think this is the perfect piece to wear to endless family gatherings. Style it with a graphic tee, jeans, and booties for casual Friday at work or a coffee date with your best girlfriends. The Sweater Weather Cardi is meant to be the piece you reach for time after time!
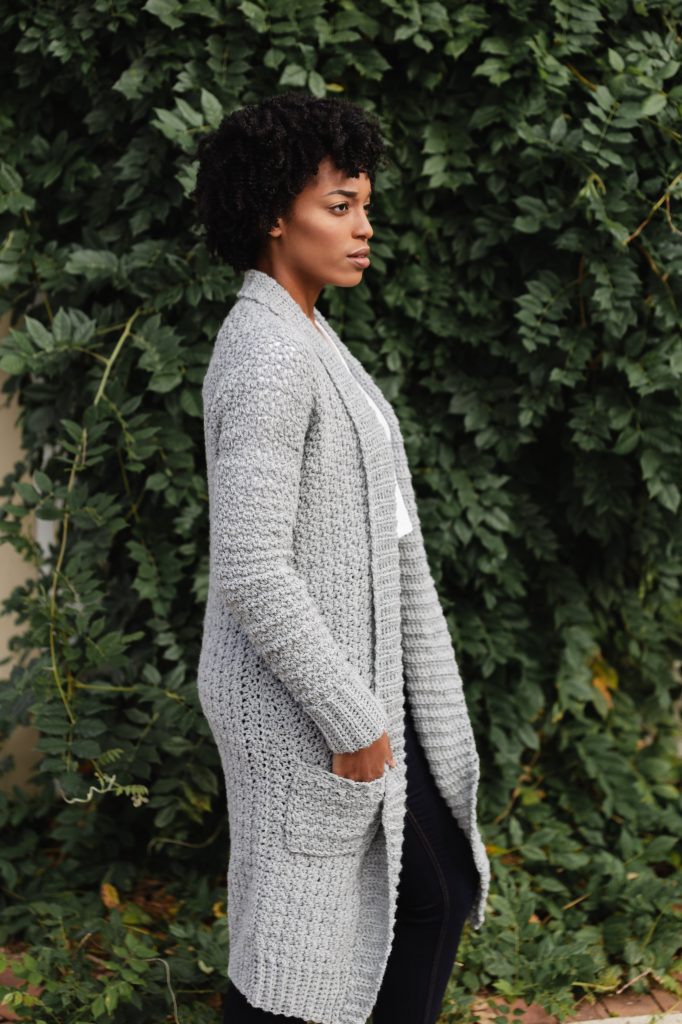
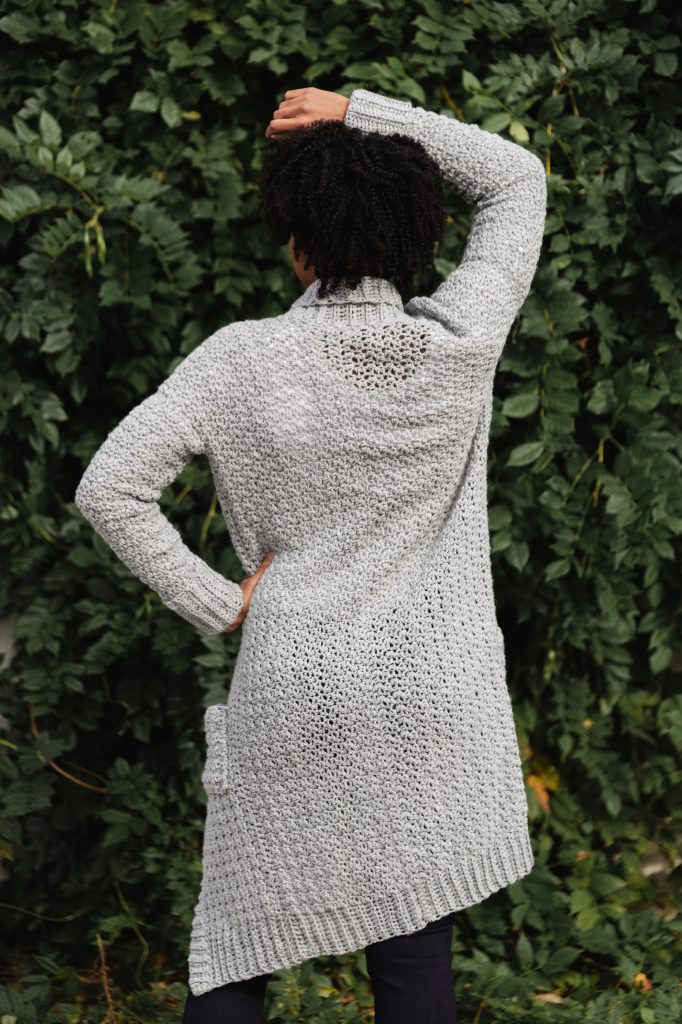
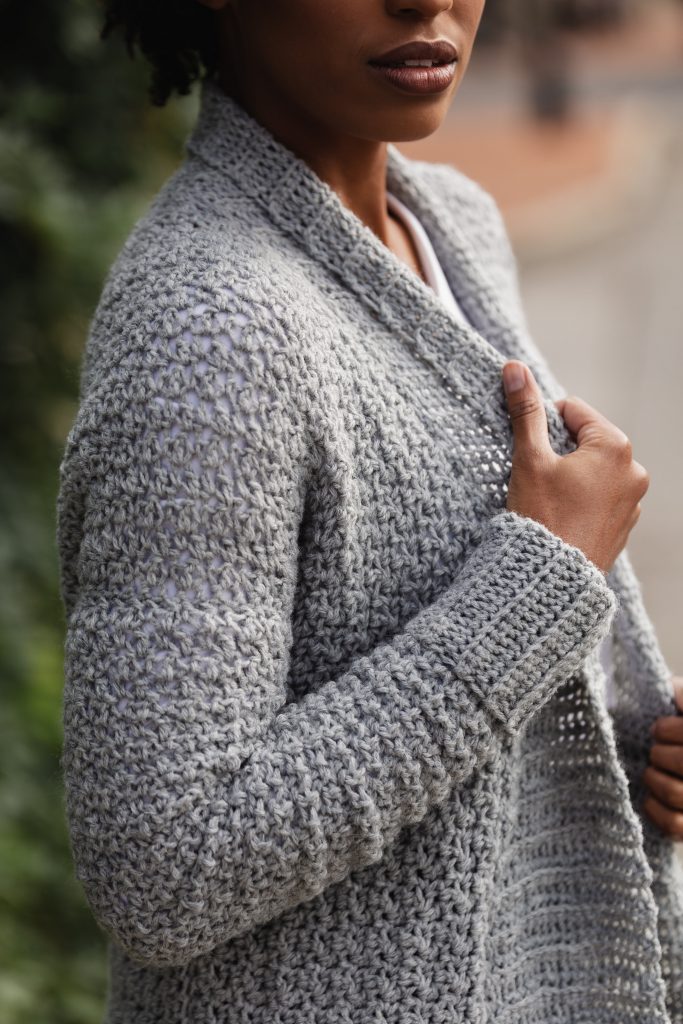
The textured body of the Sweater Weather Cardi is constructed from a simple single crochet / double crochet stitch pattern called the Lemon Peel stitch. It adds visual interest while still being light and flexible. The entire garment is built off of a base of two panels joined with a center back seam. Long cuffed sleeves are added next, along with cute pockets meant to hold your cell phone or wallet. Finish off this project with ribbing along the collar and bottom hem using my applied ribbing technique. You can watch the video for that handy technique here.
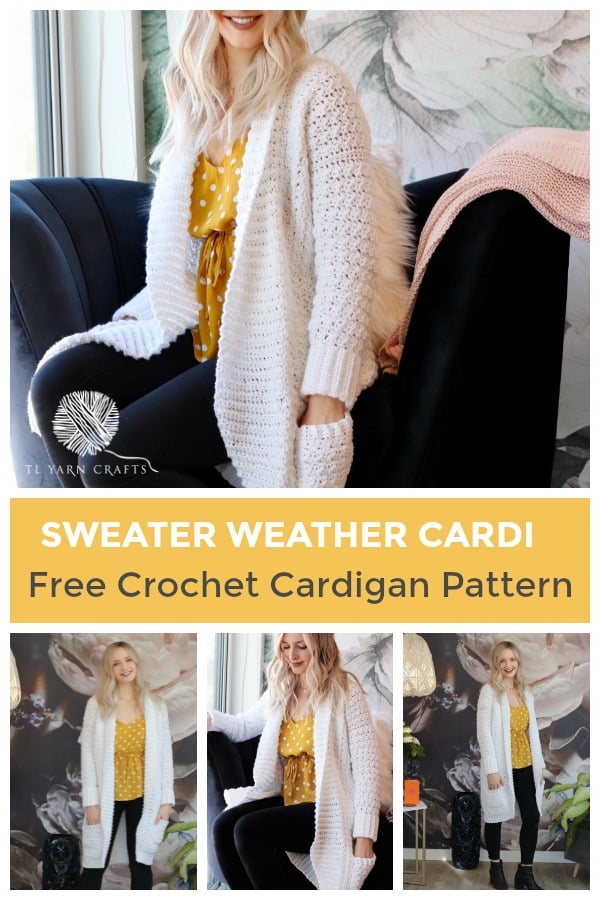
I’m often asked about my favorite yarn. It’s impossible to say what single yarn is my favorite, but there are a few staple yarns that I reach for when I’m designing. One is Lion Brand Wool-Ease. I used it design the Sweet Gingham Baby Blanket and it’s a perfect substitute to add some luxury when making the Mega Pom Beanie. It was the perfect choice for the Sweater Weather Cardi and I found all of the gorgeous yarn I needed at my local JOANN Store.
Depending on the size you make, you will need between 8 and 11 balls of Lion Brand Wool-Ease. My original sample is made in the color Grey Heather, a soft grey color that looks great with everything. (Get this exact kit from Lion Brand right now! Click here!) If I made the Sweater Weather Cardi again, I’d choose the romantic Dark Rose Heather or the woodsy Forest Green Heather.
From the first day I started designing pattern, I’ve included testers in the process. Each tester group is a bit different and includes makers of all skill levels. For the Sweater Weather Cardi, I had 10 testers (my largest group yet!) and each one did an amazing job on her sample.
I was lucky to find a group of generous testers via my private tester group, TLYC Insiders group(click to apply if you’d like to test TLYC patterns!). Please click their links below and show them some love on their amazing finished Sweater Weather Cardigans!
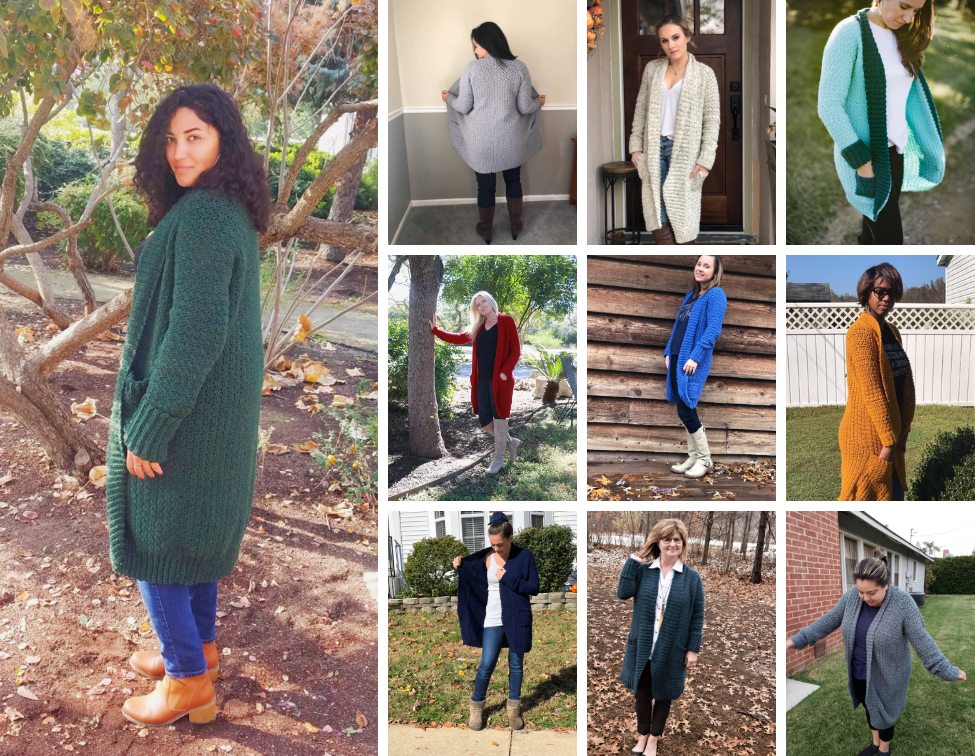
-Diandra of @primeknots (left)
-Alyssa of @1craftym0m (top row, first image)
-Taylor of @knitoriousknits (top row, second image)
-Siohban of @yarnoverfloyd (top row, third image)
-Lori of @heartoftexashandmade (middle row, first image)
-Theresa of @teaganandlu (middle row, second image)
-Danita of @stitchesandrowsbydkw (middle row, third image)
-Denise of @cutelittlestitches (bottom row, first image)
-Carrie of @carrieperlf (bottom row, second image)
-Cindy of @onemoreloop (bottom row, third image)
Click to PIN this Post!
Click here for the Sweater Weather Cardi pattern kit from Lion Brand!
Sweater Weather Cardi Pattern
FINISHED SIZE:
- Bust: 34 (38, 42, 46)”
- Length: (35 (36, 37, 38)”
- Note: This garment was designed with approximately 0-2” of positive ease. Please take this into consideration when choosing your size.
MATERIALS:
-8 (9, 10, 11) balls of Lion Brand Wool-Ease Yarn in the color Grey Heather
-6.5mm crochet hook
-7mm crochet hook
-Scissors
-Yarn Needle
-Measuring Tape
-Stitch Markers
GAUGE:
4 inches square = 10 stitches and 11 rows in (sc 1, dc 1) pattern, using 6.5mm hook
ABBREVIATIONS:
- BLO = back loop only
- Ch = chain
- Dc = double crochet
- FDNsc = foundation single crochet (video)
- Inc = 2 single crochet in the next st
- Inc BLO = 2 single crochet in the back loop of the next st
- Rem = remaining
- Rep = repeat
- RS = right side
- Sc = single crochet
- Sl st = slip stitch
- St(s) = stitches
- WS = wrong side
NOTES:
- Pattern is written for size S with other sizes in parenthesis (M, L, XL). For some sections, instructions for sizes may be written separately. Follow directions only for the size you are making.
- Portions of the pattern are written in crochet shorthand. For example – “sc 1” means single crochet in the next stitch and “dc 1” means double crochet in the next stitch.
- Numbers in parenthesis at the end of some rows indicate the total number of stitches in that row.
- The finished garment may grow after blocking. To adjust the length of the Body, add or subtract foundation single crochet stitches in multiples of 2 and make necessary adjustments at Body Panels Next Row.
- Some makers may need to adjust the sleeve measurement for length. Add/subtract rows as needed while crocheting.
- The ribbing on the collar is made perpendicular to the cardigan opening. Full instructions are included. For a tutorial of a similar technique, watch this video: https://www.youtube.com/watch?v=xsEPLeUSwmg&feature=youtu.be
Sleeves – make 2
STEP 1: With 6.5mm hook, ch 22, sc in 2nd ch from hook and each st across, turn. (21 sc)
STEP 2: Ch 1, sc BLO across row, turn.
STEP 3: Rep Step 2 until piece measures 24 (28, 30, 32) rows total.
STEP 4: With 7.0mm hook, ch 1, rotate piece to work into the ends of rows just made. Hdc into the end of each row, turn. (24, 28, 30, 32 hdc)
ROW 1: Ch 1, sc 1, dc 1, inc, dc 1, (sc 1, dc 1) across row to last 2 sts, inc, dc in last st, turn.
ROW 2: Ch 1, (sc 1, dc 1) across row, turn.
ROW 3: Rep row 2.
ROW 4: Rep row 1.
ROWS 5-12: Rep row 2.
ROW 13: Rep row 1.
ROWS 14-21: Rep row 2.
ROW 22: Rep row 1.
ROW 23-30: Rep row 2.
ROW 31: Rep row 1.
ROW 32-39: Rep row 2.
ROW 40: Rep row 1.
ROW 41-44: Rep row 2.
Cut yarn, leaving a long tail for sewing the seam later.
Body Panels – make 2
ROW 1: With 6.5mm hook, FDNsc 196 (202, 208, 214), turn.
ROW 2: Ch 1, sc BLO for 10 (10, 12, 12) sts, (sc 1, dc 1) across row to last 10 (10, 12, 12) sts, sc BLO rem sts, turn.
Repeat Row 2 until piece measures 7 (8, 9, 10)” from first row to working row in (sc 1, dc 1) stitch pattern.
NEXT ROW: Ch 1, sc BLO 10 (10, 12, 12) sts, (sc 1, dc 1) for 88 (92, 92, 96) sts, turn. Mark first st of this row.
NEXT ROW: Ch 1, (sc 1, dc 1) across row to last 10 (10, 12, 12) sts, sc BLO rem sts, turn.
Rep last 2 rows until piece measures 1.5” from marked row to working row (do not move marker). Cut yarn, leaving a long tail on one panel for sewing the back seam.
Pockets – make 2
STEP 1: With 6.5mm hook, ch 5 (5, 7, 7), sc in 2nd ch from hook and each st across, turn. (4, 4, 6, 6 sc)
STEP 2: Ch 1, sc BLO across row, turn.
STEP 3: Rep Row 2 until piece measures 14 (14, 20, 20) rows total.
STEP 4: Ch 1, rotate piece to work into the ends of rows just made. sc into the end of each row, turn. (14, 14, 20, 20 sc)
NEXT ROW: Ch 1, (sc 1, dc 1) across row, turn.
For S and M only, rep Next Row 9 more times.
For L and XL only, rep Next Row 14 more times.
Cut yarn leaving a long tail for sewing to cardigan.
Assembly
Use the schematic below as a reference when assembling your garment. Remember that the schematic is not to scale.
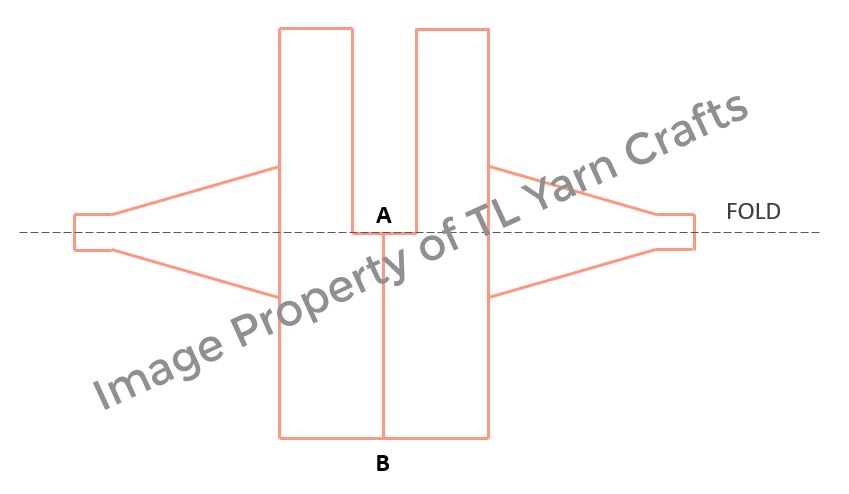
STEP 1: Seam Body Panels from Point A to Point B.
STEP 2: Seam sleeves to Body Panels, joining the midpoint of the sleeves with the midpoint of the Body Panels.
STEP 3: Fold where indicated, with WS facing out.
STEP 4: Starting at the bottom of garment, seam sides and sleeves with remaining tails.
STEP 5: Turn so RS is facing out. Attach pockets at desired height with ribbing on top.
Collar
ROW 1: With RS facing and 6.5mm hook, join yarn at bottom of right Body Panel, ch 5, sc in 2nd ch from hook and next 3 sts, sl st in next 2 sts of Body Panel, turn.
ROW 2: DO NOT CH! Sk 2 sl sts, sc BLO across sc sts, turn.
ROW 3: Ch 1, inc BLO, sc BLO across row, sl st in next 2 sts of Body Panel, turn.
ROWS 4-31: Rep Rows 2 and 3 14 times. (18 sc)
ROW 32: DO NOT CH! Sk 2 sl sts, sc BLO across sc sts, turn.
ROW 33: Ch 1, sc BLO across row, sl st in next 2 sts of Body Panel, turn.
Rep Rows 32 and 33 until you reach Point A (see schematic). Cut yarn.
Left Body Panel
With WS facing and 6.5mm hook, join yarn at bottom of left Body Panel. Rep all Right Body Panel instructions for opposite side of garment opening. Cut yarn leaving a long tail for seaming the collar.
Use remaining tail to seam collar at Point A (see schematic)
Finishing
Weave in all ends. Lightly steam block entire piece if desired.
Purchase the printable PDF Sweater Weather Cardi pattern HERE!
I hope you had as much fun making the Sweater Weather Cardi as I did making the design! I can’t wait to see all of your projects! Share them with me on Instagram and Facebook using the hashtags #SweaterWeatherCardi and #TLYCMakers for a chance to be featured in my feed.
Comment below and let me know what color you’ll be using for your Sweater Weather Cardi! 

Click here to pin this post!
Update: I can’t get enough of this Sweater Weather Cardi made by Janine of @knitsnknotswpg!
Share this Pin image now!


Hi
Thank you for this amazing pattern
I’m working on it but have a question for the panel do we start the Fdsc with the thinner hook and the Blo also and then shift for the larger one with the sc/dc ?
Hi Dina! You’ll do the panel stitches and the ribbing with the same hook – the 6.5mm hook. The 7mm hook is only used on the sleeves.
Hi!
I’m currently making this sweater, I love it so far! I have one question, on the sleeves it says (ch 1, sc 1, DC 1, inc, DC 1) I was wondering what the inc was, is it sc inc or DC inc? Thanks so much(:
Hi darling! Under the Abbreviations section of this pattern, an inc (short for increase) means to place 2 single crochet stitches in the next stitch. Let me know if we can help with anything else!
Hi there, I am currently making the sweater weather crochet cardigan and when I go to seam the body panels together I have a right side facing out and wrong side facing out. What have I done wrong?
Hi love! The body panels are made identical, so there is no right or wrong side. Hope that helps, and feel free to email [email protected] if you have more questions!
Hi Toni! I’m just finishing up my second sweater weather cardigan and I have to tell you that I absolutely LOVE your patterns. Your such a brilliant designer, so, so talented. I recently purchased your flat iron shawl as well and I can’t wait to get going on that one either. I am sure it won’t be long before I work through your whole library! Thank you for sharing this pattern, it is one of my Favorite crochet cardigans!
LAUREN! This just totally made my day. Thank you so much for your kindness and sharing in crochet with me. I can’t wait to see your projects! Be sure to share them on Instagram using the #TLYCMakers hashtag 🙂
You are the bee’s knees!
I wonder if this could be made using Tunisian crochet? I’m getting pretty confident with Tunisian, but regular crochet is still not clear to me (I know, I’m a bit backwards, lol!).
It sure could, Lorraine! You’d have to do a bit of math, but I bet you could make it work!
Thank you, Toni! One more question: what adjustment(s) would I need to make if I want to make the sleeves (upper arm part) wider?
Are there any instructions to make this larger, like a 2X or 3X?
Hi Heather! There are no instructions in the current pattern to make this larger, but you could use the gauge of the pattern to adjust it for the size and length you need.
I get confused in the collar I see in the picture it is big and my it is small
Hi Vanessa! The collar is worked perpendicular to the body of the sweater. There is a link to a video tutorial that will help you understand how to build up the collar. It’s a really fun technique 🙂
Hi Toni,
Thank you for this amazing pattern! I would like to make this larger for my DIL. I’m not sure how to use “gulags” to figure that out as you answered above. Is there a stitch multiple that would help me to size it up or any other way you could possibly assist me please?
Thank you so much!!!
Hi Sherry! I’m so glad that you’re looking into making my cardi pattern as a gift. The best way to make adjustments would be to get comfortable using the gauge as a guide for making the size you need. Since there is shaping in the sleeves and the body of the cardigan, adjusting based on gauge will be crucial.
I have all the parts for the sweater made. I’m moving on to putting it together. Is there a certain stitch you use to join the panels and sleeves?
Loving the pattern so far! I may make another one!
Thanks,
Great question, Heather! I usually use a whip stitch since it’s simple enough. I lay the panels flat next to each other and whip stitch firmly along the seam. I didn’t use the mattress stitch for this project, but it would be a great substitute.
Hi,
What does this mean? “ at row 3 bodypaneks?
I’m Dutch. My English is not very good.
Does it mean inches?
Greetz Elizabeth
Hi Elizabeth! I think some of the translation is getting lost. Can you screenshot the part of the pattern you need help with an email it to me – [email protected].
Hi! I am finally making this gorgeous sweater only longer. It makes me so happy! Your design is so beautiful! I have a question for you however. As I work on the sleeves one row has increases So I’ll have , dc, sc-sc, dc,sc, etc and in the next row it says to do the entire row following this pattern sc, dc. So the singles will no longer go in the doubles from the previous row nor will the doubles go in the singles. They will all be mixed up going into both at different times. Is this normal? What am I suppose to do?
Thanks for your help!
Hi Stephanie. You’ll increase twice in each row, so there will be areas when you’re not putting dc in sc and vice versa. But, since you increase 2 stitches each row, the row following an increase row sort of resets everything. Keep going – it’s sounds like you’ve got it!
Hi tonight, I’m just started making this gorgeous sweater & I’ve gotten the sleeve cuff but I’m confused on step 4 : With 7.0mm hook, ch 1, rotate piece to work into the ends of rows just made. Hdc into the end of each row, turn. Do I work it down the side of my 24 rows & hdc in each stitch? Please help!
Hi Krystal. Yes, that’s exactly what you do 🙂
Hello! I’m excited to try this patter, it’s lovely! But I cannot find a 7mm crochet hook. Can I just use my 6.5mm for the whole thing? Or go down a size overall, so use a 6mm and a 6.5mm instead? Thank you!
My first recommendation is to invest in a 7mm hook – there are some great patterns out there that use them and you may need one down the line. I found one on Amazon that might work well [LINK] that would work perfectly. If that’s not something you’d like to do, try a gauge swatch with your 6.5mm hook to see how you will need to adjust your sweater to meet the size you need 🙂
Hi Toni! I was wondering, can you machine wash this cardigan? Does the stitching hold up well, and will the yarn pill?
Hi! Great questions. Over time, a project made with a wool/acrylic yarn will pill in high friction areas (under arms, the seat area, etc.). This is common. To help manage and prevent pilling, spot clean this project as opposed to machine washing and use an anti-pilling took to keep the fabric looking fresh. If you need to wash it, place the sweater in a large garment bag, was on a delicate setting, and lay flat to dry.
Good evening, I started to make your sweater, and I’m a little confused on the part of the pattern that is for the body [anels, It says repeat row 2 until & (8) from first row working the sc dc pattern, then the Next Row you ch 1 scBLO10 then sc dc work for 88 (92) stitches next row is Ch 1 sc 1 Dc 1 to last 10 stitches. It is from this point Iam confused as it says repeat last 2 rows until piece measures 1.5″ from marked row, is the is the 1.5 only 1 and 1/2 inch or 12 and 1/2 inches from the marked row?? Thank you if you can clarify this Sharon.
Hi! Please email pattern questions to [email protected]
Hi! This is my first large crochet piece, and l’m really excited to start! I can’t seem to figure out my gauge though. I have too many stitches in 4” (12 stitches) and not enough rows (10 rows). I’ve tried it 4 times, and l can get one right but never both at the same time. What should or can l do?
Hi! Please email pattern support questions to [email protected].
Hello! If i wanted to do the Pockets and ribbed edge (like in your Tester’s pic (top row, top right pic) how many balls/yard would i need in the second colour? thank you!
Hi – please send pattern support questions to [email protected].
Hello,
Are the sleeves supposed to be looser or tight fitting from the shoulder to the elbow? Thank you!
The sleeves should be mostly fitted through the upper arm. If you find the sleeves are too snug, make the sleeves for the next size up 🙂
Hi I have just started making this and just wanted to ask if the cuffs on the sleeves fold over or not and what length they should be before turning to work on the main body of the sleeves as the gauge is for the sc dc combo. Thanks and I’m so excited to get going with this as the pattern seems to be very well written for a beginner like me.
Hi Natalie! So glad you’re making the Sweater Weather Cardi – it’s one of my favorites 🙂 Yes, the cuffs are meant to fold. They should wrap comfortably around your wrist before moving on to make the sleeve. If they don’t fit quite right, you can add or remove rows so you still have an even number of rows. Hope that helps, and feel free to email [email protected] if you have more questions.
Making a sherbert-coloured mint green right now! Thanks for this pattern – it is lovely!
Hi! I am making this cardigan, but chained 180 instead of 196. I’m having trouble with the mental math of the shorter section…….I know it’s not 88 stitches, would you be able to tell me how to work this out? Thank you! I’m using Icicle Wool Ease for mine.
Hi! I’d love to help you. Please send your pattern support question to [email protected].
Hi Toni,
Am about to work collar and wonder if ch5 indicated is correct? When I look at pics of collar it seems much wider than 5scblo… is it supposed to 15 maybe, if it’s to fold over?
Thanks so much!!
Taira
Great question, Taira. The collar starts thin at the bottom and gets thicker as you get toward the neckline.
Hi there
I am a beginner crocheter and I cannot see the free pattern anywhere.
Why dont you have a tutorial video of the pattern?
Thank you
Hi! The free pattern is available to view at the bottom of the blog post. There is no tutorial video for this pattern.
Hello!
What a beautiful cardigan! Do you think I might be able to make this with a pure cotton or cotton blend yarn? If so, is there anything that I should keep in mind?
Thank you so much!
Hi! Great question. I’d definitely go with a cotton blend. Since this cardigan is so long, pure cotton would stretch and sag over time. Go with a cotton/acrylic or even a cotton/wool blend to get the airness of cotton and the integrity of the other fiber.
Hi there! This is a gorgeous sweater. I just started and I’m at the 88 st portion. However I noticed mine is looking extremely small, and I’m wondering, am I supposed to crochet the sc1, dc1 in BLO or is that just for the ribbing at the ends?
Hi! The stitches in the body of the sweater are worked through both loops only. I’m happy to further troubleshoot your issue – please email [email protected] for pattern support.
Hi. This is such a beautiful pattern. I am having the same problem as Sharon in interpreting the body panel instructions.
The sleeves I understood, no problem.
The body panel seems to say , crochet until piece measures 7 inches (this is where I am at – it seems to be very short)
Then it seems to say do 2 rows and then repeat last 2 rows (approximately, how long should repeat be?)
I do not understand 1.5 inches from marked row to working row. Is that like 1-2 rows ? or am I misunderstanding ?
Please help.
Hi! Please send pattern support questions to [email protected]. We’re happy to help!
Hi Toni! I would love to make this sweater for my daughter but she really wants one with a hood. Do you have a link, tutorial or instructions on how to add a hood to this beautiful sweater? Thank you!
Hi Nancy! We do not currently have a tutorial for that. We will certainly add it to the list of future video ideas!
This is a pretty cool pattern. It took me about a year to do. Although, I think someone working on it nightly for a few hours could probably finish it in 1 to 2 months. With this, you probably don’t need a fall coat. Like another person said, it’d do well to have a hood. I may add one. (It’s not really that hard. Find a hood pattern. crochet hood. Stitch in where the collar meets the body on the inside)
Some issues – The sleeves are going to be tight, so if you don’t have skinny arms, I’d add a few stitches to those rows.
2. The collar at 5 stitches is going to be very narrow. I realized it immediately and doubled the length, but you need to add half a ball of yarn to your estimate.
It took me every bit of 12 balls of yarn to make the extra-large, and I needed about 50 feet of ball 13. Buy lots of yarn. Well over what you think you need.
3. The foundation chain is the length. You are crocheting the width. If you want it longer, you need to make your foundation chain longer. If you are tall, add more. I recommend increments of 10.
Why is the 7mm hook needed? It is only referenced once, and .5mm difference doesn’t make sense. There is no conversion for that hook into American sizes. Other than tension, what is the point?
Hi! Great question. I recommend going up 0.5mm for the sleeves to make them a little fuller – it’s all about tension, and you want a looser tension on the sleeves. While 7mm isn’t common in American sizes, it is available locally (check Clover). Conversely, you could add 2 or 4 rows on your sleeve cuff with the 6.5mm hook to make the sleeve wider.
Toni,
Your cardigan is amazing. I’m still pretty new at crochet and am wanting to make one of these for my wife.
The pattern starts with the sleeves and has 4 steps and then 44 rows of instructions. I’m just wanting to make sure that I understand. Do I start with the 4 steps and then do the rows off the piece I’m working on? Or how do they go together. Any help you can give would be most appreciated.
Thank you,
Matt
Hi! Great question. Steps 1-4 are to make the cuffs, then you move into the row instructions to make the rest of the sleeve. After completing steps 1-3, you rotate the piece in step 4 to work along the row ends of the cuff to build the sleeve. Does that make sense?
Hi, hope all is well. I have been crocheting for many years and it is my intention to start making wearables. I am attempting a gauge swatch and in order for me to achieve the 10 stitches in 4 inches i have to use a 12mm hook. I have tried using every hook in between with no luck. Do you have any suggestions? TIA
Hi darling. Happy to help! First, I’m wondering what size yarn you’re using. The original yarn is a lighter worsted, so that might be part of the issue. I also wonder how you are measuring your gauge. The gauge is worked over the (sc 1, dc 1) pattern, where each sc and dc count as one stitch. I also recommend making a gauge swatch wider than the gauge given so you can measure gauge over the center stitches and not the edge stitches. Using a bigger hook means that you originally had too many stitches in your gauge, so you may want to use a heavier yarn than you are swatching with.
[…] Pattern and Photos By: tlycblog.com […]
Thank you so much for your feature––we greatly appreciate your support 🙂