How to Increase and Decrease in Crochet

Once you have a handle on basic crochet stitches, you’re well on your way to making all of the squares and rectangles you want. But, if you want to add shaping to amigurumi, garments, and accessories, you’ll want to get comfortable with how to increase and decrease in crochet. This post shares simple increase and decrease methods for basic crochet stitches worked in rows.
This post contains affiliate links that support the content on TLYCBlog.com. All opinions are my own. Find my Privacy & Disclosures Policy here.
CLICK HERE TO PIN THIS POST
Creating shapes and curves in crochet is much simpler than it sounds. The basic concept involves adding or removing stitches as you work along a row. Adding/removing stitches allows the remaining stitches to move in different ways, accentuating the 3D nature of crochet.
Shaping in crochet can allow you to add handles to a basket, smoothly shape armholes and necklines on garments, create fun shapes to use as appliques or wall decor, and so much more. Typically, a crochet pattern will specify preferred increase and decrease methods, so pay close attention to the Notes section.
Basic Crochet Increase
When crocheting in rows, you typically put one stitch in each stitch from the previous row. That is how you maintain the same stitch count and shape of your project. To increase, you place 2 or more stitches in the stitch from the previous row.
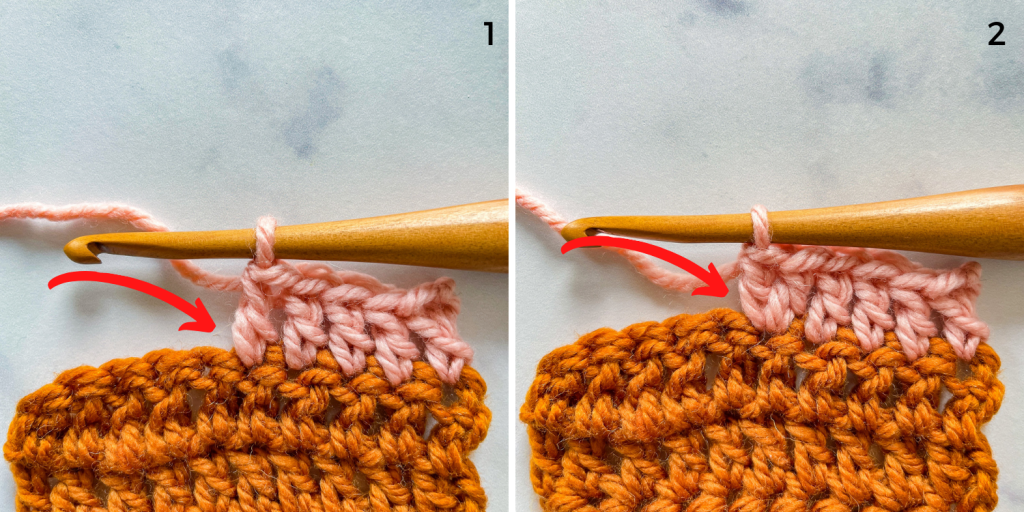
- 1: One double crochet stitch worked into the stitch below.
- 2: Two double crochet stitches worked into the stitch below (+1 increase made).
Where do crochet increases go in the row? Increases can be made anywhere in the row – at the very beginning, at the very end, and/or in any stitch within the row. Placing increases at the beginning/end of the row will cause the fabric to grow wider at the end where the increases are placed. Placing increases in the middle of the row will cause the fabric to bow up or out at the place of the increases.
How do you increase different stitches? My example shows how to increase with double crochet, but you can use this same technique for single crochet, half double crochet, or any stitch that is worked by placing one stitch into the stitch below. Simply place 2 of the same stitch into the stitch one row below.
Basic Crochet Decrease
Crochet decreases typically involve working two stitches together. The technique is different for each of the basic stitches but accomplishes the same thing – turning 2 stitches into 1 stitch.
Single Crochet Decrease
Working 2 single crochet stitches together is abbreviated as sc2tog. Here’s how you do it:
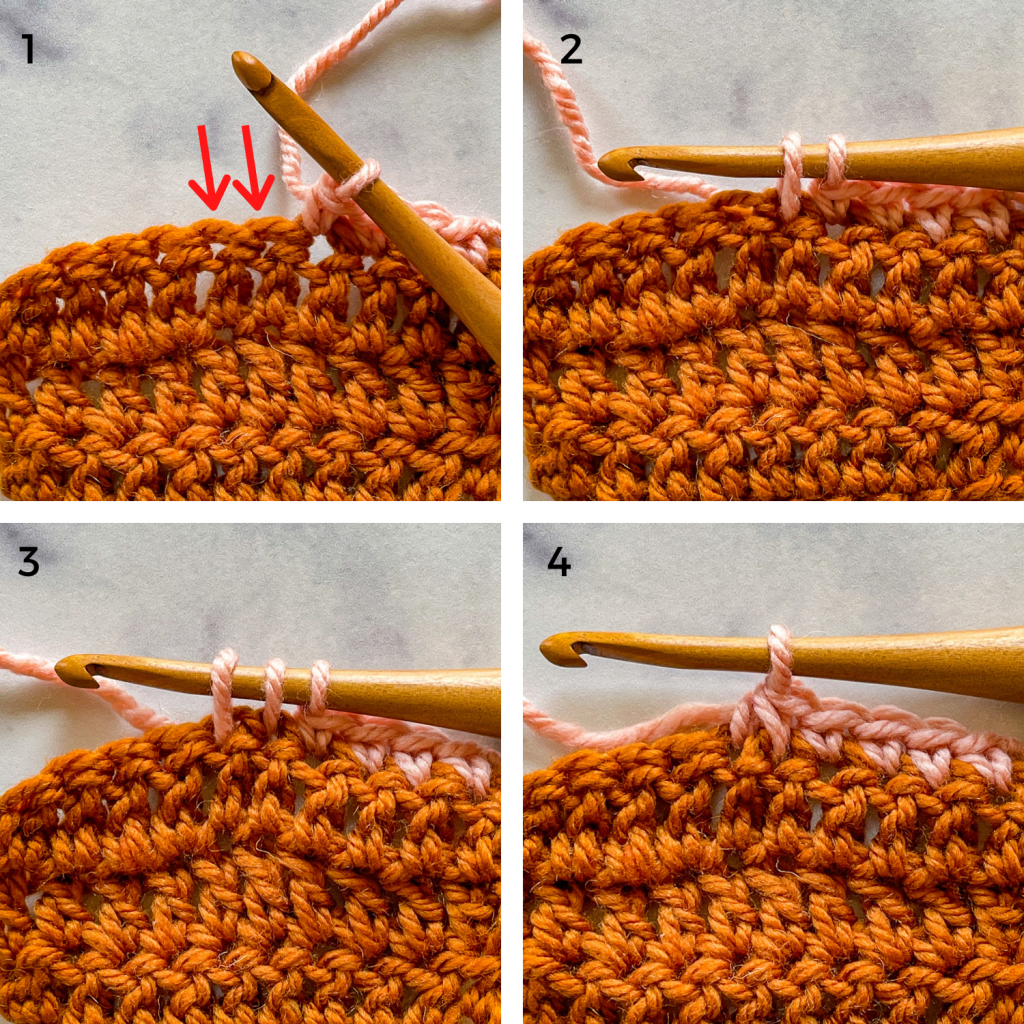
- 1: Identify the 2 stitches you want to decrease over
- 2: Pull up a loop in the first of the 2 stitches (2 loops on hook)
- 3: Pull up a loop in the second of the 2 stitches (3 loops on hook)
- 4: Yarn over and pull through all 3 loops on the hook.
Half Double Crochet Decrease
Working 2 half double crochet stitches together is abbreviated hdc2tog. Here’s how you do it:
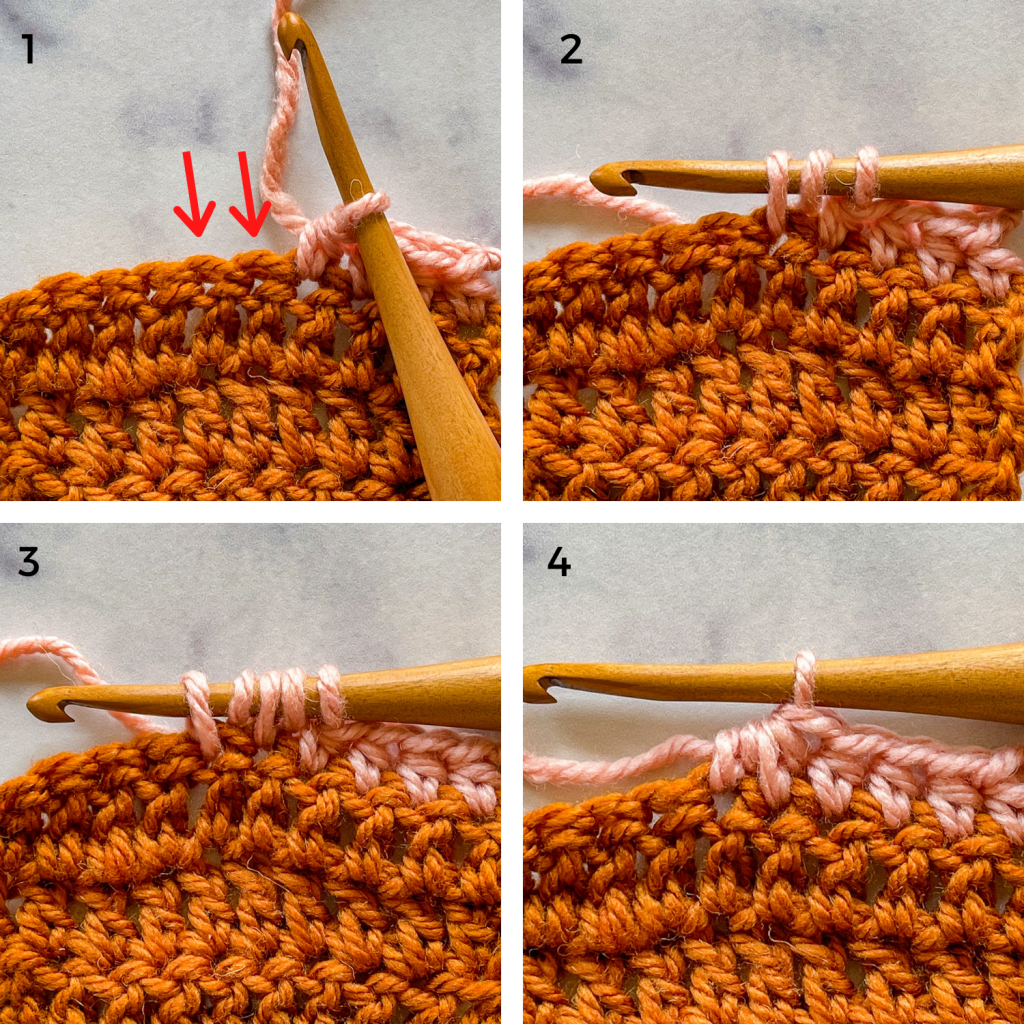
- 1: Identify the 2 stitches you want to decrease over
- 2: Yarn over and pull up a loop in the first of the 2 stitches (3 loops on hook)
- 3: Yarn over and pull up a loop in the second of the 2 stitches (5 loops on hook)
- 4: Yarn over and pull through all 5 loops on the hook.
Double Crochet Decrease
Working 2 double crochet stitches together is abbreviated dc2tog. Here’s how you do it:
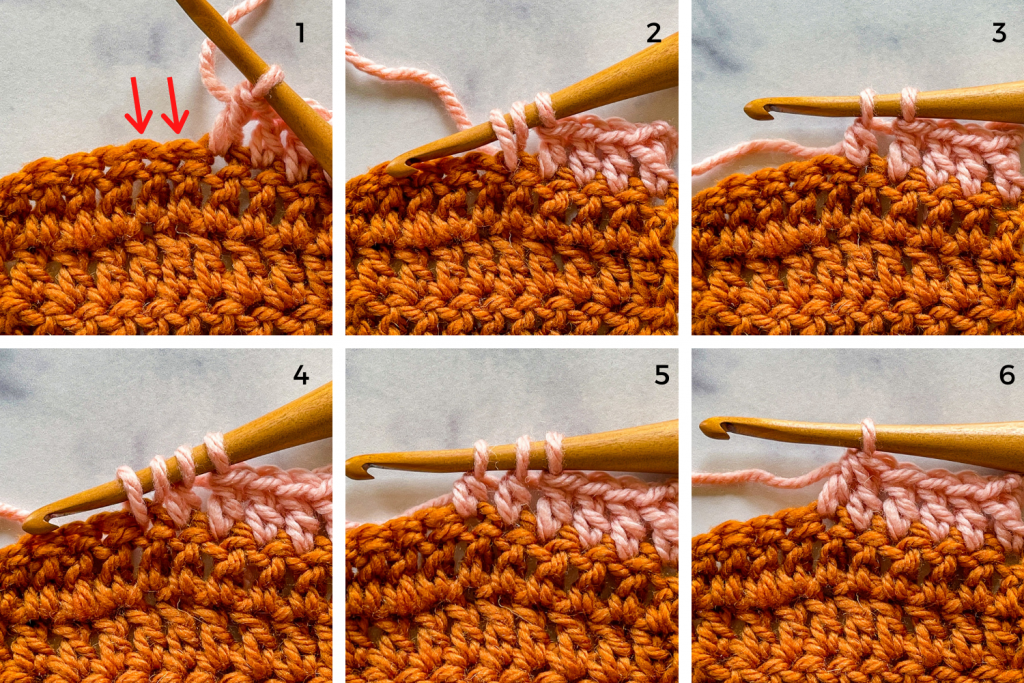
- 1: Identify the 2 stitches you want to decrease over
- 2: Yarn over and pull up a loop in the first of the 2 stitches (3 loops on hook)
- 3: Yarn over and pull through 2 loops on the hook. (2 loops on hook)
- 4: Yarn over and pull up a loop in the second of the 2 stitches (4 loops on hook)
- 5: Yarn over and pull through 2 loops on the hook. (3 loops on hook)
- 6: Yarn over and pull through all 3 loops on the hook.
Learn More About Crochet Increases and Decreases
I can’t wrap up this post without mentioning one of the most valuable books in my crochet library – Crochet Every Way Stitch Dictionary by Dora Ohrenstein. It is possible to increase and decrease on the edge and/or within the row of many simple and complex stitches. Dora breaks down exactly how to do it in this book, providing charts, written instructions, and stitched samples.

Not only is this book a wonderful resource for increasing and decreasing in crochet, but it’s a great way to learn new stitches. Crochet Every Way Stitch Dictionary is broken up into helpful chapters that explore different stitch types like mesh, textured stitches, lace, and more. Get your copy on Amazon and Barnes & Noble.


Thank you so much for these lessons. They have been soooooo helpful.
Thanks Toni! I love how simple you make the magic ring because I’ve tried different ways from YouTube videos but couldn’t get it. I also like the way you start a new row of the round by turning it. I’m going to try it.🤗
Thank you Toni<3 I hope everything is okay with your computer connection. Also, the crochet dictionary will be on my birthday wish.
Thanks Toni … increasing/decreasing makes much more sense now. However, one question – if increasing in the 1st/last stitch does that make the edges uneven? Your images show very nice even edges. Would 2nd stitch/2nd to last be an option?
Hi! I always work only 1 chain for my turning chain when doing sc, hdc, and dc. That’s what keeps my edges straight. If you’re concerned about the increase messing up the edges, absolutely do the increase one or two stitches inside of the edge.
I appreciate a great resource. Thank you.
These lessons are preciously valuable and priceless!!!! Thank you for making crochet so much easier and simple for me!!!!
Thanks for sharing a simple magic circle!
Can we get a video on this?
Maybe some day. You could also look for one already on YouTube if you need one sooner.
This has been very helpful. Thank You
Toni,
Thank you for this tutorial!
Question! Do you usually increase (or decrease) on BOTH the forward pass AND the backward pass? Or just the forward pass? Or does it depend on the pattern?
Hi! It just depends on what the pattern says. But you can place your increases/decreases wherever you want and use them as often as you need to in a project. Where and how often you increase/decrease will change the shape of your project.
I always get so confused as to what makes an increase or a decrease. Thanks for this explanation along with the photos. They help me to better visualize what to do.
I just got my Crochet every way stitch dictionary in the mail the other day. Ordered it along with several others you recommend in your video on your favorite books. Super excited to learn more about shaping. I tend to use an invisible decrease for any amigurumi that i do. So much to learn and i love it!!
I can’t make the zoom call due to work, but I am so excited to finally be crocheting successfully! Thank you for being such a great teacher!
Thank you. Another crochet mystery solved!!
Thank you Toni. These tutorials are so easy to follow. The stitch dictionary is on my list.
I am sad i missed the assembly yesterday as i was a few days behind on email. but loved this lesson as I needed to learn the different decreases.
Toni – such a helpful lesson! I created a new swatch and practiced each increase and decrease, just so my hands could learn the technique. It’s a funny little swatch now, with ripples and bumps, but it clearly shows where each increase and decrease occurred, just like your direction! You have a gift for communicating how to do something – and we are blessed!
Hi Toni! Thank you SO much for putting together this post! It is is valuable to have all the increase and decrease information in one place instead of having to look at different websites with different pictures and different explanations. Such a great resource! This would be super as a one page PDF reference guide too!
Hi Toni, this week’s lessons are just what I was looking for. I have learned so much from you. I just started crocheting in January of this year. Your Learn how to crochet was just what I needed, then along came Crochet Academy! Fun Learning more details. Thank you.
Toni, I appreciate your information on increasing & decreasing. It was very helpful. I will be ordering the book that you shared.
Toni, I won’t be able to join the assembly due to work. I have learned so much and I sure there is a lot more to learn.
Thanks for explaining increasing and decreasing. I want to start making my own garments but it seems so hard but I know I’ll get there eventually once I get my nerves out of the way.
Thankyou so much for the easy to understand tutorial with clear images for us newbies, kind regards Avril Sexton
Thanks Toni. A very helpful post for a crochet noob like me.
Does it work to do an invisible decrease when not working in the round?
I haven’t tried it, but I would think so. When worked in turned rows, you get a lot more texture that can hide a decrease. But it would be worth giving it a try 🙂
Toni, this is so clear and easy to understand! Thanks for breaking it down☺️
Thanks so much for all your amazing content. These crochet academy posts have been so informative. Just an FYI for everyone the Crochet Everyway book is available on Kindle Unlimited, if you have it!
Toni, you have cleared up my anxiety over increase/decrease! Your diagrams allowed me to visualize the steps I need to follow.
Turns out all these years old crocheting I’ve been doing the half double crochet wrong. Thank you for setting me on the right track.
Super happy to help 🙂
I bought the Oberhiem book you suggested. Great information and so easy to follow. Thank you, Toni, for this tip. I thought I was a pro at granny squares, but you have shown me some tips that I never knew. Thank you for that.
So glad you found a helpful resource. There’s always more to learn 🙂
This is excellent information! The dbc2tog I will need to practice! 🙂 It’s amazing how to grow a pattern in the round and tricky for me in an oval… I definitely need to understand where to place the increase/decrease for patterns with stitch markers.
OMG! The visual examples are EVERYTHING!