5 Quick & Easy Crochet Border Stitch Patterns for Beginners
")
Adding a crochet border to your project elevates the design and adds a nice finishing touch. If you’re unsure which border stitch pattern to use, try these! I’m breaking down 5 of my favorite crochet border patterns that I’ve used in previous designs. Use the written pattern and step-by-step tutorial video for an effortless finish to any crochet project.
This post contains affiliate links that support the content on TLYCBlog.com. All opinions are my own. Find my Privacy & Disclosures Policy here.
SAVE THESE STITCHES FOR LATER
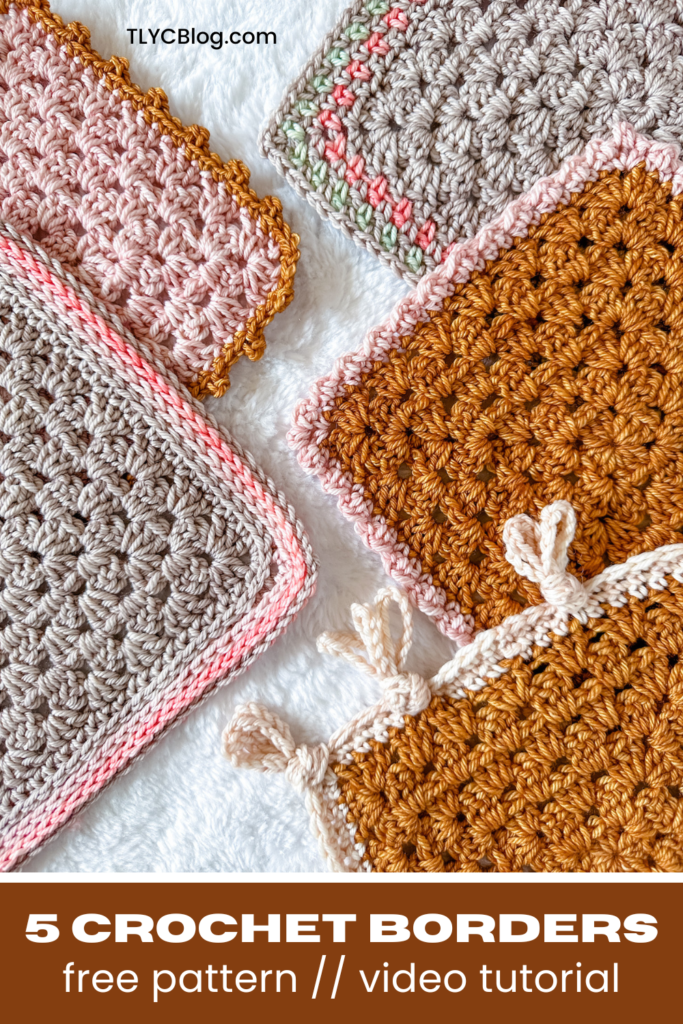
Crochet Border Patterns
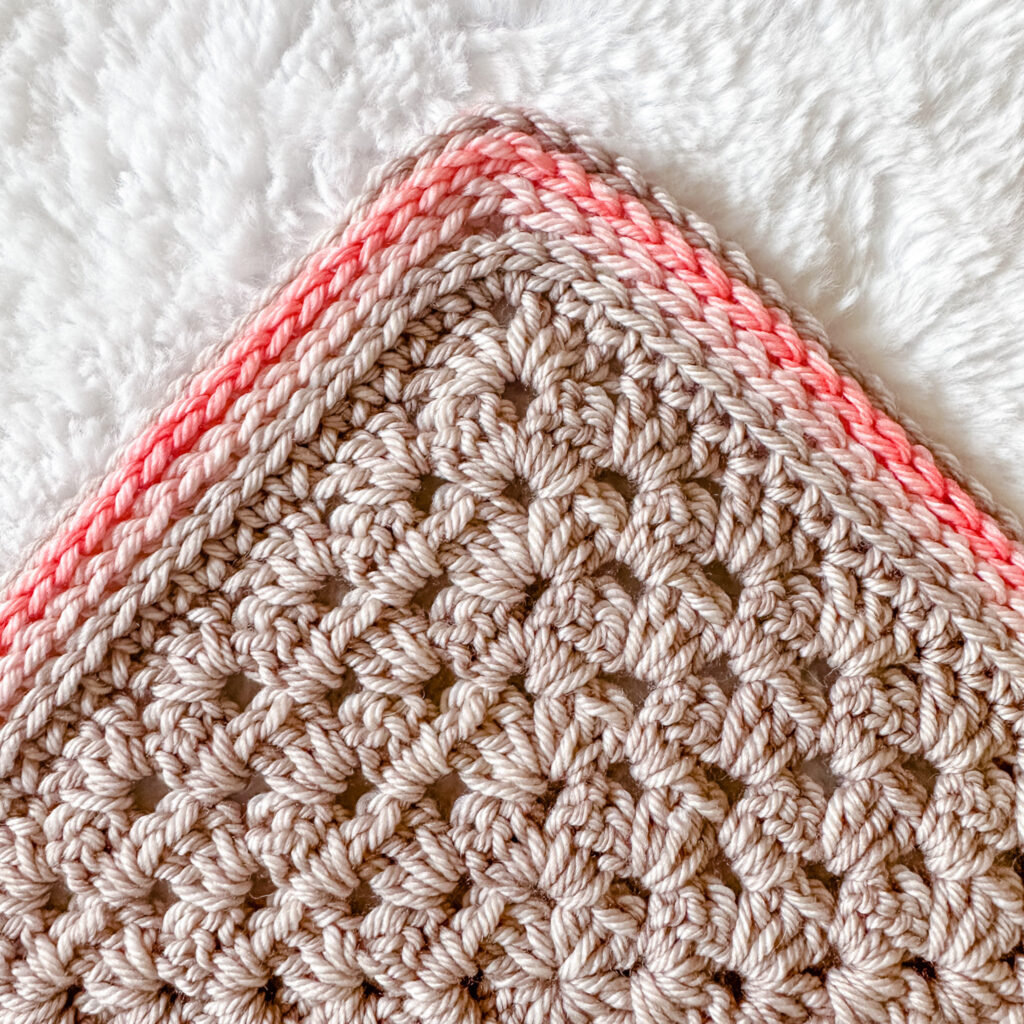
After spending hours crocheting a scarf, shawl, or blanket, finish it the right way by adding a beautiful border. Crochet borders add a touch of polish to finished pieces, just like putting a piece of priceless artwork into a frame.
Do I need to add a border to my crochet project? Consider adding a border if you need to use up leftover yarn from that project or your stash. A border can also add to the length or width of your project, making it larger while also making it more interesting to look at. A border also helps by adding strength to your project, ensuring that it doesn’t unravel.
How do I choose the right border for my crochet project? I focus on balance when choosing a crochet border to add to my project. If the project is complex or “busy”, I like to keep the border simple. Conversely, if the project is simple, I can get much more creative by adding color, texture, and visual interest to the border. Some borders require a specific stitch count to complete – count your stitches and adjust the stitch pattern to fit your project. Make a few swatches and practice the border pattern you have in mind before adding it to your final piece.
Ready to learn some crochet border stitch patterns? Check out all 5 in this video!
Need some help reading crochet patterns or understanding abbreviations? Check out this post – How to Read Crochet Patterns for Total Beginners.
Picot Border
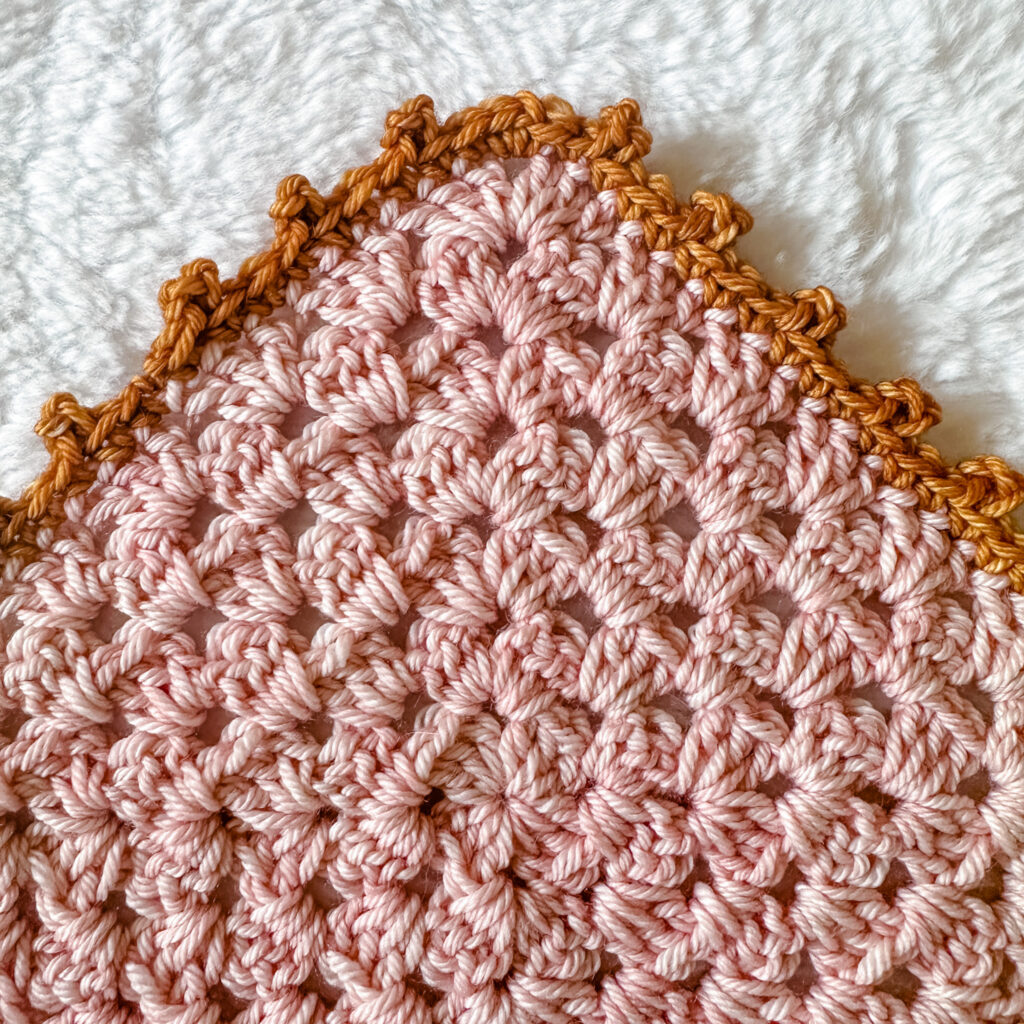
Description: The picot adds a dainty 3D effect to crochet edgings that I can’t get enough of. The picot consists of a short chain that is fastened to the work with a slip stitch. I used this border pattern on my Cadenza Wrap, available in my shop.
Stitch Multiple: Work over any number of stitches. Make sure to have a consistent number of stitches between picots for a uniform look.
Special Stitch: Picot (pic) – sc in st, ch 3, sl st in the front lp AND left lp of sc at base of ch.
Round 1: Join with a standing single crochet in any stitch. Sc to the st where you want to place your pic. (Pic, sc to next pic) to corner, (sc, ch 1, sc) in corner.
Repeat these instructions around. Join with a sl st in the first sc of the round to finish.
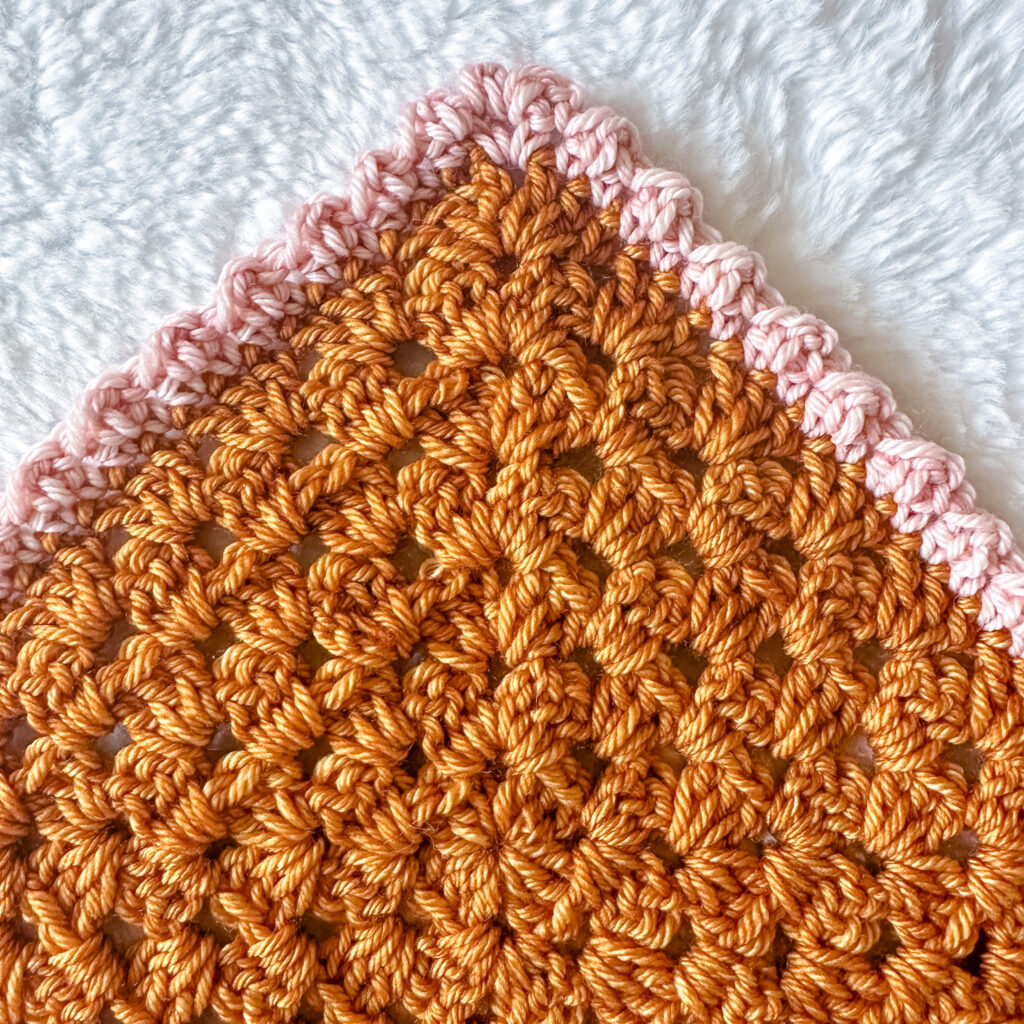
Linen Stitch Border

Description: The linen border is based on the Linen Stitch (a.k.a. Moss or Granite Stitch). It’s a classic stitch pattern that looks even more dynamic as a border. And the best part – it’s beginner friendly! Achieve this gorgeous finish with just single crochet stitches and chains. Try it out on my Linen Pixel Temperature Blanket.
Stitch Multiple: Ensure you have an ODD number of stitches between your corners.
Note: Go up one full mm size hook for this border, and be prepared to block your finished work.
Round 1: Join with a standing single crochet in any corner. (Ch 1, sk next st, sc in the following st) to corner, (sc, ch 2, sc) in corner. Repeat around to the final corner. Ch 2, join with a sl st to the first sc of the round to complete the corner. Fasten off.
Round 2: With new color, join with a standing sc in any ch-2 sp, (ch 1, sc in next ch-1 sp) to next ch-2 sp, (sc, ch 2, sc) in corner. Repeat around to final corner. Ch 2, join with a sl st in the first sc of the round to complete the corner. Fasten off.
Repeat Round 2 to your desired length. Steam block finished piece.
Little Ridges Border
Description: Am I the only one seeing pink marshmallows here? The Little Ridges border is the sweetest of the bunch, adding a youthful whimsy to any crochet project. Made from just slip stitches and double crochet stitches, it’s a simple border that adds a textured finish to use up those last scraps of yarn. Put it to good use when you make my Daphne Afghan.
Stitch Multiple: Ensure you have an ODD number of stitches between your corners.
Setup Round: With the RS facing you, join with a standing sc in the corner, sc in each st to next corner, (sc, ch 2, sc) in corner. Repeat around to last corner, (sc, ch 2) in corner, join with sl st in first st of round to complete corner. Turn work.
Final Round: With WS facing you, sl st in ch-2 sp, (sl st in next st, dc in next st) to 1 st before corner, sl st in next st, (dc, sl st, dc) in corner. Repeat around to last corner, (sl st, dc) in corner, join with sl st in first sl st of round to complete corner. Fasten off.
Camel Stitch Border
Description: The camel stitch is adored throughout the crochet community for its simple construction and braided look. It’s deceptively easy, using just the classic half double crochet stitch. The trick is putting the stitch in the right place. Play with color in this border stitch, which is a great choice for using up excess yarn. I made the most of it in my Gumball Afghan – free pattern here.
Stitch Multiple: Any number.
Special Stitch: Camel Stitch (cam): hdc in the 3rd lp of the next st.
Round 1: Join with a standing hdc in and corner, hdc in each st to corner, 3hdc in corner. Repeat around to last corner, 2hdc in corner, join with sl st to first hdc of round. Fasten off.
Round 2: Join with a standing hdc in the 3rd lp of the 2nd st of any corner, (cam in each st to 2nd st of next corner, 3cam in corner st. Repeat around to final corner. 2cam in final corner, join with sl st first hdc of round. Fasten off.
Repeat Row 2 to your desired length.
Final Round: Sl st into the 3rd lp of any st, sl st i the 3rd lp of each st around (do not increase in corners). Fasten off after last sl st of round. Weave in ends with an invisible join (learn it in the tutorial video).
Tied Loops Border
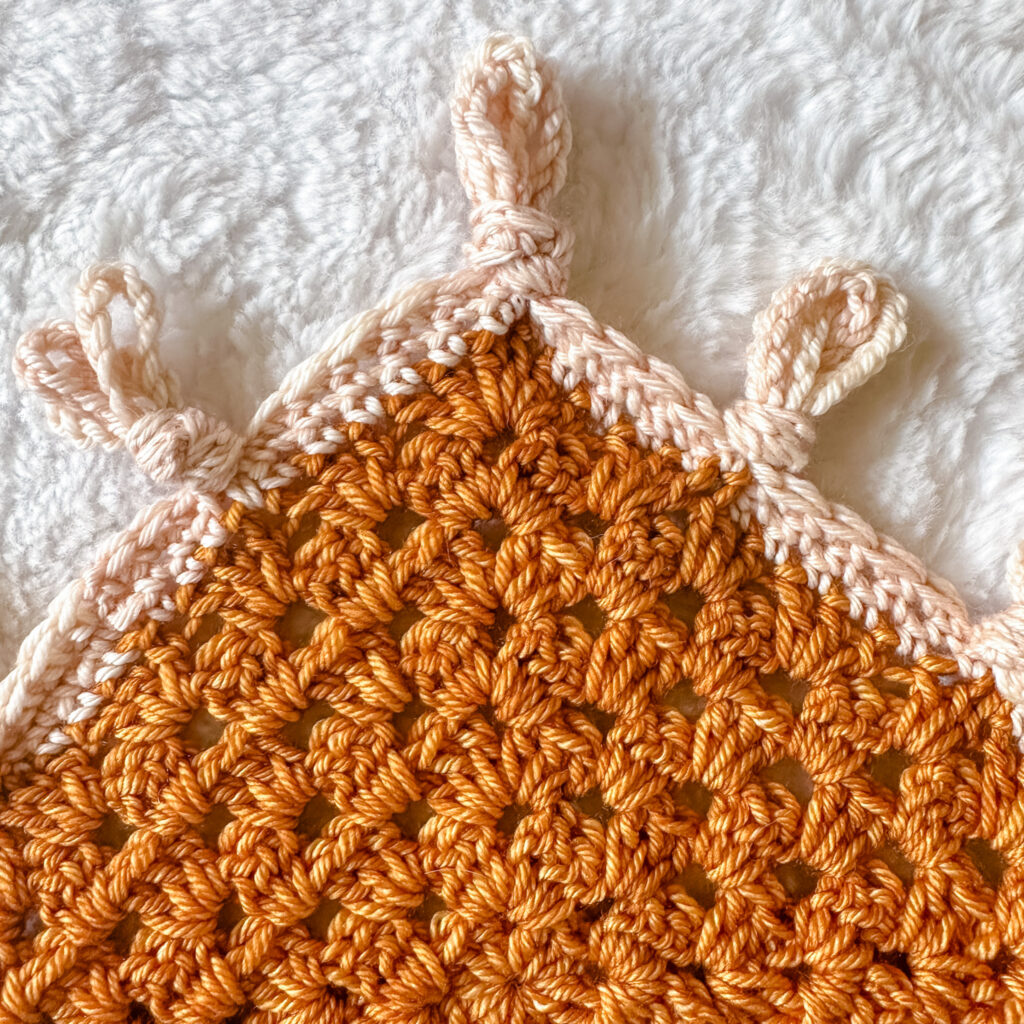
Description: Try the Tied Loops border if your finished piece needs a unique touch. Made from chain loops knotted together, this border pattern looks like nothing I’ve ever seen before. Add it to simple shawls, toddler blankets, and any project that deserves a double take. I used it for my Sylvie Shawl and it makes all the difference.
Stitch Multiple: Work over any number of stitches. Make sure to have a consistent number of stitches between chain loops for a uniform look.
Special Stitch: Chain Loop (ch-lp) – sc in next st, ch 25.
Round 1: Join with a standing single crochet in any stitch. Sc to the st where you want to place your ch-lp. (Ch-lp, sc to next ch-lp) to corner, (sc, ch 25, sc) in corner.
Repeat these instructions around. Join with a sl st in the first sc of the round to finish.
Round 2: Ch 1, sc to next ch-lp, (ch lp, sk previous ch-lp, sc to next ch-lp) to corner, sc in first sc of corner, ch 25, sc in next sc of corner. Repeat these instructions around. Join with a sl st in the first sc of the round to finish.
Round 3: Repeat Round 2 once more. Fasten off at end of round.
Pin piece to blocking boards, being sure to stretch the ch-lps. Allow to dry fully Gather groups of 3 ch-lps into an overhand knot. Massage the knot so it sits at the base of the loops and doesn’t bunch the crochet fabric. Steam block final piece one more.
Learn Even More Crochet Stitch Patterns
Looking for more crochet stitch patterns to practice? Check out these resources:
- 14 Crochet Books to Add to Your Library
- Try the Addictive Clawfoot Stitch [tutorial video]
- Check out the Retro Ripple Stitch [tutorial video]
- Like Squares? You’ll love the Moss Stitch Square [tutorial video]
- Ultimate Guide to Granny Squares [tutorial video]
Which of these crochet border patterns is your favorite? Let me know in the comments!
Make your first crochet project with these FREE CROCHET PATTERNS:


