Crochet Gauge: What Is It And Why It Matters
")
Have you ever found the perfect crochet pattern, started making, and realized that it was turning out much too large or much too small? Or maybe you bought the exact yarn you needed for a project and ran out before you had a chance to finish. You, my dear, have an issue with gauge, and I’m here to fix it. This quick and dirty guide will give you a better understanding of gauge, how to measure it, and how to adjust it for perfect crochet projects every time.
This post contains affiliate links that support the content on TLYCBlog.com. All opinions are my own. Find my Privacy & Disclosures Policy here.
CLICK TO PIN THIS POST
What is Crochet Gauge?
In short, crochet gauge is the number of stitches and rows within a measurement of crochet fabric. If you and I sat down side by side with the same hook, yarn, and pattern, likely, our finished project would still have some differences in size. That is because our tension is different, which impacts our gauge within a pattern. Nuanced differences in how we create our stitches, hold our yarn, and work our magic make each crocheter’s tension wholly unique.
Why Does Gauge Matter to Crocheters?
Differences in tension can cause small variances that are negligible in most crochet projects. For example, you might not be motivated to test your gauge for a blanket because you won’t mind if it comes out a little larger or smaller than the designer intended.
But you might be more apt to test your gauge if you were making a sweater, top, or other wearable garments and accessories. For items like this, size absolutely matters.
Crochet patterns include gauge to encourage you to replicate the designer’s original stitches. This ensures your project comes out the intended size, using the intended amount of yarn. While being a couple stitches off in a gauge swatch might seem like no big deal, imagine that difference being multiplied over thousands of stitches. And, all of a sudden, you have a tunic when you planned to crochet a crop top.
How Do I Measure Crochet Gauge?
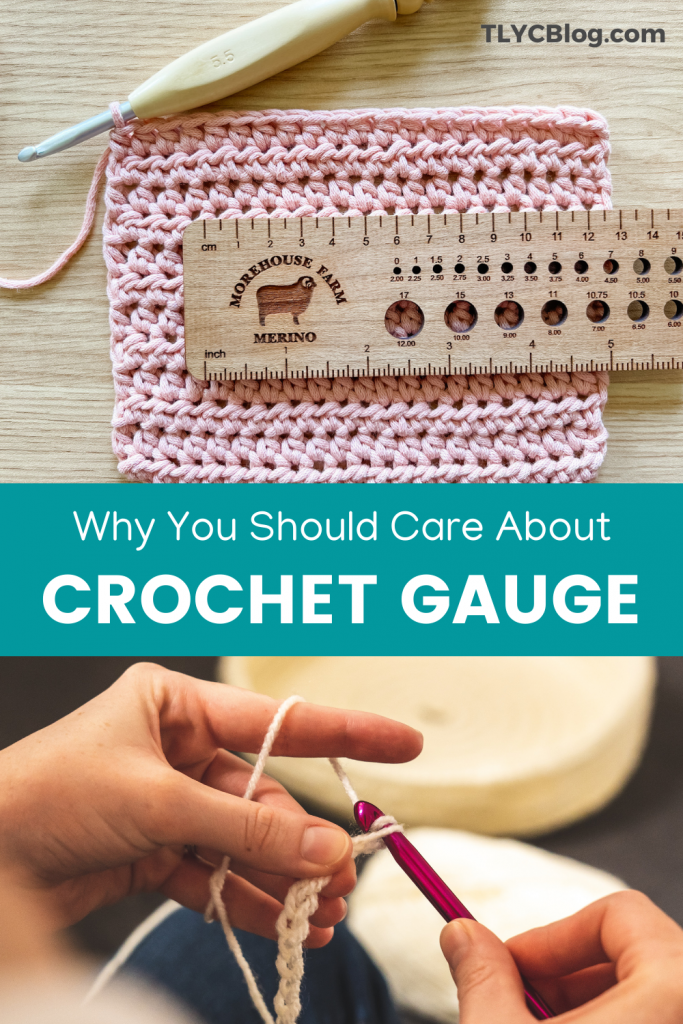
Gauge is written in crochet patterns as a certain number of stitches and rows for a measurement. The standard gauge measurement is 4″ x 4″, but that may change from pattern to pattern. To measure the gauge, make a gauge swatch (also called a tension square) using the recommended hook size and your chosen yarn. Try this for example:
Gauge: 4″ = 13 hdc x 10 rows with 5.5mm hook.
If the above were stated in a pattern, a 4″ square of half double crochet stitches worked with a 5.5mm crochet hook would be 13 stitches wide and 10 rows high. To make your gauge swatch, start with a chain just a bit more than recommended in the swatch. This swatch recommends 13 hdc for 4″, so I will start with a chain of 18, hdc in the 2nd chain from the hook and each chain across for a total of 17 hdc. I would then crochet to 12 rows, just a bit more than recommended in the gauge swatch.
Pro Tip: Make your gauge swatch a few stitches and rows larger than instructed in the pattern. You might be wondering – Toni, why would I make my gauge swatch bigger than the pattern recommends?! Gauge in edge stitches is inconsistent. We have a tendency to hold our stitches looser (or, sometimes, tighter) on the ends. Stitches in the center of the crochet fabric are more indicative of true tension.

Using a rigid ruler or a gauge ruler, measure the number of stitches and rows within gauge size. For our example, I was able to make gauge perfectly in the photos above. On the left, you can see that I’ve measured my stitches along the bottom v’s, and I have 13 hdc stitches within 4 inches. On the right, I’ve measured 10 total rows for 4″. Let me be clear: it is improbable that you will hit gauge on the first try. That’s where adjusting comes in.
How Do I Adjust My Crochet Gauge?
If gauge is important in the pattern you are working on, take the time to adjust your gauge as needed. Anytime you make adjustments, make a new swatch and measure it again.
// Adjusting Crochet Stitch Count
- Too Many Stitches. If you find that you have too many stitches in your row, it’s time to adjust your hook. Too many stitches means you need to have looser tension, so go up a hook size, or switch to a hook material that has less drag. Start by going up in 0.5mm increments if there is only a small difference. If you are using a wood or plastic hook, switch to metal.
- Too Few Stitches. If you find that you have too few stitches in your row, it is also time to adjust your hook. Too few stitches means you need to have tighter tension, so go down a hook size, or switch to a hook material that has more drag. Start by going down in 0.5mm increments if there is only a small difference. If you are using a metal hook, switch to plastic or wood.
// Adjusting Crochet Row Count
In some circumstances, row gauge is an easy fix – just add more or less rows onto your project. But, if a pattern or design has specific row repeats or you have concerns about running out of yarn, it pays to get the correct tension. Row gauge comes down to The Golden Loop, or the loop closest to your hook on the last step of your stitch. How tight (or loose) that loop is dictates the height of your rows. Learn more about the Golden Loop in THIS VIDEO.
- Too Few Rows. This means that you are a “lifter”, or that you lift the loop on your hook before yarning over to complete the stitch. This elongates your stitches, making your stitches taller than that of the designer. Try tightening down on your loop before completing your stitches.
- Too Many Rows. This means that you are a “yanker”, or that you yank down on the working yarn before yarning over to finish your stitch, thus creating a shorter stitch than that of the designer. Try loosening up on your working yarn before completing your stitches.
What Else Can Impact Crochet Gauge?
You might not realize it, but there are plenty of factors that play into your crochet gauge. Here’s a list of a few ways your crochet habits impact your gauge:
- Yarn Choice: Not all yarns within the same yarn weight are created equal. Do a gauge swatch whenever you plan to substitute yarns in a pattern.
- Holding the Working Yarn: Loosen or tighten your hold on the working yarn to adjust your tension. I like to loop the yarn over my finger twice for slippery yarns and just once for grippy yarns.
- Hook Brand: Hooks made from the same material but across brands can impact gauge. Aluminum hooks, for example, can be smooth or rough, and they can be shiny or matte. Each difference impacts the drag of the yarn over the hook, thus changing your gauge. I’m able to get consistent gauge with THESE HOOKS every time!
- Hook Size: If you keep the yarn consistent, changing hook size will loosen or tighten your gauge. Adjust your hook size to achieive the drape you are looking for in your crochet fabric.
- Hook Hold: Pencil-holders are more likely to be yankers while knife-holders are more likely to be lifters. Keep an eye on your Golden Loop and play around with your hook hold to reach the gauge you need.
- Hook Material: On the spectrum of grippy to slippery, wood hooks are the grippiest, then comes plastic hooks and finally metal hooks. This is all subjective and I recommend having each type of hook on hand and swapping them out when needed. Learn even more about crochet hooks in THIS POST.
- Maker Temperment: You might not want to hear this, but your mood can impact your tension. If you are having a good day, you’ll likely maintain smooth tension throughout the project. But, if you are stressed, have bad posture, are distracted, or any combination of not-quite-yourself, it may come out in your tension. Avoid these tension issues by resetting your frame of mind before crocheting. Also, try new stitches and techniques on a practice swatch so you won’t get frustrated with your main project.


Thank you, Toni! It seems similar as in the knitting, but the math is not my favorite part anywhere. 😳
WELL! That was an extremely helpful, eye opening lesson. The video really helped as well. I’ve been crocheting for years and the Golden loop is new information for me. WOW learning something new is amazing.
Thank you
Don’t forget about temperature affecting gauge! I read a story of a crocheter who made their swatch indoors but worked on their garment outdoors in high heat – the final garment size ended up being way off because of the temperature difference! I always keep that in mind now when I am working on a wearable.
Oh yes very useful. I figure I’m both, I lift with tunisian. And yank on crochet hehe, definitely something for the memory bank, thank you Toni! 🤗🙏
Best damn crochet advice I have ever received! There was a biopsychosocial vibe to this post and you really brought EVERYTHING together for me. I am going to take my crochet game to a new level! Thank you so much, Toni!
When I first started crocheting, I was definitely a yanker and I held my hook way too tight. I used to think I hated crocheting because of how much my hands would hurt afterwards but going through your tutorials has changed that (now I just need to remember to swatch before starting a project). I look forward to your Tunisian crochet book this fall.
Love you “pro tips”, let’s see when I can get to a stage in my progress where I can use them, lololo!
Thank you, Toni, for this great info, I never know how important to gauge when crocheting.
Wow! The Golden Loop. Who knew! What a great tip.
Thanks for helping us all out!!! In the ruana project that I’m currently working on, the stitch count along the bottom of my swatch is perfect but the height was off (mine was taller). I decided to leave it as is for more coverage on my arms. In the future, how can fix the height of the stitches while leaving the row length the same? Do I need more tension when pulling through while making a dc stitch? What am I doing wrong?
Hi! The Golden Loop is the answer. It sounds like you might be a lifter – check out that section of the post and it should clear things up for you 🙂
The insight you provided about The Golden Loop is invaluable to me. It makes so much sense. I can’t wait to work up my next swatch, instead of dreading it. Thank you so much,Toni.
Thanks for the tips. Just have to start making more clothes. I guess that sweater will be my test
I’ve always been told about the importance of gauge when crocheting. Yet I never took it seriously. Now that I have a better understanding of how to read a pattern, rest of sure I will be taking advantage of your advice! You are truly a teacher!
My tension is tight. I have a fear that my finish product is going to be loose and sloppy. Making shawls with a drape stresses me out because it’s not tight! lol I always have to go up a full hook size. I stopped using chains and started using foundation chains because the chains were always too tight and caused problems. This also causes problems with my tunisian crochet pieces. I’ve never been a gauger either. It drives me nuts! After making blanket scarves that turned out the size of regular scarves, I’ve changed that toon too. Thanks for this class Toni. You’re changing lives out here! 🙂
Toni do you ever wear a tension ring. I hear that it can help with the tension. I have never worn one. If you please demonstrate for us. Thank you so much xoxo
Hi! I’ve never tried one but I’ll definitely look into it 🙂
I’ve struggled with the row height and I’m definitely a hanker – now that I know what it is. It just feels so good to make them tight,
Oh wow! The Golden loop concept is illuminating!
Best lesson so far for me! Apparently I’m a lifter. I wondered why my swatch for the first lesson was twice as tall as your sample swatch, and now I know. Thank you! I never knew about the Golden Loop. This is going to make a world of difference.
Love your description of lifters and yankers, Ive never seen this kind of detail with tutorials on guage. You are truly a treasure.
I have learned so much this week, and last week, well each week of Crochet Academy. Thank you so, so much! I’d never heard of the Golden Loop. You are right about moods. Sometimes I’m a yanker and sometimes I’m a lifter. It also depends on if I’m fighting my yarn or if we are getting along nicely together.
The Golden Loop! I’m definitely learning lots of new-to-me things. I’m definitely not a frequent swatch maker so I’m going to make that a must for all new projects so it becomes a natural habit. Thank you, Toni@
What a fantastic post! I’ve always put off making projects I love because of gauge, and being nervous and overwhelmed by it. You have explained gauge so well, and I’m feeling a lot more confident now! Thank you Toni.
This gauge information and how to adjust it is the best explanation I’ve read. Thanks.
Gauge has always been a challenge and I normally skip it. When making squares, I use that first one as the model to follow. Now I understand, thank you for the details I have missed up until now. Looking forward to the next step.
Wow! I’ve given up on so many projects because I couldn’t meet the gauge. Thank you, this is very helpful!
Thank you for such a thorough explanation on gauge and adjustments. I don’t think I have ever done a crochet gauge but I will definitely do them from now on.
Silly question but, when making gauge swatch if you don’t meet gauge the first time can you just frog the original swatch and try again or should you be using new yarn because the frogged yarn could get stretched couldn’t it?
I would say you can use the yarn over maybe 2 more times. After that, it’s gonna be pretty stretched out and will no longer give you a true measure of gauge with that yarn.
You are so clever and organized Toni, do you have a way of storing and labeling your swatches for future projects with the same yarn? I just did my first two swatches and decided to embroider the hook size on to them.
Hi! I like to use small squares of cardstock, put the info on the card, and attach it to the swatch with a safety pin. Whatever method works for you is great 🙂
What do you do if your gauge swatch is dead on, and the pattern says at a certain point it should measure a certain size, and it doesn’t?
I’d just recommend blocking it at that point. Unless it is way off. Then there might be an issue with the pattern and you should contact the designer. But, do everything you can think of BEFORE contacting the designer 🙂
Just started a new project and really wanted to skip the gauge. So glad I didn’t because it turns out I needed to go up a hook size, which would’ve made my Medium sweater turn into a Small if I hadn’t. This information really helped in figuring out why my gauge was so off and I can’t wait to see how this new project turns out. Thanks Toni!
Hi Toni, I have to tell you, I have been crocheting since I was a teenager (a few decades ago). I don’t ever remember making a gauge swatch so of course I learned the hard way frogging out and making adjustment(s). I took your advice and did a swatch using Paintbox DX 100% cotton crocheting 22 chains (23 for the turn) x 30 rows with their recommended 4mm hook. My swatch measured 4 1/2” x 5” so I know my gauge is definitely off. I figure to adjust my gauge, I would have to crochet 20 stitches x 24 rows! How does this translate in making a project/garment?
I understand your washcloth uses DK weight with 4.5mm hook so I’m curious to see the size of the finished product!
Ugh…I loved everything about this blog post, but I am having trouble with my row gauge for the Avon throw, I fixed my stitch count by going up to a 12mm hook but my rows are 14 instead of 13…. I know the only way to fix that is to pull up a teenie tiny bit on the golden loop but I also feel like I wasn’t yanking when I made my swatch! I want a bigger throw anyway but not because my gauge is 1 row too many 😭
Not to worry! The difference of one stitch will not make a huge difference for this blanket. Get started and see if you’re comfortable with the drape of the stitched fabric. If you are, just keep going. You have a sea of single crochet in the middle – add/remove stitches in this section to keep your blanket the size you want it to be.
It is always wonderful to learn new things after years of crocheting. The golden loop concept was so very illuminating! Thank you Toni for a great lesson today.
Wow! I never knew about the golden loop. This will help me a lot. Love the yarn weight chart.
The Golden Loop! A very helpful video.
Thank you.
Hi Toni, thank you so much for all the information above, been a newbie this will definitely help me! Thinking of making the Kimo Cardi, however l want to use chunky or super chunky acrylic yarn. The amount of yarn in these yarn is 3.5oz. Would l need to increase the yarn ? Thanks in advance Elaine 😊
Hi Elaine. When substituting your yarn, I recommend sticking to the yarn weight recommended in the pattern, and substitute for yardage, not ounces. That should get you closer to the amount of yarn you need.
So much information to absorb! Hopefully I will remember most but sure I will need to review. Thank for the info.
Thanks Toni!
Day 2 has been very informative and interesting. Although I’m still classified as a beginner, this class is helpful.
Wow super interesting on the “Golden Loop”!!
So enjoying learning “all the Things” about the art of crochet.